Critique away.... (1 Viewer)

zblang

1st Lieutenant
Joined
Jan 7, 2013
Messages
4,479
Ok, so I've finished my first ever painting project. I am posting pictures with the progress. Please critique each step as I had no idea Idea what i was doing. Did I do the right sections first?, etc. is there something you do differently? Be honest, I want to get better. I know there are a few areas that aren't the cleanest (amazing what you don't notice until it's blown up in a photo), that I can correct and I know the eyes suck, but I was too afraid to do them properly and screw it up. I decided I am going to get some cheap castings just to keep trying eyes over and over. The woman and soldier is approx 54mm and the small king figure is approx 28mm

fullsizeoutput_762-L.jpg


fullsizeoutput_762-L.jpg


fullsizeoutput_763-L.jpg


IMG_1446-L.jpg


IMG_0024-L.jpg


IMG_0025-L.jpg


IMG_0026-L.jpg
 
Ok, so I've finished my first ever painting project. I am posting pictures with the progress. Please critique each step as I had no idea Idea what i was doing. Did I do the right sections first?, etc. is there something you do differently? Be honest, I want to get better. I know there are a few areas that aren't the cleanest (amazing what you don't notice until it's blown up in a photo), that I can correct and I know the eyes suck, but I was too afraid to do them properly and screw it up. I decided I am going to get some cheap castings just to keep trying eyes over and over. The woman and soldier is approx 54mm and the small king figure is approx 28mm

Congratulations, Zach! You've taken your first step into a larger world.

Not bad, but my first question is, are you painting to a particular style? That is, classic toy soldier look, "Chinese style" a la Reeves or early K&C and Frontline, something else? If you don't have a goal in mind, don't worry, you'll probably develop a picture in your mind of what you want your figures to look like, and your eye will train itself to that.

As far as doing the right things first, there's not necessarily a right or wrong sequence, but what works best for the individual painter is what's right. Having said that, I tend to work from the inside out, like dressing the figure, something I first learned reading Shep Paine's "Tips on Building Dioramas" in Monogram kits when I was a kid. So, after priming the figure, I will often start with the flesh areas, then the small clothes (eg, a vest, breeches or trousers), then coats, then equipment. But it's not a hard-and-fast rule; it will depend on the figure.

Your idea about practicing is a good one. Along with cheap castings, you could even use a piece of scrap plastic, or a piece of metal that you prime. Personally, for the eyes for my toy soldiers, I like to paint a line for the upper lash line, and put a dot for the pupil under the line, just touching it, and also, "looking" in the direction I want the figure to look when finished. And since I'm right-handed. it's easy for me to paint the figure's left eye, but painting the right eye is hard, because the nose gets in the way. So I will turn the figure upside down to paint that eye.

If painting the lash line is difficult to do, to get a nice fine line, you can always lay on a line as thin as you can get it, and then go back later with your flesh color and cut it in over the top of the lash line, to make it thinner. I do that all the time. But it really does help the look, I think. That's my preference. Of course, the classic gloss toy soldier face is two dots for the eyes, and maybe eyebrows added, and two rosy patches on the cheeks.

I like the little king character, he looks like a cartoon character. Maybe that provides direction for a finish for him.

Keep it up, and keep sharing your work with us! I think you'll have fun as you go along.

Prost!
Brad
 
Thanks for the input. I didn't have a specific style in mind other than keeping it simple for the first try - ie, minimal mixing shading, etc.

Do you use the paint right out of the container or put some on a palette of some sort and add thinner?
Do you use gray or white primer and spray or brush it on?
 
Zak...like Larry David says...pretty good...pretty pretty good!

I think you have a second career to fall back on...
 
They look great for a first attempt !!!

I agree with everything Brad has said.

I use my paint straight out of the tin and for a primer just a cheap and cheerful spray can from the hardware store is what I use.
 
Hello Zach,

Welcome to the dark side!

Your first attempt is pretty good as it shows that you can paint the buttons on the guard tunic.

If you are going for a toy soldier style, consider adding some nice pink cheeks and lips to the figures.

I presume you are using enamels. For myself, I take the paint out onto a palette and add thinner to it.

Rgds Victor
 
Zach,

good to see another painter showing off his work in this Forum.

Looks like the lady with the guardsman has 'been around' a bit ...

JagerLady.JPG


This one is that I have on my website is a German Lady, with a Garde Schutze Officer c 1900, so Sarum Soldiers is recycling their figures, but it sure works :)

Keep up the good work,

John
 
Zach , great to see another painter on the forum.

eBay has a group of 13 Valiant Miniatures for $65.(various subjects) if you are looking for some cheap castings to practise on . Valiant castings are excellent with great detail.

Eyes are tough to paint . Even thought many YouTube videos show it is easy it is not .
Best of luck
Kirk


Ok, so I've finished my first ever painting project. I am posting pictures with the progress. Please critique each step as I had no idea Idea what i was doing. Did I do the right sections first?, etc. is there something you do differently? Be honest, I want to get better. I know there are a few areas that aren't the cleanest (amazing what you don't notice until it's blown up in a photo), that I can correct and I know the eyes suck, but I was too afraid to do them properly and screw it up. I decided I am going to get some cheap castings just to keep trying eyes over and over. The woman and soldier is approx 54mm and the small king figure is approx 28mm

fullsizeoutput_762-L.jpg


fullsizeoutput_762-L.jpg


fullsizeoutput_763-L.jpg


IMG_1446-L.jpg


IMG_0024-L.jpg


IMG_0025-L.jpg


IMG_0026-L.jpg
 
Zak...like Larry David says...pretty good...pretty pretty good!

I think you have a second career to fall back on...


My proverbial hat is off to you Zach so I'm with Mike. One who doesn't shouldn't critique those who do!
 
Thanks for the input. I didn't have a specific style in mind other than keeping it simple for the first try - ie, minimal mixing shading, etc.

Do you use the paint right out of the container or put some on a palette of some sort and add thinner?
Do you use gray or white primer and spray or brush it on?

Hi, Zach!

I do both, paint from the jar or lid, paint from a palette, depending on the paint I'm using. When I'm painting toy soldiers, I use gloss enamels, mostly Testor's, but with some other brands. With those, I don't usually thin them. They do go on a little thick, but they're self-leveling, and when they cure, they show the details of the casting ok. I'll dip the brush right into the paint, or pick up paint from the lid, and then apply it.

I also use acrylics, such as Tamiya, Andrea, Vallejo, and even craft store acrylics, like Apple Barrel or Americana (from Michael's, AC Moore, HobbyLobby, etc). Those, I thin, using a ceramic palette:


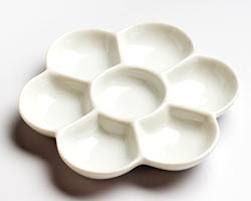
You can use almost anything as a palette, but I prefer ceramic, because I will at times thin enamels or oils, and the solvents are a little harsh to use on a plastic palette. I used to use an old plain saucer, before I bought that palette.

I came to thin acrylics through my experience with Tamiya's paints. I used to paint them right out of the jar, too, but I found that generally, the paint would dry too quickly on the brush, clump up on the brush and on the figure, and when I would apply a second coat, it would lift the first coat. I picked up tips on various forums, the first one, that Tamiya paints are formulated for airbrushing, and therefore, they are 
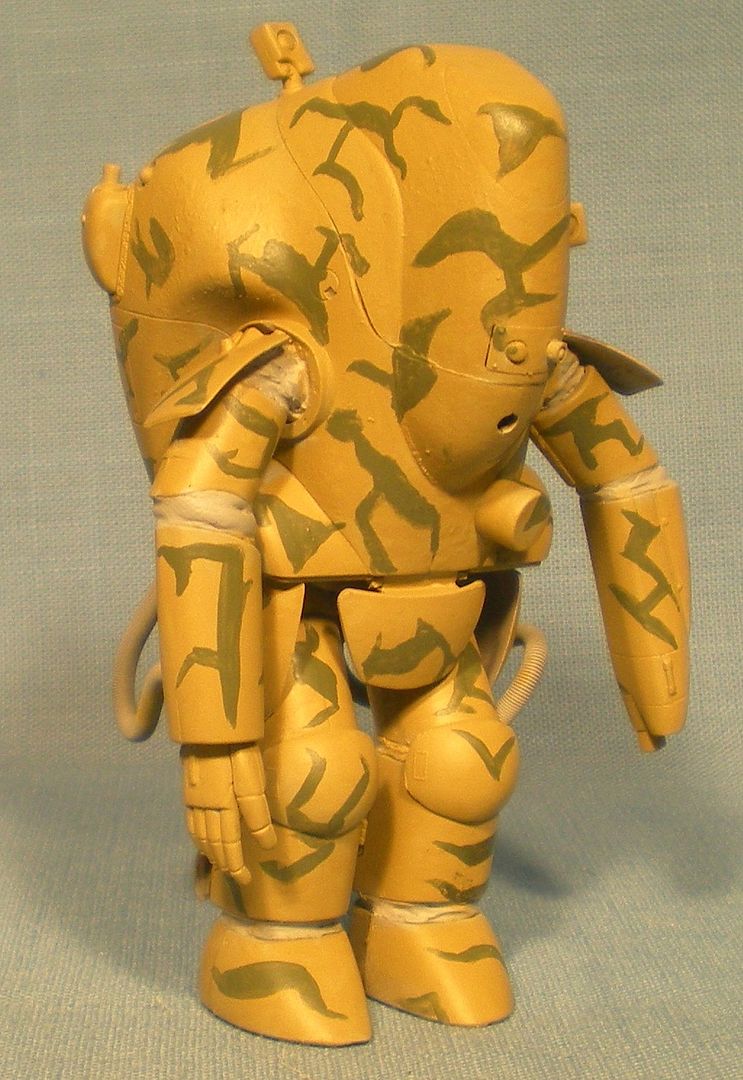
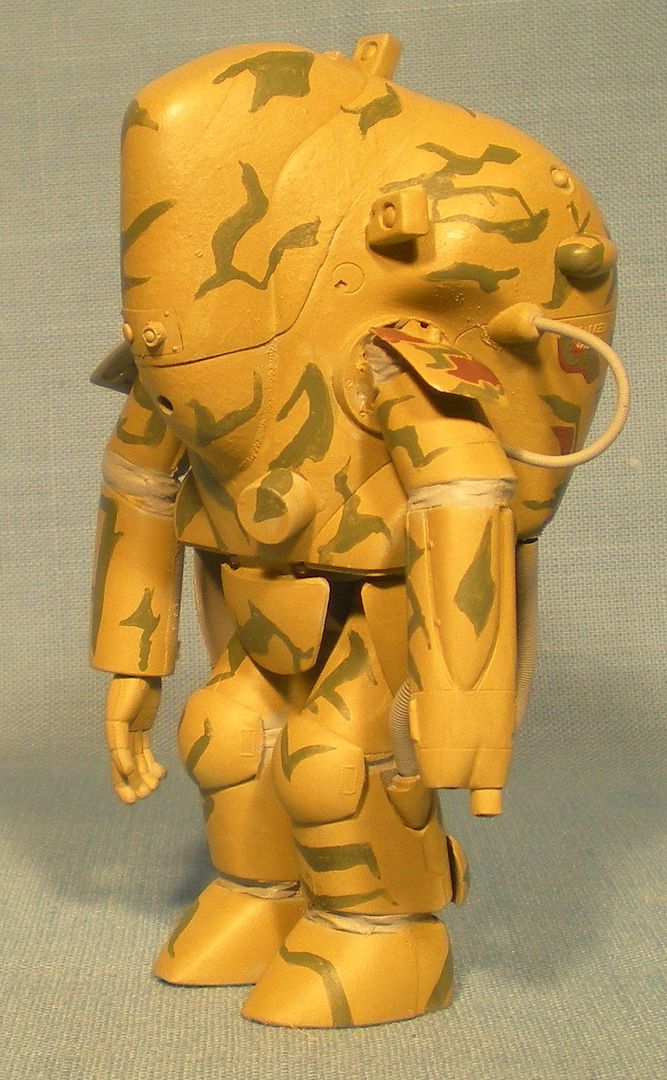
meant to be thinned for use. Then I experimented with different thinners. My Dutchy senses failed me, because I thought, "I'm not paying the price for Tamiya's thinner", but after trying water, then ispropyl, I broke down and bought a bottle of Tamiya's own acrylic thinner. And I wished that I had before, because it worked perfectly. Not only do I get a good finish with the airbrush, but I found that if I thinned the paint, I can get a finish painting by hand, that looks like it went on with the airbrush. Here's an example of a model I'm painting, that I have painted by hand, using Tamiya paints:


Tamiya's acrylics can also be thinned with lacquer thinner, but I would only do this for airbrushing. They cure to an absolute matte finish, thinned this way, but if you are applying the paint by hand, the lacquer thinner is so "hot" that you can lift off any paint under the coat you're applying.

Andrea and Vallejo acrylics are also meant to be thinned for application, but they can be thinned with water or isopropyl. If you get any Vallejo airbrush paints, though, do buy the thinner from that line, for the best results.

Craft store acrylics are best thinned, in my opinion, because they are so thick right out of the bottle, and it is possible to lay them on too thick, leaving brush marks. They have relatively coarsely-ground pigments, too, which impacts the finish. But they can be thinned with water, and they can even be airbrushed. I tend to use them most for weathering effects on scale models, but you can get as good a finish with them, as with more expensive paints, if you practice. I have seen the results.

For priming, I use medium gray and a very light gray, depending on the finish colors. The color of the primer can affect the shade of the finish colors, especially if the finish layers are relatively thin. A dark undercoat will tend to make later coats darker, especially light colors, like white, yellow or red. A light undercoat will tend to make them lighter. In fact, it's common for guys building airplanes to prime an area that will later get red or yellow, like the cowling on a P-47, say, with flat white, because that will brighten the top coat and make it look more natural.

I have used automotive primers, usually Walmart's house brand, as well as Rustoleum and Krylon, but I've been using Tamiya's fine surface primer more and more, especially for my scale models, but even for metal figures. The automotive primers can be a little coarse when cured, which provides a good tooth, but sometimes needs to be sanded out a little. But I stopped using them, when the quality of the cans went down. I was getting more rattlecans that would clog--not the nozzle itself, but inside the valve at the top of the can, where the nozzle inserts. I also had tried the Tamiya primer on some airplane models, found it to cover well, provide a good tooth for finish coats, and to go a relatively long distance, despite the smaller can. So I switched to using that on all my models and toy soldiers. It comes in a medium gray and in a very light gray.

I have also used a red-brown rust color, and a matte black, as an undercoat for specific effects (black for chipping on armor, for example).

And I've used Tamiya's flat medium grey as a primer, applied with the brush or with the airbrush, depending on the project.

I always clean the piece first, to remove any oils or grease. I use warm water with a couple drops of the automotive de-greaser SuperClean in it. You could use dishwashing liquid, too; the goal is to get as grease-free a surface as possible, to get the best paint adhesion.

I hope that helps! It's a lot of experience from trial-and-error, and it works for me.

Prost!
Brad
 
Zach,

good to see another painter showing off his work in this Forum.

Looks like the lady with the guardsman has 'been around' a bit ...

JagerLady.JPG


This one is that I have on my website is a German Lady, with a Garde Schutze Officer c 1900, so Sarum Soldiers is recycling their figures, but it sure works :)

Keep up the good work,

John

That's currently available? I may have to get that, for my Kaiser's Birthday Parade collection. I'm always looking for figures to fill out the crowd of spectators.

Prost!
Brad
 
I can only conclude that she is the Mata Hari....flerting with officers from the Ye Old Coldstream Guard and then with members of the Kaiser´s General Staff..{sm4}{sm4}{sm4}{sm4}{sm4}{sm4}.......
Very nice set.
Cheers
Luiz


That's currently available? I may have to get that, for my Kaiser's Birthday Parade collection. I'm always looking for figures to fill out the crowd of spectators.

Prost!
Brad

Zach,

good to see another painter showing off his work in this Forum.

Looks like the lady with the guardsman has 'been around' a bit ...

JagerLady.JPG


This one is that I have on my website is a German Lady, with a Garde Schutze Officer c 1900, so Sarum Soldiers is recycling their figures, but it sure works :)

Keep up the good work,

John
 
That's currently available? I may have to get that, for my Kaiser's Birthday Parade collection. I'm always looking for figures to fill out the crowd of spectators.

Prost!
Brad

Would you mind posting a photo of that collection. I'd love to see it.

Brad
 
Has anyone used paint pens to the the eyes and lash lines? If so, what do you recommend?
 
Has anyone used paint pens to the the eyes and lash lines? If so, what do you recommend?

I have not, and I don't think it would work too well.

There are modelers who do use fine pens for panel lines on aircraft. The problem I see in this particular application is that the ink might rub off too easily.

With enamels, it's relatively simple to do the line, because the paint stays wet as you draw out the line with the brush. I use a 00 size brush for this, and I recommend getting one, if you don't have one. I use it for piping, braiding, too, anything that requires a fine line, in 54mm. And with enamels, I can use just a little bit of paint, because it does stay wet (oils work the same way, too, they have a long drying time).

With acrylics, I found it to be the opposite. First, acrylics dry very fast--an advantage, in that you can do a lot of work in a single session, without waiting for the paint to dry, as with enamels (or oils). But because they do dry so quickly, if I try to paint an eye the same way as I do with enamels, with a little bit of paint on the brush, it dries in the time it takes to dip the brush in the paint and take it to the figure. If I load up the brush, it's too much paint and it flows all over. My buddy Hershbell (oldtrousers here in the forum) taught me that I'd have to use a bigger brush, albeit with a fine tip, and so, have a little more paint on the brush. But it's like using a brush to write, as in calligraphy.

I practice lines, too, on a scrap of plastic. There's another tip--if you get junk mail with any kind of card in it, like an AmEx mailer with the fake credit card, or other such mailings, save those cards. They make good palettes for this kind of work. And if they're plastic, they are good to use where you need plastic card, like on a model. I use them for mixing 2-part epoxy glues, for testing out paint schemes, for paint cards (showing all the colors I want to use on a figure or model), and it goes on and on.

Anyway, I'd take a piece of card, and practice drawing lines, to get the feel of it.

Also, I don't know about your eyes, but I need magnification now. I need to get close, to see what I'm doing, but I lost close-up focus some time ago. I use an OptiVisor now for this kind of work. Heck, I use it to thread a needle when I have to sew a button back on a shirt. But without it, I couldn't hold the figure close enough to see what I'm doing. I can see the details at about a foot, but that's too far for me to have good control of the brush.

Hope that helps!
Prost!
Brad
 
Zach...

I'm not a quality painter like the other commentators...I struggle though every figure I paint and when I take a close-up picture...like you...I see 10 things that need to be corrected...

the only suggestion I have...is when you are 100% finished with a figure...completely satisfied with it...is to give it a spray coat of high gloss clear coat to protect it from chipping or flaking...

Testors makes a good product...sold at Walmart for under $5.00...one can will cover tons of figures...
 
Would you mind posting a photo of that collection. I'd love to see it.

Brad

Thanks, Brad, I posted this thread shortly after I joined:

http://www.treefrogtreasures.com/forum/showthread.php?11906-Tonight-the-Kaiser-s-army&highlight=

but it doesn't include pictures of the Alexanders. I set the whole thing up sometimes at Christmas. I do have some pics that I took back in 2008, but I will take some new and better ones over the holidays and post them in a new thread.

Prost!
Brad
 
Brad,

I don't believe I ever saw that thread or if I did, I probably glossed over it as I probably wasn't interested in that period then (unlike now) so thanks for the link. I truly enjoyed looking at them.

Brad
 

Users who are viewing this thread

Back
Top