Fixing a Britain (Help!!) (1 Viewer)

Aggie99

Private 2
Joined
Nov 1, 2010
Messages
120
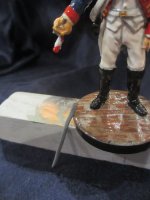
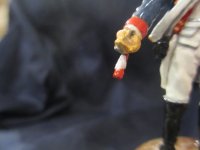
Okay, so I have a British Soldier on Horseback (made by Britains) that I got when I was a kid. He has been on my shelf forever, but recently was knocked off and fell onto my desk and the horses leg broke off!! (Its really more of just the foot breaking off at the ankle).

I was curious if any of you guys know the best way to fix such a thing? I imagine the leg can be glued back on, but I didnt know if there was a certain type of glue that was best; or if there was another method altogether.

If you have any suggestions, please let me know! I would appreciate it!


Here is a photo I found online of the figure I am talking about. This appears to be the exact same figure, although mine does not have a green base. Actually, other than the horse, there is no base to the figure (like my other Britains have).

Britains Mounted Life Guard

http://www.uniquecollections.co.uk/showitem.asp?model=8841&William Britains Toy Soldiers New 41074

items8841.jpg
 
I suggest cutting a paper clip so that you have a bit straight wire to use as a pin; then drill a hole in each end of the broken foot; then glue into each hole with a two part epoxy.

Good luck.
 
Hi, Aggie, is the horse solid or hollowcast? As Scott and PJ have described, pinning the joint where the break occurred in the best way to repair it, it will give you the strongest join. Also, as PJ described, if the piece is solid, you'll want to drill a hole in the mating surfaces, and insert the pin, with whatever adhesive you choose to use. If the horse is hollowcast, you could use a pin, but I've even used pieces of toothpick for repairs on hollowcast pieces, instead of a metal pin.

CA glue (ie, cyanoacrylate glue, aka super glue) is a good adhesive; a 2-part epoxy is also very good, too. An epoxy will take a little longer to set, but it also gives you some wiggle room as far as the time goes, to adjust the angle of the piece as necessary.

Hope that helps!

Prost!
Brad
 
Thanks! I would try the "pin" approach, but the horses leg is so skinny that I don't see how I could ever drill a hole in it. (Not sure how to answer the "casting" question...but the horse is solid, if that is what you mean).

I guess I should ask, if I don't drill a hole and use the pin, should I still use the e-poxy glue you recommended instead of just using super glue?

Thanks
 
Hi, Aggie!

If it's solid, that's called a solid casting, as opposed to the classic method that Britain developed, called hollowcasting. They poured the molten metal into the mold, let it set for a second, then poured it back out again. That left a casting consisting of a thin hollow shell. It was lighter, and so, cheaper to ship, and more figures could be made from the same amount of metal as a smaller number of solidcasts. That process allowed Britain to undercut the foreign toy soldier makers, mostly German, who had cornered the British market up till then.

There are a couple of things I can think of. One is drilling, but you probably need to get a bit fine enough for the piece, so a trip to the hobby shop is in order. Another is to make a slot in the side of each piece, at the place where the break is, and then set a piece of wire into that slot, glue it, and putty over it when the glue has cured. A third choice is to try using heavy tissue paper, like the kind used in gifts or in clothes packaging, wrapping pieces around the join, and soaking it with glue. That method is a last resort, if you absolutely can't get a pin into the join. All would be stronger than a butt join (ie, two flat surfaces with glue between).

Hope that helps!

Prost!
Brad
 
Thanks! I would try the "pin" approach, but the horses leg is so skinny that I don't see how I could ever drill a hole in it. (Not sure how to answer the "casting" question...but the horse is solid, if that is what you mean).

I guess I should ask, if I don't drill a hole and use the pin, should I still use the e-poxy glue you recommended instead of just using super glue?

Thanks

It can be done with a set of micro drillbits (look for size 0.0XX) and a hand drill. If you want the thing to look decent and the join to last, you'll have to invest in some equipment - either to drill or, as Brad sugests, to make a channel for the wire. If you just glue the two ends together - even with 2 part epoxy -you'll be fixing it every month - assuming you can get the thing to set in the first place without gluing it ot your fingers. [ {eek3}]. If you know someone who has the tools, maybe they will fix for you. Since this part of the horse bears all the weight it has to be strong.
 
...to make a channel for the wire...

Thank you, Pat! That is the word I was looking for, but I couldn't think of it :eek: I kept thinking "gouge", too, but couldn't think of anything better, it was a real brain cramp.
 
All good advice so far - don't despair.

First - put a base on it - it is far less likely to fall over again. Not so aesthetically pleasing perhaps - but far safer in the long run - for the future.

Then - drill and pin each leg to the new base. I have recently bought some drill bits - the largest of which is 2mm - and there were twenty in the packet - for a mere £4. I also bought a hand "Archimedes Drill" for £1,50. So £5.50 for both. This means I can drill holes small enough for a very small pin for each foot - at less than the cost of an average casting. It doesn't need to cost the earth! Also - get a magnifyer to be able to see what you are doing.

Pieces cut from paper clips are excellent as pins(good tip from PJD!).

Use epoxy two part glue for strength - or Superglue for speed - or both ( some for each pair of feet perhaps?). Do two with superglue - and two with epoxy resin perhaps.

Then - when it's fixed - do be more careful - they are tiny, and soft metal works of art, after all. Take care of them as if they are jewels ( which they are). Remember how heartbroken you felt - okay - accidents happen - BUT - treat 'em right and handle with care from now on!!

Good luck - but do not despair. If it's broke - YOU CAN fix it!

Lastly - if you love it - but don't feel confident enough - ask someone who CAN fix it to do it for you - BUT I would encourage you to have a go first. You broke it - so try to fix it - and you won't forget how much he means to you............. ( I'm not being hard - honest!)

Good luck - johnnybach
 
All good advice so far - don't despair.

First - put a base on it - it is far less likely to fall over again. Not so aesthetically pleasing perhaps - but far safer in the long run - for the future.

Great idea. It didn't originally have a base, but I will most likely add one now. If nothing else, it will make it more "sturdy."

Then - drill and pin each leg to the new base. I have recently bought some drill bits - the largest of which is 2mm - and there were twenty in the packet - for a mere £4. I also bought a hand "Archimedes Drill" for £1,50. So £5.50 for both. This means I can drill holes small enough for a very small pin for each foot - at less than the cost of an average casting . . . Also - get a magnifyer to be able to see what you are doing.

Pieces cut from paper clips are excellent as pins(good tip from PJD!).

Good to know that drilling such a small hole is common. I haven't started this project yet (obviously) but I have been wondering how I would drill a hole into such a small leg. I am guessing that a pin made from paper clip will be about the right size, as the horses leg itself isn't much bigger around than that.


when it's fixed - do be more careful - they are tiny, and soft metal works of art, after all. Take care of them as if they are jewels ( which they are) . . . treat 'em right and handle with care from now on!!

You have no idea how careful I am with my miniatures. I have had this particular miniature since I was a kid . . . I got him around 25 years ago? This is his first "scratch."

Good luck - but do not despair. If it's broke - YOU CAN fix it!

Best news ever!

Lastly - if you love it - but don't feel confident enough - ask someone who CAN fix it to do it for you - BUT I would encourage you to have a go first.

I will try it before I hand it off. However, if it is something that I think I will only make look worse . . . I won't hesitate to ask for help.
 
Hi Aggie99 ,
As we alll know, what happened, really really sucks.
We have all been there I think .
While I know you can't replace the sentiment of owning
the piece for so long .
If you can't fix it , I think I have a loose one that I will give you .
( if not I'll buy you one )

Good luck and pm me if needed.
Chuck
 
I repaired this one a while back using methods already described, hope the photos help.

Jeff

http://www.treefrogtreasures.com/forum/showthread.php?14757-Hamleys-Hussars-Tom-s-Horse!&highlight=

Jeff,

thats a great set of instructions, I couldn't have done better myself :)

Incidently, I've recently had to do the same repair on a couple of 'Hamleys' horses for a local collector, and he is most please with the result.

Maybe I should have looked in the Forum first for your instructions?

Cheers,

John
 
A related repair question for John and Jeff.

How would you repair/attach a sword blade on a 54mm metal figure that has broken at the hilt? And is far too thin to drill and pin?

Scott
 
A related repair question for John and Jeff.

How would you repair/attach a sword blade on a 54mm metal figure that has broken at the hilt? And is far too thin to drill and pin?

Scott

Hi, Scott, I know you directed this to John and Jeff, but I can't help butting in.

I'd replace the blade altogether, using a piece of brass rod hammered flat, or a piece of thin sheet metal cut to shape. I would still drill a hole in the hilt, deep enough to receive the flattened brass rod or strip of sheet and use a 2-part epoxy to secure it. I have used this method to make this kind of repair.

Hope that helps, prost!
Brad
 
A related repair question for John and Jeff.

How would you repair/attach a sword blade on a 54mm metal figure that has broken at the hilt? And is far too thin to drill and pin?

Scott

Scott,

I have done this task on a K&C Curassier and posted it here at POST #9 http://www.treefrogtreasures.com/forum/showthread.php?17870-Battle-damaged-Cuirassier/page3

I hope that helps, if not get back post some images of the parts and we can see what you mean.... "a picture is worth a thousand words"

John
 
Thanks Brad and John.

I should be able to get a drill in at the hilt. I hadn't thought of fabricaing one from brass but it makes a lot of sense. This one broke due to movement over the years and I have a feeling one of the 'little people' was taking an interest in dad's collection not long ago!

Here is the damaged soldier-
 

Attachments

  • IMG_1859.jpg
    IMG_1859.jpg
    70.9 KB · Views: 56
  • IMG_1858.jpg
    IMG_1858.jpg
    50.3 KB · Views: 58

Users who are viewing this thread

Back
Top