Fixing Plume Drum Horse (1 Viewer)

Cardigan600

Memoriam Member
Joined
Jan 9, 2008
Messages
1,388
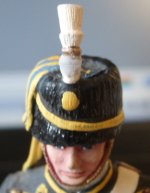
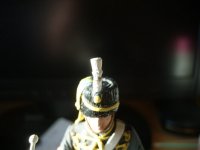
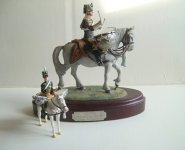
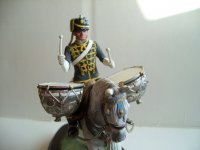
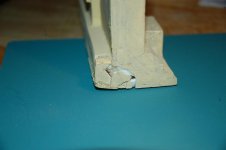
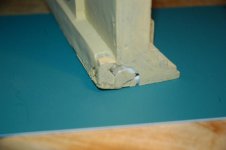
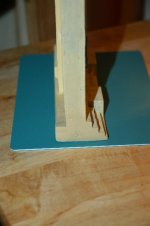
Yo Troopers, just had a go at fixing the plume back on the Chas Stadden Queens Own Hussars Drum Horse. Under Jeffs guidance via email man my hands have never shaken so much lol. It was a very difficult break, it was like trying to glue to cotton buds together end to end. Then I was left with a gap all the way around which I had to fill in with superglue gel, I had to do it three times (1st photo). Then I had to shave the bits sticking out with a scalpel (know how Damian must feel now lol) then put a coat of paint on it. I take my hat off to you guys who repair and paint these models guys, when you look at the painting on this Drum Horse it is so special, beats me how anyone can get such fine detail to such perfection is beyond me. OK it was done by the master himself, but some of the items I have in the collection are not far behind. To me it must be the most important part of the finished item, and the most skillful. Anyway it wouldn't get past the trained eye but its back on. Will leave it at that for now, Jeff keeps threatening to come over for a holiday, so his paint brushes wont take up much room in the luggage:rolleyes:.
Bernard.
 

Attachments

  • SL730943.JPG
    SL730943.JPG
    85 KB · Views: 137
  • SL730946.JPG
    SL730946.JPG
    64 KB · Views: 133
  • SL730937.jpg
    SL730937.jpg
    76.7 KB · Views: 131
  • SL730940.JPG
    SL730940.JPG
    74.7 KB · Views: 133
Well mate, I'm about as far removed from a plume expert as you can be, but that looks a pretty neat job to me. Well done!
 
Well done Bernard, it wasn't that difficult after all was it? As for a holiday - Tooth Brush, Paint Brush, Distemper Brush........all the same thing really :eek::p:D

Jeff
 
See, it's not that hard, is it, trooper? A decent-looking repair! Did you pin the joint before gluing it? Soon you'll be casting your own figures, too.

Prost!
Brad
 
Check you Bernard, great job. And looks like you are also getting to be a dab hand at taking pics too.
 
Good for you! For the artistic, and the really handy folks this stuff is a walk

in the park.......for the rest of us its like walking a tight rope!

Good job!
 
See, it's not that hard, is it, trooper? A decent-looking repair! Did you pin the joint before gluing it? Soon you'll be casting your own figures, too.

Prost!
Brad

Yo Brad lost me there mate (pin it) you will have to explain that one. Not being funny when I say this but I am a pain in the butt to myself perfectionist, so not all that happy with it, you can see it was repaired. Somebody with your skill or Jeffs, it would have looked a lot better and hard to tell it was repaired. BTW read your thread on casting the other day was really impressed the way you go about it, and thats as far as it goes with me guys reading how you do it lol.
Bernard.
 
Hello Bernard,
You are to hard with yourself.
From the last picture I wouldn't have told it was repaired.
Of course you know it was broken and you know you have repaired it yourself, so I'm quite sure your mind will never let you think it is as new.
Well done !
Michel
 
Repairs can be fun, if you take your time and exercise patience! I have little

artistic ability, or craft skill.....to say the least! And to make matters worse I

am extremely picky on condition of items!

You could imagine how upset I was when a recent item I picked up arrived

poorly packaged and shedding marble dust as I unwrapped it! The box it

barely fit in had taken a blow to a corner with the resulting damage to the

piece! One rear corner was barely hanging on with a large cavity in the back!

What a disaster!
 

Attachments

  • LAH16 Damage-.jpg
    LAH16 Damage-.jpg
    22.1 KB · Views: 77
  • LAH16 Damage-1.jpg
    LAH16 Damage-1.jpg
    21.4 KB · Views: 80
So what to do? Well call Kilted Vampire of course!.......but he is under the

weather! Dam! Okay there must be something, so I head to my local hobby

center where I always find items I can't live without......not necessarily for

this project.....but I know I can't live without them!:D

A late night trip to my local home center for just the right product......which

they no longer carry!:eek:

Oh well, I take my time 3 days, of fun up in the den between working on

model motoring cars and other fun projects and here is the result.

Mind you from unskilled hands (not really, I can fix any Lionel item pre 1964

ever made......and model motoring trucks in my sleep):D

But this type work is far beyond my skill level!

I must admit it passes even my strick inspection!

So, if you take your time, and have fun....almost anything is possible!
 

Attachments

  • LAH16 Repair-1.jpg
    LAH16 Repair-1.jpg
    18.6 KB · Views: 85
  • LAH16 Repair-2.jpg
    LAH16 Repair-2.jpg
    21.1 KB · Views: 90
  • LAH16-2.jpg
    LAH16-2.jpg
    36.3 KB · Views: 86
  • LAH16-1.jpg
    LAH16-1.jpg
    13.1 KB · Views: 84
Yo, Bernard, back from Sunday dinner and I saw your response, thanks for your kind words about the casting thread.

Sorry, I should clarify about the pin. I was referring to adding a pin to the joint, to strengthen it. That would consist of drilling small holes in the plume and its base on the kettledrummer's busby, and using a piece of wire as a pin. That gives us a far stronger joint, than a simple butt join (eg, two pieces with smooth surfaces). It looked like the piece was wide enough to use a small drill bit and a pin vise.

On an Imrie-Risley kit, for example, the arms are usually cast with these shapeless bumps that fit into shallow depressions at the shoulder. I'll hold the arm to the shoulder with a piece of tape, and drill through into the shoulder, then use some 2-part epoxy to fill the hole, insert a piece of wire, and when it's set, cut off the excess, and sand it smooth, or even use a grinding bit (very carefully ;) ) in my Dremel, to smooth over the joint.

We're talking very small diameter drill bits, and small-gauge wire, too, especially with 54mm figures. Depending on the size of the piece, I use brass rod, or even paper clip wire. I also have a reel of aluminum wire that I use for finer pinning, like pinning the queue to the back of a grenadier's head, in 54mm. That takes my finest drill bit, and a light touch, to drill into a white metal queue about 3mm in diameter.

But it's all practice, practice, practice, or (pun intended) drill, drill, drill! :)
If you enjoyed fixing the plume, I recommend dipping your toes a little more, the more you do it, the easier it gets, till you're making your own figures!

Prost!
Brad
 
Yo Brad, thanks for the info mate, but dont think you could have drilled the plume it was only about 2mm at the break. I just had to butt it together with the gel, I had to hold a magnifying glass in one hand while I did it, bit of a strain on the old eyes. Think Chas was sitting on my shoulder while I did it, and whispered in my ear NOT HAPPY with that lol. Going to get a set of needle files and see if I can make it look a little better. Will let you know how it goes:eek:
Bernard.
 

Users who are viewing this thread

Back
Top