Yesteryear: I seem to be spending more time there than in the real world these days. Saturday night's swirling mist of Tetley's Best Bitter fumes revealed a vision, that takes me back again, maybe never to return! Neil Thomas is a ruleriter who I believe was cloned from the DNA of Donald Featherstone and Charles Grant so his 'One Hour Wargames' rules are nailed on, for mi' next braynwave.
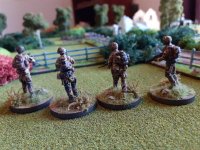
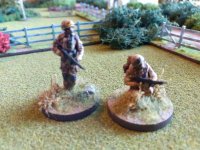
Using the book's unit stats, two units will be created, one British the other German. The units will all be Airfix models from the dawn of time, painted as we did in the sixties...
British
One Infantry Company (British Infantry Combat Group)
Two anti-tank guns (6pdr. and carrier)
One Artillery Battery of two guns (25pdr. and Quad)
Tank Troop (Churchill and Sherman)
German
One Infantry Company (*)
Two anti-tank guns (Stug 111 and SDKFz.234)
One Artillery Battery of two guns (88mm Gun and Tractor)
Tank Troop (Tiger and Panther)
(*) Them vintage Airfix [FONT="]Germans[/FONT] with the drainpipe bazooka thingy and that little anti-tank cannon?
That should make a nice collection of the crappest looking figures and vehicles still in existence. When they're done we'll fight all 30 OHW scenarios in order and find out who really did win WW2 in yesteryear!
D+1
British
3 Infantry Platoons
2 25pdr guns
1 Churchill tank
Germans
3 Infantry Platoons
1 88mm gun
2 Anti/tank guns
The opening moves saw the British Infantry probing forward to locate the [FONT="]Germans[/FONT]' positions, supported by both their FOO and armour. The gunners ready themselves...
The advancing British are engaged by dug in [FONT="]German[/FONT] Infantry, these too are supported by a forward observer for their 88mm gun. Two anti-tank teams begin to stalk the British armour... A devastating barrage from the 88 drives the right flanking British Infantry to ground, killing their Company Commander. Equally accurate fire from the Panzerschreck teams put paid to the Churchill!
Heavy return fire from the quick firing 25pdrs kills one [FONT="]German[/FONT] anti-tank crew and force the other one to fall back, quickly switching fire the gunners target the supporting Jerry Infantry with equally potent effect.
Driven to ground by accutate artillery fire, both sides lay low, digging in and exchanging sporadic small arms fire as dusk falls on D+1.
During the night the Germans pull back and dig in around Hill 99. Looking through his glasses in the dawn's early light the German Commander realises his men have pulled back a tad too far, leaving a road junction dangerously exposed. Looking through his glasses in the dawn's early light the British Commander realises his men are now being overlooked from Hill 99. This must be taken quickly before the Germans have time to fortify it too strongly. Leaving a small force to hold the nearby road junction, the advance begins...
The Germans make a determined push to retake the crossroads. Inflicting heavy casualties on the defending Tommies.
An East Riding Yeomanry Sherman moves up to give support, but is spotted by a cunningly concealed Stug, hit through the turret the Sherman does a 'Ronson'!
Once again very heavy Allied artillery support, directed by a FOO from the cover of a ruined building, blunts the German advance.
Over on the left flank two of A Company's Platoons push for Hill 99.
A Tiger tank leads a strong force of Jerry Infantry over the bridge and into the flank of the advancing Rifle Brigade. The Hussars try desperately to bring their anti-tank gun into action, the Tiger wrecks it before it can deploy!
On the right flank the rifles assault the bridge with great dash, running slap bang into camouflaged German armour. Tank hunting teams let fly with a volley of PIAT bombs, but it's a very one sided, but grimly contested fight...
Two Rifle Brigade Platoons, sorely needed at the bridge fight, are redeployed to shore up the threatened left flank.
The fight to take the bridge is relegated to a holding action, the Rifles only staying north of the river thanks to sterling work from the RHA.
The aggressive Panzer Grenadiers, with heavy tank support, break through on the left. The one sided fight north of the bridge comes to an end as the Rifle Brigade Platoon exhausts their supply of PIAT bombs.
Ordering smoke from the Gunners the Rifles Company commander falls back, leaving both bridges firmly in German hands!
2 Infantry Platoons (A Company 8th Rifle Brigade)
1 Infantry Platoon (B Company 12th (Yorkshire) Parachute Battalion)
1 Anti-tank weapon (12th Parachute Battalion) 1 Sherman tank (East Riding Yeomanry)
1 Churchill tank (51st (Leeds Rifles) Royal Tank Regiment)
Germans
4 Infantry Platoons
1 Panther Tank
1 88mm Gun
D+4 A Rifle Platoon and an anti-tank weapon of the 12th Parachute Battalion are dug in on a shallow ridge on the outskirts of the village of Ranville. They must hold the Germans till reinforcements, from the Rifle Brigade, move up the road to relieve them...
The Jerry's deploy and quickly advance to capture the hill.
Waiting for them, dug in on the hill, are the Paratroopers of the Yorkshire Battalion...
The Germans put in a heavy Infantry attack, it's left flank supported by a Panther tank that speeds up the road.
At close range the Paras Stens are as devastating as their Brens, the Germans suffer heavy casualties. The Paras Bazooka team stalk the enemy armour, and from cover of a hedgerow get in a killing shot...
The German attack is pushed home with great determination and after gallant resistance the Paratroopers are wiped out. German troops occupy the ridge, posting one Platoon and an Artillery FOO in the outskirts of Ranville.
The Rifle Brigade column arrives, deploys and launches an immediate counter attack on the ridge. The attached British armour advances on Ranville and blasts the German FOO from his perch!
The British Infantry attack is pinned down by heavy fire from the crest of the ridge.
The British armour races to their aid, losing a Yeomanry Sherman to a Panzerfaust. undaunted a heavy Churchill makes it to the top of the ridge with Besas blazing!
The Leeds Rifles' Churchill takes a hull down position on the ridge top, making it hard for the German counter attack launched from Ranville to get an effective hit with their Panzerfausts.
A brave, close quarter grenade assault, on the British tank is cut to ribbons and the Germans fall back leaving the ridge in British hands. [FONT="]Casualties on both side have been heavy, dead soldiers and burning tanks litter the hedgerows...
D+5
British
3 Infantry Platoons (A Company 8th Rifle Brigade)
1 Infantry Platoon B Company 12th (Yorkshire) Parachute Battalion)
1 6pdr anti-tank gun (12th Parachute Battalion)
1 FOO 1st Airlanding Light Battery RA
Germans
4 Infantry Platoons
1 Tiger Tank
1 88mm Gun
D+5 To the west of Ranville runs a small tributary of the River Orne. On D-Day a Platoon from B Company 12th (Yorkshire) Parachute Battalion captured the bridge, finding it substantial enough to take the weight of heavy armour they were tasked with holding it until relieved. Of course Jerry already knows all about the bridge and has plans to oust the Paras and take it back...
The Airborne man enter the woodland west of the bridge as Jerry Infantry move into the attack, a close range firefight ensues. The 1st Airlanding Light Battery RA FOO has spotted the Jerry's advancing in the open and whistles up his guns...
Jerry Infantry reel under the onslaught...
The Germans pour in more Infantry and bring up a gun of their own, the feared 88, to bolster the fight against the Paras. These units deploy further north using the wood to mask them from the British Artillery fire. Relief for the hard pressed Paratroops is forthcoming as Infantry and anti-tank guns push up the Ranville road and begin to deploy. They are only just in time as Jerry tanks and Infantry pour over the nearby Hill 76 and push hard for the bridge. Accurate fire from the Tiger and Flak 88 quickly knock out the 6pdr. and pin down the British Infantry...
This site uses cookies to help personalise content, tailor your experience and to keep you logged in if you register.
By continuing to use this site, you are consenting to our use of cookies.


.jpg")


.jpg")
.jpg")
.jpg")
.jpg")

.jpg")
.jpg")
.jpg")
.jpg")
.jpg")
.jpg")
.jpg")


.jpg")
.jpg")
.jpg")
.jpg")


")


.jpg")
.jpg")


.jpg")


.jpg")
.jpg")


.jpg")
.jpg")
.jpg")
.jpg")


.jpg")
.jpg")

