Have a casualty to fix (1 Viewer)

kogu

2nd Lieutenant
Joined
Mar 1, 2007
Messages
3,635
Hi everyone,
I do have a casualty that I need to fix and want to ask for some advise.
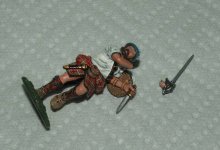
As you see in the picture, I have this John Jenkins Jacobite Highlander whose right hand broke off at the wrist.
Before glueing the joint I will drill both sides and insert a small pin for a sturdier connection.
The issue is, when holding the pieces together, they don't close perfectly, leaving a tiny crack at the joint.
What would be a good "filler" to close this crack? I never used any of that stuff like putty yet, so some advise would be appreciated.
After getting it back together I do have some skin colors from Vallejo and think I will be able to match the color of the figure alright to hide the repair.
Thanks for any help.
Konrad
 

Attachments

  • casualty.JPG
    casualty.JPG
    53.3 KB · Views: 325
One of the best is Green Putty which u can buy at
Squadron Shop in Chicago
Dries hard , don't schrink and very eazy to file
Maybe the pros can give u a better solution
Good luck my freind
 
That would be my choice aswell. You can also get it in white which can be a little easier for repainting (same stuff though). I would recommend keeping the lid on the tube whenever not in use as it does dry out fairly quickly.
Cheers
Simon
 
Hi, Konrad, you might be able to get away without using putty at all, depending on the adhesive that you use. When you glue the hand back on, the adhesive could ooze out, filling the seam/gap. You could then carefully file or sand away the bead of cured adhesive, and prime and paint over it.

I would use a 2-part epoxy for this kind of join, and that lends itself well to this type of repair.

Hope that helps, prosit!
Brad
 
I'm no expert Konrad - but I'm with the Baron on this one. A wrist is a tiny joint - and any putty used is likely to show up as a bulge there - if you aren't extremely careful. I would use my new favourite "Araldite Rapid" - which as the name suggests is pretty quick to cure - and oozes nicely without running everywhere. I would drill and pin as well firstly - to get a strong joint. Finally, a light sanding and careful painting ought to cover the new join up very well.

Then - don't drop him again - you naughty boy!^&grin


Have a good one - chum ...............johnnybach
 
Konrad...

I think Johnny and Brad are right...

the adhesive should take up the slack...

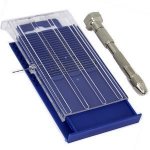
I would recommend a $10 pin vise drill...

and drilling a "female receptacle hole" on each connecting piece with a small metal rod inserted inside both holes to give it much more added strength...

you can get the pin vises on Ebay pretty cheap ($8.09 starting bid)...or almost any hardware store...it's a great tool to have...

you can get some thin metal rods at the hardware store also...

http://www.ebay.com/itm/Tiny-Small-...407824?pt=Model_RR_Trains&hash=item4843384a50
 

Attachments

  • $(KGrHqJ,!pgE7Bcvh2mHBO5rctrqDg~~60_1.jpg
    $(KGrHqJ,!pgE7Bcvh2mHBO5rctrqDg~~60_1.jpg
    19.2 KB · Views: 191
Thanks guys,
the crack that is left when the pieces are together is indeed very small, so a thicker applied glue will most likely cover it and will have to be sanded down then.
Got the pin vise already, but will be looking for a set of those tiny steel rods.
And I am going to get me a tube of the green putty or white. I do have a bunch of kits to assemble and will need a filler for some not so perfect fitting joints.
With all your comments I feel comfortable to get the right stuff together before starting the work :) :wink2:
Konrad
 
Got the pin vise already, but will be looking for a set of those tiny steel rods.

Konrad,
If the joint is big enough to take it, I use bits snipped off a paper clip. Otherwise, piano wire comes in all sorts of silly small guages.
 
Paper clips-the older ones, not the newer ones that are nicked every couple of millimeters, which allow them to snap easily, any odd bits of stiffer wire of various thickness (eg, I have a small spool of aluminum wire for use in the garden, it's good for pinning), I even save the handles from the Chinese take-out containers, which is good wire stock (yes, that's Dutchy, I concede :D ), all are good to use. I have also used toothpicks, on occasion. They have the property of being able to soak of the more liquid CA glues.

Prost!
Brad
 
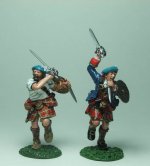
Got him fixed the other day, and here is a photo of him with his companion of set no. JR-03
By now he also has received his glossy finish as all of my Jacobite Highlanders will have.
The skin color came out a bit more pale than the original, but I think it will not be too noticeable within a group of figures.
I am just glad I got him back in the charge ^&grin :wink2:
Konrad
 

Attachments

  • JR-03-f.jpg
    JR-03-f.jpg
    27.1 KB · Views: 132
Konrad,

looks good, no one (except all of the people in the Forum) would know he had been damaged.

Its exactly what I strive to do with my work,

John
 
Konrad...you did an excellent job...no one would ever know unless you pointed it out...they also will look very nice glossed I bet...
 
OK, which one was it? I'm serious--I haven't gone back to earlier posts, to see which figure was broken. I can't tell which one was repaired. I guess this is a good test, Konrad. Well done! As Ben Kenobi said, "You've taken your first step into a larger world" ;)

Prost!
Brad
 
Well done Konrad! - Fixed him up a treat!

You didn';t even have to resort to the old wristwatch trick! Mind you, you would have had trouble with that dodge - as I doubt they had been invented then!^&grin

Good Lad! - johnnybach
 
Thanks for the comments, guys :)
It is encouraging.
Not long ago, I sure would have sent the figure back to the dealer and ask for replacement.
The figure's wrist was broken when I took him out of the box and the hand fell off completely upon touching it.
But now, at least in some cases, I can fix it up myself and save the hassle of shipping back and forth.
Especially when I plan to alter the figure anyway, like giving it a gloss finish in this case.
Konrad
 

Users who are viewing this thread

Back
Top