
You are using an out of date browser. It may not display this or other websites correctly.
You should upgrade or use an alternative browser.
You should upgrade or use an alternative browser.
Making Schurzen for 21stC Panther? (1 Viewer)
- Thread starter scgatgbi
- Start date
theBaron
Major
- Joined
- Mar 27, 2008
- Messages
- 10,308
I've never made them for that specific subject, but scratchbuilding them would be relatively easy. I'd use a thicker sheet of styrene plastic-Evergreen is a popular brand and available at hobby shops. You could also salvage the stock from "For Sale" signs and the like, the smaller kind that are smaller than letter-sized paper, those are also made of styrene.
If you can, make a template-I'd use photos as a reference. Then use a straight edge-a metal rule is best-and a sharp hobby knife to score the pieces, following the template, until you can snap them along the scored lines. Once you've cut those pieces, you can prime and paint them.
The attachment points are a different matter, because I don't know what they looked like for the Panther. For the vehicles using the Pzkfw IV chassis, I know what the frame looks like, and I'd use strips of styrene, cut to shape, to make that.
There are other scratchbuilders here at the forum, so I'm sure you'll get a lot of good suggestions.
Prost!
Brad
Brad,
Thanks alot. I was thinking along the same lines. My biggest hang up is the mounting brackets as well. They're pretty basic, just a L shape mount. It's just getting the scale close. I'm thinking a trip to home depot may be in order to find something along those lines. Thanks again.
Thanks alot. I was thinking along the same lines. My biggest hang up is the mounting brackets as well. They're pretty basic, just a L shape mount. It's just getting the scale close. I'm thinking a trip to home depot may be in order to find something along those lines. Thanks again.
binder001
Command Sergeant Major
- Joined
- Apr 30, 2005
- Messages
- 2,729
I'm thinking a trip to home depot may be in order to find something along those lines. Thanks again.
Instead of Home Depot I think you might be better off if you have a local hobby shop that carries the line of Evergreen styrene products. The have plastic sheet in various thicknesses and they have a number of pre-molded shapes, such as L-angles. Plastruct also makes a wide range of shapes and sheets - they have smaller L-angles than Evergreen. I'm not a BIG fan of the Hobbytown chain but most do carry the styrene lines. If you don't have a shop nearby, then one source is www.walthers.com These guys are a big model railroad supplier but they also carry most lines of stryrene, brass shapes, glues, a massive amount of scenery, etc. Plus their website tells you whether an item is in stock or not. Use the "advanced search" feature and you can enter terms like "styrene", etc.
Just a suggestion.
Gary B
theBaron
Major
- Joined
- Mar 27, 2008
- Messages
- 10,308
Gary's right, I left out Plastruct--and I even use their liquid cement!
He's also got a good point, in mentioning model railroading. I'd check for a LHS (local hobby shop), including a store that advertizes specifically as a model railroad supplier, as well as more general hobby stores. For me, Hobbytown is the LHS, and I think I may have the same issues with them as Gary does, but they do carry both Plastruct and Evergreen.
For L-shaped brackets, I'd use square styrene bar stock, with a model cement on the plastic, and CA glue to attach the finished pieces to the model.
As an aside, my issue with Hobbytown is that they don't have on hand the things you need, once you progress beyond a certain basic level. They can order some things, but even then, they don't carry some things in their catalog. Gunze-Sangyo paints, for example, or Vallejo or Andrea acrylics. But I have found that my local HT's owner is very willing to listen to requests, and he'll try adding new products, if a couple people ask for them. But generally, they're a sort of McDonald's or USAToday of hobby stores-a generic assortment of things aimed at the broadest possible market.
Please keep us informed on your progress, maybe post some pics as a step-by-step on how you build the skirts.
Prost!
Brad
Thanks guys for all the help. My LHS Warricks (they're the only one down here in Florida) thankfully has the plastistrut. I'll have to take a trip soon & see what they've got. They're more geared towards trains & RC, but have a decent model section. I'm actually kicking around opening my own shop. It drives me nuts having to order most of my supplies. I tried etching a zimmeritt pattern into the Panther & it looks really promising, so once I get the skirt designed I think I'll have a pretty nice looking Panther. I'll keep everyone posted & post pics as it progresses for feedback. Thanks again.
binder001
Command Sergeant Major
- Joined
- Apr 30, 2005
- Messages
- 2,729
Brad, I think we are in agreement. Hobbytown is not a bad thing, they just try to be "everything to everybody" and often just skim the surface of model-building. On the good news - most of them have good stocks of paint, adhesives, styrene, etc. Each Hobbytown has to carry certain basic stock, but they often reflect the personal interests of their owners. For example, the LaVista, NE store has a good stock of military models and carries some Vallejo paints, etc. The Lincoln, NE store is very "fantasy game" oriented. One store in Dallas that I visited in March had quite a few FoV, 21C, and other diecasts as well as some TSSD soldiers, so each one bears a look. Internet shopping has rapidly done in many of the old "mom & pop" hobby stores, so I do appreciate the ability to drive over a pick up some paint.
Side note - the HobbyTown USA chain started in Lincoln, NE. I used to go to the original store "Chick Bartlett's Hobby Town" while growing up. Merl Hayes and Thom Walla got into the hobby business with a slot car store in north Lincoln. When Mr. Bartlett retired (ca. 1979-80), Merl and Thom bought HobbyTown. Before long they had closed the old slot car store, moved it to a mall and named in HobbyTown Eastpark. I worked part time for Merl at the original HobbyTown from the fall of 1980 into 1984. The franchise business started several years after I left the organization. If I had stayed I might have ended up with a store of my own and probably would have been in bankcruptcy - I am a fair modeler but a LOUSY businessman.
As far as parts and supplies - have a look at what the nearby store(s) offer. There are also some good internet suppliers that can get other items for you and offer good service.
Gary
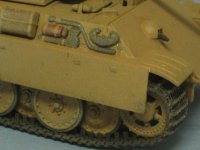
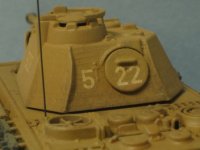
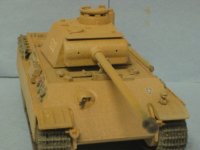
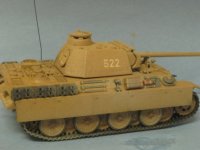
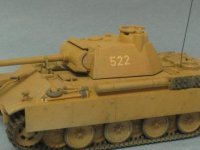
Well, I'm done. What a pain!!!!!! I didn't do a build log or step by step on this one. Even I couldn't have followed it if I did. I tried a number of different things. Either way, I finished it. I'll do a build log on the next one since I know what I'm doing now. Let me know what you think.
Attachments
theBaron
Major
- Joined
- Mar 27, 2008
- Messages
- 10,308
Well, if it was painful scratching the Schürzen, I'd consider it worth the pain, they turned out very nice.
Was there a particular part of the build that gave difficulties? And were the difficulties worse than the feeling of satisfaction of building your own? For me, in the end, that's worth all of the aggravation.
Yes, looks good, prost!
Brad
Was there a particular part of the build that gave difficulties? And were the difficulties worse than the feeling of satisfaction of building your own? For me, in the end, that's worth all of the aggravation.
Yes, looks good, prost!
Brad
I think the biggest pain was trying to figure out how to mount the schurzen. At 1st, I went for 100% accuracy & tried to mount them like they would have been on the real thing. That didn't work to well! so after fiddling with the mounts I finally settled on gluing the schurzen to the mounts. But since the plastic is thin & I used brass for the mounts the super glue wanted to eat the plastic. I finally wound up coating the brass with squadron putty & once it was dry I glued the schurzen to that & it worked fine. But, as you point out, in the end I was really pleased with the results. The other thing that I guess turned it into a major pain was that I etched zimmerit & due to the painting it's almost invisable. Lesson learned on that one. Thanks for the reply.
Sean
Sean
kilted vampire
Lieutenant Colonel
- Joined
- Mar 2, 2006
- Messages
- 7,900
Did you know there is decal zimmerit available? It would go well with your Panther. Good work on the Schurzen. Especially for even trying it.!
theBaron
Major
- Joined
- Mar 27, 2008
- Messages
- 10,308
I use putty or spackle, and shape it with a razor saw, for the Zimmerit. I like to have the 3-D relief to the final product.
You just trowel on a thin layer of the putty or spackle, then use the razor saw. Hold the blade perpendicular to the surface, and vertical to the "ground", embed the teeth of the saw in the putty, and then drag it horizontally from one side to the other. Then take the blade and use the very tip, and drag it from top to bottom at intervals, to cut the vertical lines. I got that from Shep Paine's diorama tips in the old Monogram armor kits.
Prost!
Brad
Users who are viewing this thread
Total: 2 (members: 0, guests: 2)