New "Jenkins" Monongahela British, BM-28? (2 Viewers)

BlakeWR85

Specialist
Joined
Jan 21, 2010
Messages
315
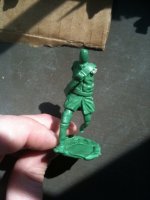
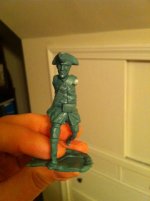
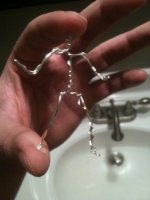
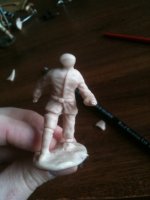
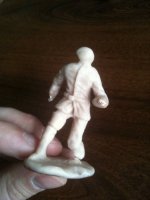
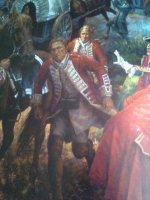
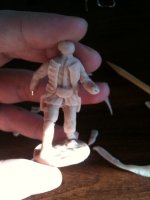
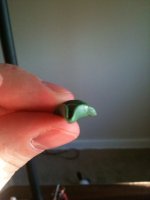
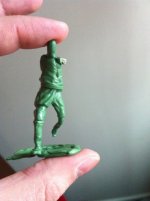
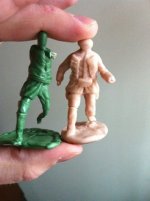
This is another sculpt I did today, it is meant to fit-in with other Jenkins Monongahela figures. The painting is from Robert Griffing, my figure is roughly based off this picture. This is the first time I've used an armature, I decided that the young Washington figure was becoming counter-productive because I used no armature, so I'm constantly reshaping parts, then messing them up; so I thought if I'm going to make more sculpts, I need an armature because I can work a lot quicker because it supports the figure, plus I have a plan, I'm not making it up as I go, which can be bad later when I'm trying to make a difficult pose. This is the progress I've made so far, it's still a little rough, but thought you guys would want to see the process, from the wire armature, to a finished painted figure. I started with the wire armature, then I made a clay base and some "meat" to the "bones," then I baked the clay so it was hard and then I could add clay on top of it, which is the detailed part. This particular pose was one that I was hoping John would make, some Brits running away after they've tossed their guns in a desperate attempt to flee the Indians and stay alive. I think I will make a few different poses of Brits running from battle, maybe one jacket-less since Griffing also had depicted one in his painting. I'll update you guys on those, but until then, I'm gonna not get ahead of myself and finish this one :smile2: Here's the pics, what do you guys think:
 

Attachments

  • photo-44.jpg
    photo-44.jpg
    55.5 KB · Views: 291
  • photo-40.jpg
    photo-40.jpg
    62.1 KB · Views: 264
  • photo-42.jpg
    photo-42.jpg
    49.3 KB · Views: 273
  • photo-43.jpg
    photo-43.jpg
    53.3 KB · Views: 279
  • photo-41.jpg
    photo-41.jpg
    85.1 KB · Views: 301
Blake...you seem very talented...can't wait to see your work finished...you're off to a great start...
 
This is what I added yesterday, I decided to add a belly box, and here's a little bit of the jacket too. Do you guys think his lapels are too wide?
 

Attachments

  • photo-46.jpg
    photo-46.jpg
    58.6 KB · Views: 158
Last edited:
Blake:

First...great work! Second...The lapels may be a tiny bit wide, but if you created a bit more separation between the fold back of the lapel where it meets the waistcoat and gave that fold the kind of volume you did just below the lapels, I think it would be both perfect and impressive. The one thing I notice with John's figure's apparel is that it is dynamic, often extending the movement of the figure in the shape of the article. With a tiny modification here, I think you can do the same. Please let me know when you start working on your Naps range; I am ready to place my first order. :smile2:

Thanks for the compliment! I knew they were already too big before I asked, just needed to hear it from somebody else :wink2: I think I will fix it though. Naps huh? hmmmm, interesting, how about some French assaulting Pratzen Heights, and some Russian guards with some "oh s**t" faces :salute::
 
Okay, got some new tools to work with, and more importantly, got some "greenstuff!" I love this stuff, so far I've succeeded in making a tricorn hat (which I asked about in another thread), and I'm starting on a brown bess, I've only finished the butt of the gun so far. I want to make mold these pieces and cast my own in resin, then use those on other sculpts. Now that I have greenstuff, I'm gonna start pumping out other pieces that I can "mass" produce, like canteens, swords, hats, cartridge boxes, etc. Greenstuff is way different to work with than super sculpey, but the amount of detail and smooth finish you can achieve is priceless!! The hat and gun aren't perfect, I'll probably actually make some more before I will mold them, choosing the best one I make. Just like the other sculpts I showed you guys, which were basically the results of my technique practice, these "greens" are the same thing, not perfectly finished "products," but hopefully I'm working in that direction, thanks again guys for looking and giving me encouragement and criticism, both are welcome :smile2:
 

Attachments

  • photo-47.jpg
    photo-47.jpg
    46.1 KB · Views: 119
  • photo-48.jpg
    photo-48.jpg
    48.8 KB · Views: 146
Did you ever sculpt before?Whether you did or not I think you are an upcoming talent.
Mark
 
Did you ever sculpt before?Whether you did or not I think you are an upcoming talent.
Mark

Wow, thanks for the compliment Mark! Actually no, I've literally only been doing this for a couple of weeks now, it was sorta of an experiment to see if I had any ability which turned out okay........
 
Blake...
you did a fantastic job on the tricorn...your work is very nice...kudos to you...
 
Here's my project this afternoon, once again, I love greenstuff ^&grin I'm able to achieve smaller details than previous, the second pic is a comparison so you guys could see the difference. The two figures had taken about the same amount of time to do because greenstuff is stiffer and a lot harder to manipulate, but it's worth the extra time.
 

Attachments

  • photo-49.JPG
    photo-49.JPG
    50.6 KB · Views: 97
  • photo-50.JPG
    photo-50.JPG
    57.2 KB · Views: 97
Your progress is great...what a difference with the green stuff. It is much more refined, and the dynamic pose really helps. I'm looking forward to seeing the final product!
 
Haven't had a chance to finish this yet (been busy with work and EMT classes and family visiting from out of town), but here's what I did today, I finished the other half of his vest in the front, then I added a cartridge box strap. Separately, I made a cartridge box (a large one on the hip), and a smaller belly box, and a haversack (a cloth one, I'm still going to make the "furry" one though :wink2:). I didn't take a picture of these, when they're hard enough, I'll attach them and take a photo then. Thanks guys, here's the pic:
 

Attachments

  • photo-52.jpg
    photo-52.jpg
    61.6 KB · Views: 86
Here's my update.....I know, I know, his heads a little big :rolleyes2:
 

Attachments

  • photo-53.JPG
    photo-53.JPG
    60.7 KB · Views: 58
There are people with big heads Blake.^&grin Myself I look like pinhead.:D
Mark
 

Users who are viewing this thread

Back
Top