You are using an out of date browser. It may not display this or other websites correctly.
You should upgrade or use an alternative browser.
You should upgrade or use an alternative browser.
Shadow boxes/display cases (1 Viewer)
- Thread starter gus123
- Start date
theBaron
Major
- Joined
- Mar 27, 2008
- Messages
- 10,326
Those wouldn't be too hard to make, it depends on how you'd choose to make the joins between the sides and the cap pieces, whether to use simple butt joints with glue and fasteners, or to get more elaborate and use biscuit joinery, or even dovetailing. Also, you'd have to decide whether you'd want to use glass shelves, or wooden shelves.
As to where to buy them, not sure. I've seen some decent shadowboxes for sale at a farmer's market near here, the guy who makes them is a regular.
Prost!
Brad
As to where to buy them, not sure. I've seen some decent shadowboxes for sale at a farmer's market near here, the guy who makes them is a regular.
Prost!
Brad
Harrytheheid
Banned
- Joined
- Apr 19, 2007
- Messages
- 4,672
Those wouldn't be too hard to make, it depends on how you'd choose to make the joins between the sides and the cap pieces, whether to use simple butt joints with glue and fasteners, or to get more elaborate and use biscuit joinery, or even dovetailing. Also, you'd have to decide whether you'd want to use glass shelves, or wooden shelves.
As to where to buy them, not sure. I've seen some decent shadowboxes for sale at a farmer's market near here, the guy who makes them is a regular.
Prost!
Brad
Brad,
This request would probably be better addressed in the "Diorama How-To" section, but I saw the title of the thread and thought I'd look in.
Can you, or anyone else, please offer some advise on how to make a proper "Light Box (?)" for taking photographs of small vignettes consisting of a few figures and the odd piece of scenery? A friend of mine in Hong Kong told me you can buy them, but facilities for purchasing these kind of things are limited where I live and the natural light in our present home is horrible for taking decent photos.
Thanks
Harry
Rob
Four Star General
- Joined
- May 18, 2005
- Messages
- 26,622
The Military Workshop
1st Lieutenant
- Joined
- Jul 31, 2005
- Messages
- 4,778
If there is one near you I would also look in IKEA as they shoulf have something similar.
Regards
Brett
Regards
Brett
Gus, I personally would not recommend display cases without doors. One of the greatest dangers for damaging the figures is during removing them for dusting ...
(Not that I speak of experience )
)
I am looking for one myself, but so far have not found one I like in my price range (excpt maybe IKEA). This is what is generally available:
http://www.displays2go.com/product.asp?ID=7016 (in metal)
http://www.displays2go.com/product.asp?ID=12312 (in different woods)
(Not that I speak of experience
I am looking for one myself, but so far have not found one I like in my price range (excpt maybe IKEA). This is what is generally available:
http://www.displays2go.com/product.asp?ID=7016 (in metal)
http://www.displays2go.com/product.asp?ID=12312 (in different woods)
Rob
Four Star General
- Joined
- May 18, 2005
- Messages
- 26,622
Gus, I personally would not recommend display cases without doors. One of the greatest dangers for damaging the figures is during removing them for dusting ...
(Not that I speak of experience)
I am looking for one myself, but so far have not found one I like in my price range (excpt maybe IKEA). This is what is generally available:
http://www.displays2go.com/product.asp?ID=7016 (in metal)
http://www.displays2go.com/product.asp?ID=12312 (in different woods)
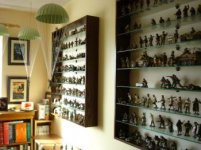
Just for infomation,my shelves in Gus's photo DO have doors which are easily removed.I took them off when taking the pictures so as to avoid reflection in the photo's.
Rob
Just for infomation,my shelves in Gus's photo DO have doors which are easily removed.I took them off when taking the pictures so as to avoid reflection in the photo's.
Rob
Well done, Rob. Very nice shelves and certainly a better quality than IKEA.
Rob
Four Star General
- Joined
- May 18, 2005
- Messages
- 26,622
Well done, Rob. Very nice shelves and certainly a better quality than IKEA.
Thank you Andanna,IKEA are probably cheaper but i am pleased with these
Cheers
Rob
Phantom Warrior
Major
- Joined
- May 1, 2009
- Messages
- 6,881
Thank you Andanna,IKEA are probably cheaper but i am pleased with these.I agree with you re the doors,dusting would be a nightmare with figures,Tanks are bad enough in that regard!.
Cheers
Rob
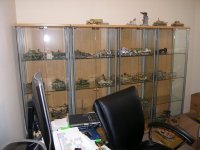
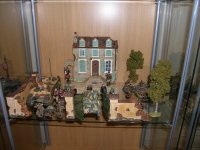
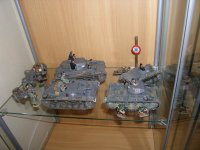
I bought a row of cabinets from Solutions (They are in the USA and Canada) and rest on the floor. They are not high quality solid wood but are similar to Ikea display cabinets with particle board covered with woodgrain veneer and safety glass sides, shelves and fron door. Their quality is a little below Ikea's, but their size is much better at 22.5" wide and 13.5" deep. Each shelf space is 13.5" tall. The shelves deep enough to make double and triple wide columns of tanks/vehicles and small scenarios and high enough to house the 1/30 scale K&c and Figarti buildings. The wood back can be covered with large format background. I planned to have just one display cabinet - that grew to 7-1/2 and that's all the room there is.
Terry
Attachments
Phantom Warrior
Major
- Joined
- May 1, 2009
- Messages
- 6,881
Very nice Terry,very nice indeed.Great collection you have there.
Rob
Thanks Rob.
I envy the guys that have the room for a display table and can make a full sized scenario. But my collection cannot spill outside of the computer room.
Terry
thebritfarmer
Moderator
- Joined
- Jan 29, 2008
- Messages
- 10,444
I am looking at those also Terry. They are reasonably priced and have a fair bit of storage space.
Another thing that you guys may want to consider is looking for cabinets used to store model locomotives and trains sets.
Another thing that you guys may want to consider is looking for cabinets used to store model locomotives and trains sets.
Last edited:
1879fanatic
2nd Lieutenant
- Joined
- Jan 8, 2007
- Messages
- 3,159
Brad,
This request would probably be better addressed in the "Diorama How-To" section, but I saw the title of the thread and thought I'd look in.
Can you, or anyone else, please offer some advise on how to make a proper "Light Box (?)" for taking photographs of small vignettes consisting of a few figures and the odd piece of scenery? A friend of mine in Hong Kong told me you can buy them, but facilities for purchasing these kind of things are limited where I live and the natural light in our present home is horrible for taking decent photos.
Thanks
Harry
H,
That's not fair...I've seen your pictures from inside the homestead. They are among the colourful and crispy clean that I've seen! Maybe it's the awesome furniture you've got that sets the figures and set off, but first rate regardless.
Have a local craftsman make the case to YOUR specs and you'll be able to pass it on to the grandkids!
Mike
Richard Tree
Private 2
- Joined
- Nov 5, 2008
- Messages
- 94
Thanks for the discussion guys. It made me contact my hometown Ikea and to my surprise they had resupplied their display shelve in black/brown wich went out of production a long time ago. I always regretted I bought just one of them (as my collection have grown out of the cupboard.

Thanks again
Thanks again
theBaron
Major
- Joined
- Mar 27, 2008
- Messages
- 10,326
Brad,
This request would probably be better addressed in the "Diorama How-To" section, but I saw the title of the thread and thought I'd look in.
Can you, or anyone else, please offer some advise on how to make a proper "Light Box (?)" for taking photographs of small vignettes consisting of a few figures and the odd piece of scenery? A friend of mine in Hong Kong told me you can buy them, but facilities for purchasing these kind of things are limited where I live and the natural light in our present home is horrible for taking decent photos.
Thanks
Harry
Hi, Harry, that's a good question, I never thought of making a "light box" in that sense. I don't know that you'd need a box of fixed size, necessarily, as much as having good light sources--note the plural--to light the piece for photographing.
I draw on experience from another hobby, stage lighting. If you think about it, a diorama is like a scene on a proscenium stage (the traditional stage), and we're sitting in the audience, about 40 feet away.
One general rule in lighting a stage is that you want two sources of light on every target, to reduce shadows as much as possible, and to help preserve the 3-D effect. A single source of light on a scene will tend to make it flat to the viewer. The next time you watch the news on TV, take a good look at the anchors, and you'll see that they're backlit from above, for the same reason. Also, studio portrait photographers do the same thing.
For my pics, I'm currently using a pair of quarz halogen work lights mounted on a stand, angled in at about 45 degrees. I still get some shadows on the ground, but for my purposes, they're not too bad. In a dio, those shadows would be diffused into the scenery. But you could also use smaller, portable work lights, that have a spring clamp base and a stamped metal reflector, I've seen a lot of guys use those.
If you can, put the subject on a table or some other kind of platform, and arrange the lights so you're hitting the subject from either side, and from slightly in front, anywhere from a 15 degree to a 45 degree angle. The 45 rule is a good rule of thumb for the elevation of the light source, too, that is, the light should strike the subject from about 45 degrees up in the air. The higher the angle, the more overhead the light source is, the more you get shadows on the object (like onstage, an actor's eyes will go dark, because his brow starts to cast a shadow).
Beyond positioning a white light, you might think about color, too. White light will tend to wash out the natural colors, and so we use colored gels to tint stage lights. (Called gels because back in the day, they were made from colored gelatin, poured out in very thin sheets). You can get them at a stage supply company. For a general scene, we use shades of amber-in catalogs here, they're 01, 02 and 03 ambers. Amber has the effect of making human skin tones look normal and healthy, they way we look in ordinary daylight. Straw yellow replicates sunlight, reds will add warmth or heat to the lighting, and blues will cool them.
Bit of a ramble, I suppose, but I hope it helps!
Prosit!
Brad
thebritfarmer
Moderator
- Joined
- Jan 29, 2008
- Messages
- 10,444
Brad,
This request would probably be better addressed in the "Diorama How-To" section, but I saw the title of the thread and thought I'd look in.
Can you, or anyone else, please offer some advise on how to make a proper "Light Box (?)" for taking photographs of small vignettes consisting of a few figures and the odd piece of scenery? A friend of mine in Hong Kong told me you can buy them, but facilities for purchasing these kind of things are limited where I live and the natural light in our present home is horrible for taking decent photos.
Thanks
Harry
Hi Harry
Give this site a whirl.
http://strobist.blogspot.com/2006/07/how-to-diy-10-macro-photo-studio.html
Toy Soldier Brigade
Sergeant Major
- Joined
- Aug 5, 2005
- Messages
- 1,662
Gus, I personally would not recommend display cases without doors. One of the greatest dangers for damaging the figures is during removing them for dusting ...
I could not agree more. I can't even imagine what I would do if I had to dust a 1000 plus figures. It would be like painting the Verrazano-Narrows Bridge. Once you get to the end you have to start painting all over again. Cases with doors are the only way to go.
Users who are viewing this thread
Total: 2 (members: 0, guests: 2)


