Stadden Gersdorf Hussar SBS (1 Viewer)

theBaron

Major
Joined
Mar 27, 2008
Messages
10,467
Hi, all!

I just got done saying in another thread that we painters have been quiet lately, so I thought I'd do my part to bump our forum a little, and post some pics of a quick project that I just finished.

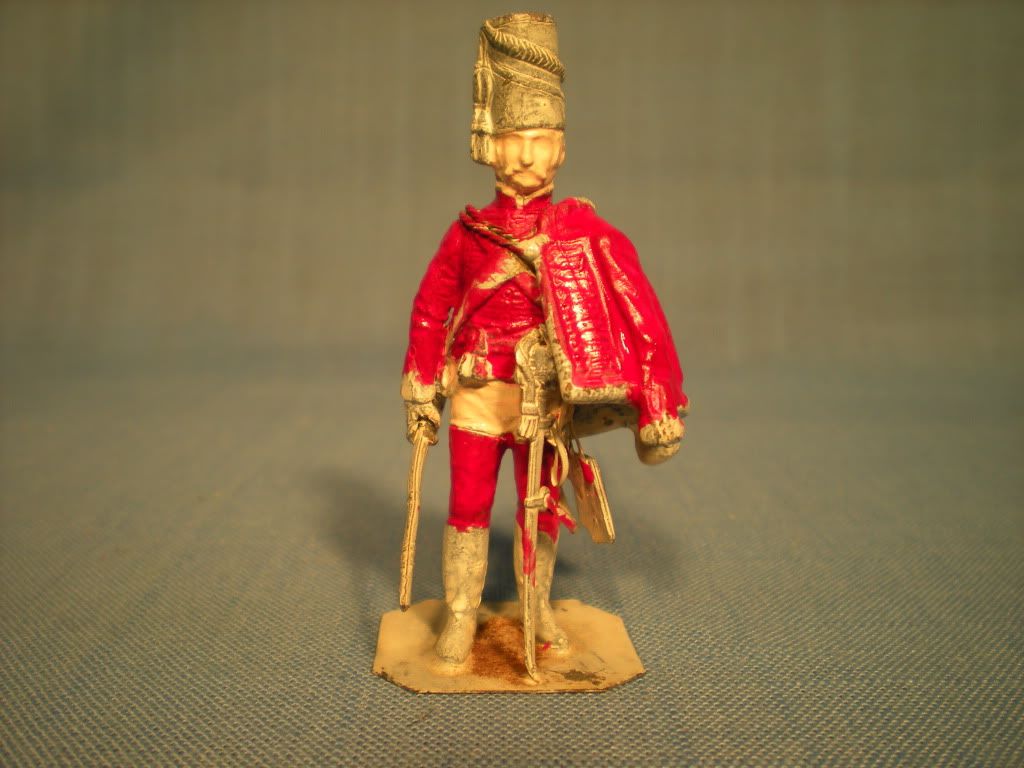
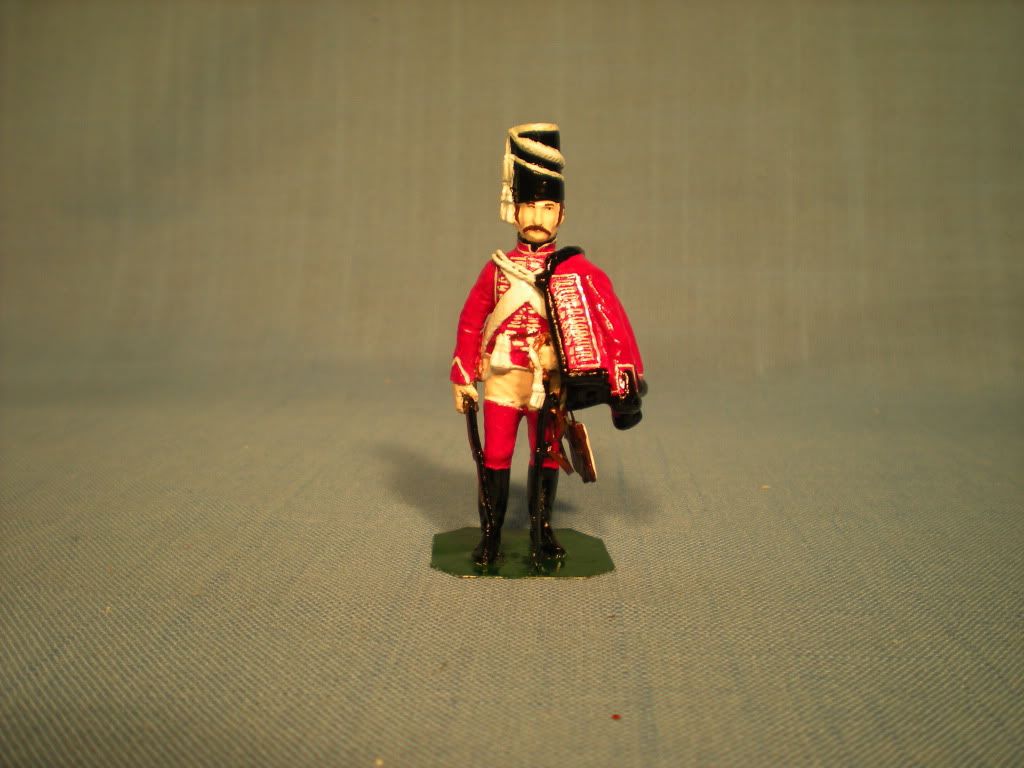
The subject is a Prussian hussar of the Gersdorff regiment. This was a recent find on eBay. Stadden's Prussian hussar castings don't turn up very often, so I was glad to win this one. Here is a front view of the casting, with the studio's own primer applied. Detail is of the usual quality that we expect from Stadden, which is pretty good, especially considering that it was probably cast back in the 60s:

1-1GersdorffHusarfront.jpg


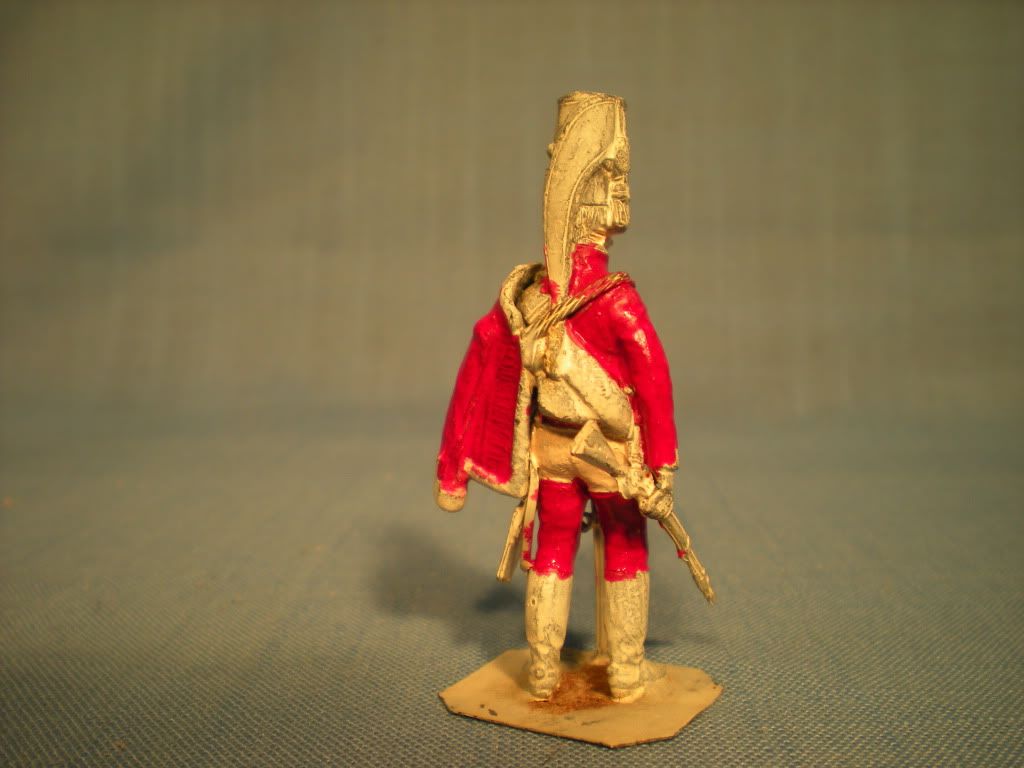
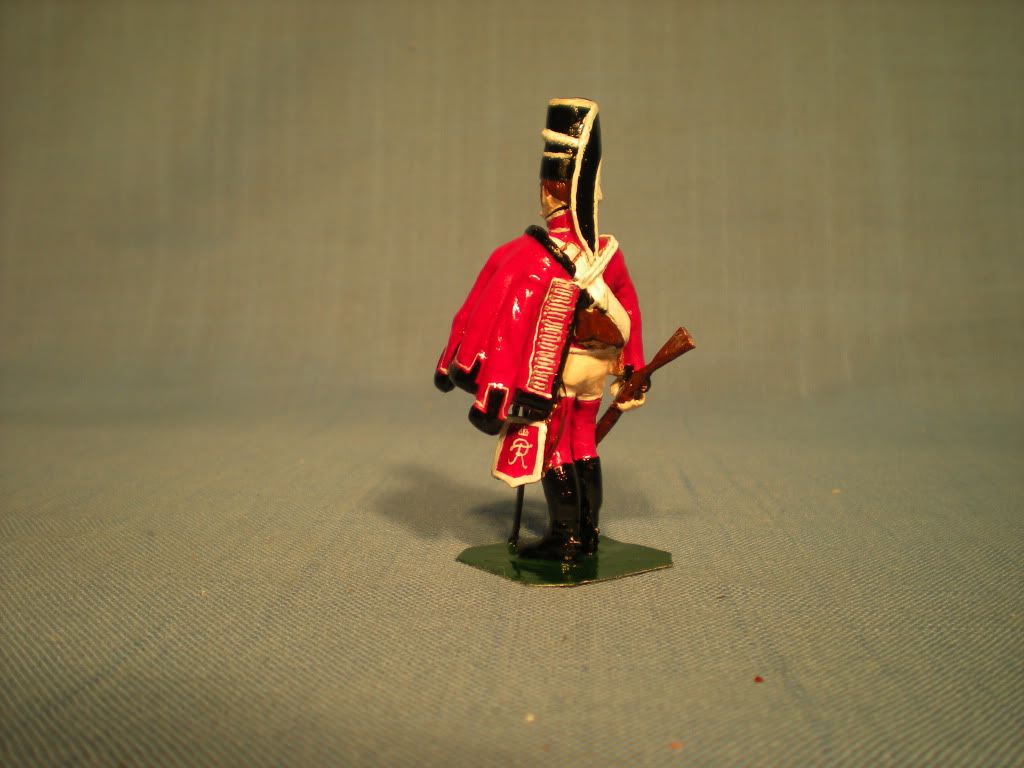
A shot of the casting from the back. Note how the cartridge box is under the carbine belt. That's actually a detail unique to this regiment. I had originally chosen the Red Hussars as the finish, because I don't have any yet in my collection, but when I saw this, I was impressed that Stadden had actually paid that much attention to the detail:

1-2GersdorffHusarback.jpg


Not the original Stadden label, but I'll leave it there:

1-3GersdorffHusarlabel.jpg


"Die Malvorlage", or painting guide. The Gersdorff hussar is the second from the left. The regiment was also known as the Red Hussars. Illustration by Brian Fosten in Osprey's "Men at Arms", Nr. 236, "Frederick the Great's Army 1: Cavalry":

2-1GersdorffHusarMalvorlage.jpg


So, now we put brush to tin! Here, I have added the base color for the face, and for the buckskin breeches. I use Testor's gloss enamel Cream for both, for my toy soldiers:

3-1fleshandbreechesfront.jpg


3-2fleshandbreechesback.jpg


More to follow...
 
Here, I've applied Tamiya XF-7, which is a flat acrylic, instead of my usual Testor's gloss enamel Red, because the Tamiya color is a little darker:

4-1redappliedfront.jpg


A rear view with the red base colors laid in:

4-2redappliedback.jpg


With the basic uniform colors laid in, I added the black fur trim to this pelisse; black trim was another distinction of this regiment. I've also painted the Flügelmütze.

4-3pelissefurtrimfront.jpg


The black is my usual choice for my toy soldiers, Model Master acrylic Gloss Black. Here is the back of the figure:

4-4pelissefurtrimback.jpg


Next, I added the eyes and moustache. That's when a casting becomes a figure, when he has a face:

5-1Facialdetailsandbootsadded.jpg


Without an Optivisor, I could no longer paint lace like this in 54mm!

5-2Facialdetailsandbootsadded.jpg


And here, all remaining details added, and a coat of clear acrylic (Future) to seal everything:

6-1Finishedfront.jpg


The Optivisor is indispensible for painting things like the Säbeltasche, too. I'm pleased with the way it came out.

6-2Finishedback.jpg


Thanks for looking, and any questions about techniques or comments are welcome.

Prost!
Brad
 
Brad,

thanks for sharing your painting of the Stadden with us all.

You know that I just LOVE Stadden AND 7 Years War so I'm in in 7th heaven :)

Well Done,

John
 
Hello Brad,

A most striking figure. Those Stadden figures are really nice, aren't they despite their age?

I note that you use various makes of acrylics and enamels in one single figure. Clearly, the acrylics cannot be mixed across different brands to obtain extra shades. Why not stick to one brand with a full colour range for full compatibility?

Rgds Victor
 
@John--thanks very much! Your comment means a lot to me, especially since I've enjoyed for many years now seeing your work on your webpage.

@Vic--that's a very good question, and the main reason that I use the different paints is that I've accumulated them over the years, for different hobby uses. I have flat enamels and acrylics, for scale modeling, and gloss enamels and acrylics primarily for the toy soldiers. I'm not very experienced at mixing my own colors-though I'm learning-so I've always looked for closest match that I can find on the market.

Also, in each brand of paint, I've found that some colors have storage problems. For example, Tamiya gloss white acrylic got thick right away, but didn't dry out, while Testor's gloss white enamel has a shelf life of a couple of weeks, once it's opened. But I have other colors from both of those lines that have lasted for years without needing thinning. That might lie with the chemical composition of the pigments each one uses for white, too.

I also have oils, which I do not typically use for my toy soldiers, but I have started using my ivory black to do the eyes, because oils right from the tube work best for me for the technique of depositing a dot for the pupil and then a nice thin line for the upper lid. My acrylic blacks (Tamiya and Model Master) would dry before I could get them on the figure. I didn't use it on this hussar, but on the figures I'm finishing, I've used the oil for the eyes, and I'm pleased with the results.

As far as mixing colors across manufacturers goes, I've been of the same mind as you, but someone here in the forum--maybe George (Warrior)--noted that he mixed acrylics from different makers and didn't notice any issues. I may try it it, if I get to a color that I can't find on the shelf.

Do you use a particular brand? I'd like to hear what experience you've had.

Prost!
Brad
 
Thanks again for another SBS Brad. It is always great to see what other members are up to. I love your figures as they are just something a little different from the mainstream and I also like the history that you provide with them.

Thanks

Scott
 
Hi Brad,

You've opened a tinlet of painted worms with that question. I also confess to having too many makes and type of paint on my desk.

For enamels, I stick mainly to Humbrol. I find that their shelf life varies, but is generally limited to a few months after opening. The quality also varies, with some paints spoiling even before being used. The pigment comes out of solution and is unuseable. I never mix the paint in the tinlet, but tilt the tinlet and scoop out the paint from the bottom onto a palette and add turpentine thinner.

I have the odd Testors enamels but find these incompatible with Humbrol. These appear to work with lacquer thinner.

I find the Tamiya enamels to lack "bite" when being painted on, the paint seeming to slush around.

I use oils from W&N artist quality, Old Holland and Schminke. Despite all these claims as to finest quality, I find that each tube has to be *****sed because we paint in miniatures and some of these paints can be lumpy.

For acrylics, I use Jo Sinclair. I found Andrea and Vallejo not to adhere as well, as I can easily scrape off the paint.

I also use an optivisor and shh, I sometimes use a pinhead to dot the eyes...

Rgds Victor
 
Hi, Vic, regarding Tamiya, I've seen the same kind of behavior with some of the colors, especially once I've had them for a while, though primarily with the matte colors. Flat black, and flat gray--I don't have the catalog numbers handy, unfortunately--both will clump up after a few strokes of the brush, and a stroke over an area with the same color that's still not cured will lift the first layer right off. I've found that I can only use those with a fresh thinning using isopropyl. When they were new, however, they went on and cured with no problems.

I think that might go back to something I read about Tamiya paints on a modeling site, and that's that they're formulated to be used with a thinner in an airbrush, rather than brushed on. But that's what I do, right out of the bottle :D

Testor's I thin with mineral spirits. I use mineral spirits also with the oils, when I'm going to use them to cover an area, or to make a wash. For the eye technique, though, I just dip the tip of a fine brush into the tube, just enough to coat it, and then paint the eyes. Again, since the oils remain wet for so long, and because of their viscosity, they're perfect for that application. I'd use Testor's gloss black enamel, too, because it stays wet long enough and is viscuous enough to deposit a dot or give a nice, consistent line, but unfortunately, every bottle of Testor's gloss black that I've ever had went bad within a few weeks of opening. So for gloss black, I switched to Model Master water-based enamel, which lasts a lot longer, but is better suited to painting larger areas with a larger brush.

My favorite is my Testor's gloss enamel Copper. I use it for some gold braid, and I've had the same bottle since around 1978 or so. It reduced to a thick paste years ago, but every so often, I add a drop or two of mineral spirits and keep it going.

I'll have to list the array of brushes that I have, too.

Prost!
Brad
 
Here, I've applied Tamiya XF-7, which is a flat acrylic, instead of my usual Testor's gloss enamel Red, because the Tamiya color is a little darker:

4-1redappliedfront.jpg


A rear view with the red base colors laid in:

4-2redappliedback.jpg


With the basic uniform colors laid in, I added the black fur trim to this pelisse; black trim was another distinction of this regiment. I've also painted the Flügelmütze.

4-3pelissefurtrimfront.jpg


The black is my usual choice for my toy soldiers, Model Master acrylic Gloss Black. Here is the back of the figure:

4-4pelissefurtrimback.jpg


Next, I added the eyes and moustache. That's when a casting becomes a figure, when he has a face:

5-1Facialdetailsandbootsadded.jpg


Without an Optivisor, I could no longer paint lace like this in 54mm!

5-2Facialdetailsandbootsadded.jpg


And here, all remaining details added, and a coat of clear acrylic (Future) to seal everything:

6-1Finishedfront.jpg


The Optivisor is indispensible for painting things like the Säbeltasche, too. I'm pleased with the way it came out.

6-2Finishedback.jpg


Thanks for looking, and any questions about techniques or comments are welcome.

Prost!
Brad

Brad,

Just found this, that was a quick turn-a-round! I like your selection of SYW figures, always makes for a colourful thread. :cool:

Jeff
 
Brad,

Just found this, that was a quick turn-a-round! I like your selection of SYW figures, always makes for a colourful thread. :cool:

Jeff

Hehe, thanks, Jeff, but it's a little deceptive, I decided this time to hold all the pics and post them all at once. I'm still working on those Rose Prussian cuirassiers--well, not really working on them--and I've left everyone hanging on that one. I think I'm going to do painting SBS' this way from now on.

Thanks for the kind words about the collection, too! I do have a couple more that are almost finished, though I didn't take pictures along the way, I'll just put up pictures of the finished figures.

Prost!
Brad
 

Users who are viewing this thread

Back
Top