Sherlock Holmes at the Reichenbach Falls - Step by step (1 Viewer)

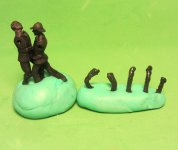
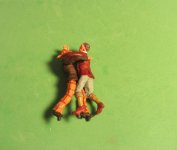
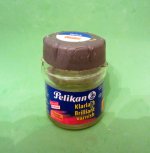
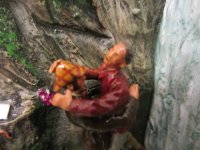
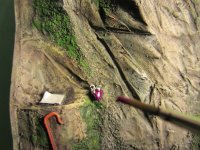
Now since I am getting tired and tonights duck (see earlier message to avoid confusion) demands a rest and I will end this for tonight. Last pictures are on final refinements, corrections and never ending attempts to better the overall appearence of the base. Flower painting not my number 1 discipline. As I wrote earlier not every step could be documented but I hope that I have given a usefull overview so far. Any questions please ask. Will be back tomorrow with the waterfall (tricky one!) and at least starting on the figures.
Good night and kind regards
Wolfgang
 

Attachments

  • 25.JPG
    25.JPG
    397.3 KB · Views: 135
  • 24.JPG
    24.JPG
    255.2 KB · Views: 120
Last edited:
Waterfall is next. Basic mix of Plaka paint Light Blue and Green to get started.
 

Attachments

  • 16.JPG
    16.JPG
    187.8 KB · Views: 102
This is the first basic coat painting the waterfall.
 

Attachments

  • 17.JPG
    17.JPG
    219.8 KB · Views: 101
To paint the steaming boiling water of the falls I decided on Gouache paint White since this gives the purest and strongest white.
 

Attachments

  • 18.JPG
    18.JPG
    137.1 KB · Views: 96
I used some green watercolour for the "deeper" ends of the waterfall and started to paint some of the small details such as the two rocks that look outside the watercurtain. Now since I had to paint various coats there was the need to shield the allready painted areas against more Watercolour or Gouache. I did this by applying a coat of Matt Varnish. This works surpriseingly well. The paint under this coat of varnish is now waterproof, use Matt Varnish to give your waterbased colours a better grip. Gloss or Semi Gloss have much too much surface tension and will not allow for additional waterbased colour to be added as a next coat.
I was not really busy doing a lot of photographs while painting the waterfall, since it proofed rather tricky to get the shades and highlights right. So I had to go back and forth with my paints to get it look allright.
 

Attachments

  • 19.JPG
    19.JPG
    139.2 KB · Views: 98
Do not forget the edges of both of the resin scenic pieces. I painted mine in black but I guess the colour to choose is a poor matter of taste
 

Attachments

  • 26.JPG
    26.JPG
    175.7 KB · Views: 102
When I finished painting the scenic pieces I made sure that all sides where painted black - do nont forget the lower bottom.
Afterwards I used some epoxy resin glue to join both pieces. There was no problem in doing so the parts fit together very well - no problem here at all.
 

Attachments

  • 28.JPG
    28.JPG
    123.5 KB · Views: 78
  • 27.JPG
    27.JPG
    180.9 KB · Views: 99
Just to make sure - I put two pieces of tape to the back of the resin pieces while the glue was drying. This only takes a couple of seconds to attach and will aid the process of glueing the pieces together at an right angle.
 

Attachments

  • 29.JPG
    29.JPG
    118.8 KB · Views: 94
Time to start on the figures now. Clean up comes first.
Again, no problems here at all, this pair is a most interesting casting judged by the shape of the figures - must be difficult to cast.
 

Attachments

  • IMG_1320.JPG
    IMG_1320.JPG
    259.8 KB · Views: 105
Looking at those two figures you are fettling there Wolfgang - are you sure they aren't new contendors in "Strictly Come Dancing"????:D jb
 
Rather than putting too much attention on how I painted the figures I thought some members might find it interesting to get a new idea on how to handle the figures dureing painting. Anyway this is my olfficial excuse for not takeing enough Step-by-step pics dureing painting.

I had this idea of creating some kind of a stand (as you can see there is none casted on) when I had the figures prepared and ready for the first coat of primer. I had some surplus 2part Silicone rubber which I do not need anymore at hand. It is the kneadable version and you can buy this stuff rather cheap at your local dental supply.
 

Attachments

  • IMG_1323.JPG
    IMG_1323.JPG
    161.5 KB · Views: 96
Mix both parts and you get a pliable silicone compound that will evetually set hard and keep the shape of whatever you formed with it. I created a stand which securly held the figures in place and which acted as the thrird hand dureing painting.
 

Attachments

  • IMG_1322.JPG
    IMG_1322.JPG
    115.3 KB · Views: 85
Now since you loose acces to some parts of the figure (or object) you want to paint it is important to have two stands of each object - one upright and the other "downright".
Look at the pictures and you'll see what I mean.
 

Attachments

  • IMG_1324.JPG
    IMG_1324.JPG
    136.6 KB · Views: 111
Black Gesso as primer was the first coat used. Haah -- no paint on my fingers on this one.
Please compare pictures.
 

Attachments

  • IMG_1341.JPG
    IMG_1341.JPG
    135 KB · Views: 85
  • IMG_1325.JPG
    IMG_1325.JPG
    133.6 KB · Views: 80
  • IMG_1336.JPG
    IMG_1336.JPG
    160.1 KB · Views: 80
  • IMG_1337.JPG
    IMG_1337.JPG
    156.5 KB · Views: 80
Could I have done without it ? You know the answer but it was still fun to try out and especially while doing the "Glossing" with solvent based laquer it really proofed to be rather handy ...---{sm3}{sm4}{sm4}
 
Now I was taken away painting those gentlemen. I had to correct my original paint sheme from time to time, but I had a lot of fun dureing the painting process. As for colours I used Gouache and Acrylic paints. Don't know what made me doing that since I intended to use only Plaka paints in order to demonstrate what I had written about these fine paints earlier on. But I ran out of light brown so I used acryllic instead, than this nice reddish-brown Gouche colour and little of this and that here and there and ended up with the figures being ready painted and not one picture taken - sorry. Anyway here is the result and I am NOT really happy with it.
regards
Wolfgang
 

Attachments

  • IMG_1421.JPG
    IMG_1421.JPG
    144.5 KB · Views: 122
  • IMG_1420.JPG
    IMG_1420.JPG
    181.8 KB · Views: 117
Now finally for the FUN part - GLOSSING IT ALL UP - I use
my current No. 1 favourite SOLVENT BASED gloss Plaka laquer to do this job. It dries rather quickly and gives the models a real nice shine. One thing to bear in mind Gouache likes to suck up the first coat of laquer. But you will be rewarded with a very nice shine on such very bright Gouache colours after a 2nd or 3rd coat of laquer.
Kind regards
Wolfgang
:)
 

Attachments

  • IMG_1430.JPG
    IMG_1430.JPG
    174.3 KB · Views: 138
Looking at those two figures you are fettling there Wolfgang - are you sure they aren't new contendors in "Strictly Come Dancing"????:D jb

Hi,
yes they certainly made me dance when I tried to paint Mr. Holmes hat and trousers lacking any previous Tartan-Painting-Experience - but I honestly like the animation of this pair a lot...
regards
Wolfgang
 
Now - finnished. Due to the shape of this model there are endless possibilities from which angle to photograp.
But most important it simply looks great in our glass cabinet.
These pictures are taken useing cold flashlight
Regards
Wolfgang
 

Attachments

  • IMG_1424.JPG
    IMG_1424.JPG
    160.4 KB · Views: 111
  • IMG_1425.JPG
    IMG_1425.JPG
    151.9 KB · Views: 102

Users who are viewing this thread

Back
Top