1/72 aircraft canopy- advice needed. (1 Viewer)

Hazebrouck

Sergeant
Joined
Aug 30, 2010
Messages
622
Looking for some advice from the aero modellers.

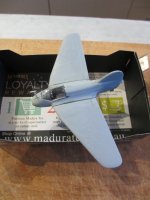
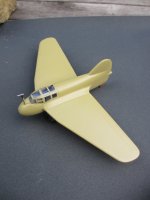
I am working on a little German experimental jet (DFS-194) in 1/72 made by PM. The canopy is very thin and the frame lines are etched flat into the moulding and are difficult to see. I normally hand paint canopy frames (most have raised detail) and glue with PVA after painting the body of the plane. I am a bit wary of making a mess of the canopy hand brushing, however with the lack of raised frame detail it looks difficult to mask with tape accurately either.

Gut feeling is to mask canopy, glue in place and paint (airbrush) in one go. Hoping that PVA might close up the small gaps around the canopy as well.

Any thoughts?
 

Attachments

  • IMG_3802.jpg
    IMG_3802.jpg
    94.5 KB · Views: 143
  • IMG_3800.jpg
    IMG_3800.jpg
    77.7 KB · Views: 138
I always mask the canopy and use airbrush. I did hand painted before but the result did not come out very nice. Your model looks to be a very nice one after painted.
 
You could also try cutting masks with Dymo tape, the tape stock used in old-school label makers, using those to scribe the panel lines a little deeper, enough to be able to paint. But in Braille scale, that is going to be a fiddly afair, requiring the OptiVisor and a steady hand. Otherwise, I'd mask it, glue it in place--you could use white glue, or you could use glue for styrene, too. I use both, depending on the fit of the canopy to the fuselage. White glue is good for filling gaps. Glue it in place, and then paint the aircraft. I mentioned to mask it first, because I find it easier to do this when the canopy is still unattached.

If you think this canopy is bad, you should see the old Aoshima Buffalo kit that I have. The canopy was engineered with a sprue gate inside, right over the pilot's head. I'm going to try grinding it out, then polishing with polishing pads, and dipping it in Future, but boy, who designed the die for this one?

Prost!
Brad
 
Thanks Brad and CNQ.

Aoshima were regarded as good kits in their day!

Bought some Tamiya tape and spent an our or so cutting and fitting fiddly masks and the canopy developed a crack on its rear edge whilst doing so. Nonetheless glued in place with white glue and will see how it turns out when sprayed. An aftermarket canopy for this kit would be good.

What is "future" by the way?

Scott
 
Scott,

Future is a floor care product that is used to protect Tile & vinyl floor and is also used for acrylic protection. It gives a shine/gloss finished.
You dip your painted canopy in it to protect the paint job, and use it to make the gloss finished on your model before decal job. This Future
is sold in all hard ware store. It also goes by the name "pledge" which is the same product. I use it on all my models before decal job.
 
...What is "future" by the way?

Scott

As cnq said, it's an acrylic floor polish, or as we used to say, floor wax. It's made by SC Johnson & Co. Through several combinations of labels with other productions in their line, the name has changed a couple of times recently, and here, it's currently called "Pledge with Future Shine". Here is a link to a page at Matt Swan's website, where he reviews the history of the product, and the various names for the same thing around the world:

http://www.swannysmodels.com/TheCompleteFuture.html

Also as cnq noted, we use it as a gloss coat before applying decals--the smooth surface helps reduce the chance that air gets trapped in tiny surface imperfections, causing silvering. And we use it to dip clear parts. Again, it fills tiny scratches in the surface of the parts, making them much clearer.

It can be applied with a brush, as I do on my toy soldiers, or with an airbrush. And when applying with an airbrush, it can be applied straight from the bottle, or cut with other liquids, like water for thinning it, or in combination with things like Tamiya matte, to produce a range of finishes from gloss to semi-gloss, or even matte.

If you have a clear piece that has been damaged, whether it's scratched, or if you get glue on it, you can use fine sandpaper and then polishing pads to buff out the damage, then dip it in Future, and restore the piece to its original look.

I like the fact that it's a cheap alternative to buying gloss varnishes from the hobby suppliers; those products are invariably more expensive by volume. And one bottle will last for years. I bought the one I currently have back in 1990 or so, and it's still good.

Hope that helps, prosit!
Brad
 
If you wanted the panels raised I would suggest thin plastic card and adhere the shapes to the canopy. In that way you get a more realistic canopy and can paint them before they go on
Mitch
 
I used to use a brush-on masking liquid, but I can't remember the name, it was light blue and worked rather well. You'd paint it on, allow it to dry, paint over it and then peel it off easily.
And yes, "Future" is the way to go. It can be thinned and used in an airbrush too. I did an Arado 180 floatplane, which I wanted to look like it just landed, so it needed to look "wet". The Future even beaded up and dripped off the guy wires so realistically, even I was impressed with my work.
 
Thanks for the information about the floor polish, something I will try in the future:)

Have finished the little jet and went with masking the panels with Tamiya tape. Struggled with the masking and the crack in the canopy but probably better than hand painting, but mediocre at best- this little jet may end up as ceiling hanger.

Scott
 

Attachments

  • IMG_3819.jpg
    IMG_3819.jpg
    74.7 KB · Views: 87
The canopy looks good to me Scott. i can't wait to see it painted.
I stop building model planes for now since the weather is getting warm and I spend more time outside. I started on the Stuka 1:32 from Trumpeter last month but it will have to wait until the summer is over ^&grin.
 

Users who are viewing this thread

Back
Top