
You are using an out of date browser. It may not display this or other websites correctly.
You should upgrade or use an alternative browser.
You should upgrade or use an alternative browser.
A Gordon for Me (1 Viewer)
- Thread starter johnnybach
- Start date
johnnybach
Major General
- Joined
- Nov 24, 2010
- Messages
- 13,663
Thanks Konrad - but I keep explaining - I'm not really a collector - I'm just a painter who can't bear to part with them once they're done!^&grin
Does look nice though - I must admit. Just got to get it finished now - then I can concentrate on filling it up!
After that?????
Will just have to start losing desks I s'pose
But musn't start jumping fences until I reach them........
Does look nice though - I must admit. Just got to get it finished now - then I can concentrate on filling it up!
After that?????
Will just have to start losing desks I s'pose
But musn't start jumping fences until I reach them........
thebritfarmer
Moderator
- Joined
- Jan 29, 2008
- Messages
- 10,446
Thanks Konrad - but I keep explaining - I'm not really a collector - I'm just a painter who can't bear to part with them once they're done!^&grin
Does look nice though - I must admit. Just got to get it finished now - then I can concentrate on filling it up!
After that?????
Will just have to start losing desks I s'pose
But musn't start jumping fences until I reach them........
You've got carriages that need purchasing and painting !!

johnnybach
Major General
- Joined
- Nov 24, 2010
- Messages
- 13,663
You know too much! - And now I have just seen a Coronation Coach too. So, thats a Phaeton - Coach - Mounties Gun Team - Pipers on horseback - etcetera
Yup - filling it up is No Problemo!
Where will this all end? No use - need a bigger house................ unless I can take over La Commandante's sewing room....Hmmmmm....I wonder..............
"Darling..... I was wondering ........"
Yup - filling it up is No Problemo!
Where will this all end? No use - need a bigger house................ unless I can take over La Commandante's sewing room....Hmmmmm....I wonder..............
"Darling..... I was wondering ........"
johnnybach
Major General
- Joined
- Nov 24, 2010
- Messages
- 13,663
Finished it last night - and now have three empty shelves left for future projects. The current Gordon Highlanders are on the third shelf down - underneath the Marines and an empty shelf (gloat!). I need to dust the bottom two shelves now - as they are covered in fine sawdust. What a lovely feeling - now to catch up on some painting - or I may get chucked off the painting area!^&grin

johnnybach
Major General
- Joined
- Nov 24, 2010
- Messages
- 13,663
Rightho - back to the day job.
Below are the latest five Gordon Highlander musicians from the Military Band. After my brief layoff - to complete a shelf for them to live on ( and a few more for the future) - I am able to progress these. One advantage is that at least they were thoroughly dry from previous coats of paint - and much easier to handle. In front are the arms/instruments with French cuffs painted on (much easier to do this way, than when mounted on the figure - as usual). I ran out of red paint on my palette - but after an hour or two of concentration, I find it better to break - rather than press on with more paint from the tin. Tartan was overlaid with the distinctive yellow stripe of the Gordons first, of course. Red looks a bit ragged in places - but when dry I can tidy this up later by applying white - or red - as required.
Note the clear desk now - as the others completed are safely tucked away in their new home! - johnnybach^&grin
johnnybach
Major General
- Joined
- Nov 24, 2010
- Messages
- 13,663
Well, thanks gents - but I don't set out to be "quick" - in fact I've always thought that I'm a bit slow at painting. Don't forget, these five had the basic coats done before - and I just painted the yellow stripe and the red bits on some of them.
Also, these are numbers 20-25 of the thirty strong band, and what does happen - when you are painting essentially the same basic figure, over and over again. is that you get very familiar with doing them. You develop a methodical approach to painting them - and just know what to do next without stopping to think.
For example take the red parts.
I start with the small red dashes of paint on the headband - then the tip of the plume - next the thin line around the neck and down the tunic front (two parts actually). Then the trickiest bits around the skirt of the doublet - with the fine lines of the flaps and button slashes. Then comes the sporran - five tassels and the small curve around the top - then the easy socks. Red done!
Note that I might have to return to the fine lines later (next day) to tidy up - but thats it. Also that I'm working from the top down nearly always, as there's less chance of smudges that way. I'll do faces/hair next - then I can think about getting the arms completed (hands & instruments) before fitting them on - and getting the "wings" sorted out for each one.
Same order and method each time - so I suppose it gets quicker - johnnybach
johnnybach
Major General
- Joined
- Nov 24, 2010
- Messages
- 13,663
A bit more head-work done on these now and others had some more work done with the red paint. One sporran needs another coat of Ivory, before the tassels are added. I have decided to attach the arms of the cymbalist to one figure. I gave him a bit of a flourish with the cymbals - so arms are well out of the way of the tunic now. He looks better than the other cymbalist - who I thought looked less animated - so I did more work on this one, to get the arms up more ( took a bit more off the shoulder area with a file - to make them fit better this way).
Whilst these are drying off - I'll develop the basic uniform colours for the last five of the original thirty. Always gets a bit more exciting when coming to the last few figures of a big band! johnnybach

Whilst these are drying off - I'll develop the basic uniform colours for the last five of the original thirty. Always gets a bit more exciting when coming to the last few figures of a big band! johnnybach
Dragoon
Command Sergeant Major
- Joined
- Apr 27, 2005
- Messages
- 2,282
JB, I got up early this morning to read through this entire thread. Love your creativity for finding solutions for missing parts, uniform details and new arm positions!
Found it all very inspiring, and I'm looking forward to getting out the bone saws, files and epoxy putty this weekend to give it a go. Thanks so much for posting - Ken
Found it all very inspiring, and I'm looking forward to getting out the bone saws, files and epoxy putty this weekend to give it a go.
Thanks so much for posting - Kenjohnnybach
Major General
- Joined
- Nov 24, 2010
- Messages
- 13,663
Wow - that's a fair bit of reading to do - so I admire your fortitude. A lot of what I've been doing is repetative stuff - but yes - along the way - the odd snag has arisen - but that's just a challenge! I suppose its always like that when you are trying to make something up from pretty basic castings - to appear as something you have seen in a book and read further on elsewhere. In this regard - I have also been helped along by a sympathetic castings provider - who helped enormously with advice on my choice of castings (Giles Browne of Dorset Soldiers).
I know there will inevitably be some errors along the way - as - after all - I'm not making historically accurate miniature figurines - I'm going for what I like - which is something like "Best Britain's Toy Soldiers" - in a glossy finish - yet I like to get them more or less accurate wherever I can - and therein lies yet another part of the fun of it all. Also - the help and encouragement that I have received - and still am receiving, is nothing less than heart-warming from forum members - so I try to give some back - where I can.
I'm very glad you are yet another willing to "have a go" once again. I have been reading elsewhere on this forum, quite a few grumbles about the price that ready-mades are reaching now - which I simply find difficult to understand when castings like mine have come in at less than £3 each - which is about $5(US) or so. Shows where the major costs involved with production lie I suppose. Okay - you have paint, brushes, glue milliput etc, to buy too - and put a fair deal of thought into the project - but that for me is the start of the joy of it all. I can't see for the life of me, where the fun is in just buying them, superb though many of the latest products are. I do very occasionally get tempted enough to buy the odd one - but its nothing like the pleasure of making some up yourself.
As to the " I can't paint for toffee" arguments - well, neither could I when I started, ( some might say " You can't now!"). But with a bit of perseverance - even downright copying the style of some other folks' work ( in my case - of both Obees work, and Wm Hocker that they so kindly share on their web-sites), and anyone can improve. ( A wise man starts with the chepest plastic model to practice on!) Okay, I'm not the best - and maybe never will be now that I'm knocking on a bit. But the sheer pleasure I get from doing what I do - I just find difficult to explain - and they are not too bad! (well, okay for me to play with!).
Good luck with whatever you decide to try Ken - if you get half as much pleasure from it as me - it will be worth it - and just think of all the other castings you can buy with the bucks you save!
When you have finished - and are comfortable with doing it - lets have a peek at what you've made. All the best - johnnybach.^&grin
johnnybach
Major General
- Joined
- Nov 24, 2010
- Messages
- 13,663
With the pic below, I have tried to show how a figure progresses at this stage. On the right - see the hands and instrument have now been painted on both Cornet players. The other three have the same - but arms are now fitted on. The last of the trombonists has the same - but also his wings have been fitted to the shoulders - and as yet - are unpainted. So this is yet another area where an order of doing things comes into play. By now I am very used to it - so should be done much quicker than the earlier figures, where I was still learning which was the best way to do it.

johnnybach
Major General
- Joined
- Nov 24, 2010
- Messages
- 13,663
I have just turned the trombonist to show his left arm. Remember this was the one that gave me trouble - so needed a hole drilled to fit the arm to a post. This has yet to be filled , sanded and painted over - but you can see that it now fits well and has the wing glued on neatly. I will wait for all to set, before attempting any more work on this piece yet.
The bassonist behind, will need the paint gently scraped off the shoulder - before a wing is fabricated and glued to his shoulder too. jb

The bassonist behind, will need the paint gently scraped off the shoulder - before a wing is fabricated and glued to his shoulder too. jb
johnnybach
Major General
- Joined
- Nov 24, 2010
- Messages
- 13,663
Hi Jeff - thanks - I think it was Scott's suggestion that I might try to show how I do a largish group - so I agreed to have a go. I found it a bit tricky at first, because I had never shown anyone what I do before - let alone by this Internet means - and I had to learn a lot too. Like, how La Commandante's camera worked - and then how to post pictures on Photobucket ( and get 'em back again!). It also takes a bit of thought whilst you are painting, of what and how you are going to show what you are doing.
However, now I'm into the swing of it, it is okay and not so much of a chore anymore. I just hope that it is doing what I set out to show - which is how I dream up a project, research what's required - then DO it. There's bits and pieces of modification required of course, but mainly it's painting - and I hope that what I'm showing is the way I have developed painting them my way, and in the style that I like best.
I think there is also a bit of a hidden agenda with me too, as I'm always trying to encourage people to have a go at making up castings into Toy Soldiers - simply because I enjoy doing it myself so much - as well as the other benefits such as saving tons of cash - and building up a tidy collection at the same time. After a while you also get to the point where if you see something you fancy, you start thinking "Now how can I make that up?" - and you're off on another project before you know it. Wandered off a bit there - never mind:smile2: .... Cheers Jeff - johnnybach
johnnybach
Major General
- Joined
- Nov 24, 2010
- Messages
- 13,663
Latest five musicians are shown again below. Three have had their "wings" fabricated and added - and I have turned these to show the wings better, all still unpainted as yet. Both Cornet players have now had their arms/instruments firmly glued in place. Both of these need to have their arms set a bit more firmly, as I have a bit of infill with milliput to do with the arms before making and fitting wings. I thought I would show them this way, so you can see them from a slightly different angle.
Again, these arms and instruments were not intended for these figures - hence the need to fill in some small gaps (which you can't really see - as they are under the armpits) - but I want a really firm fit for them.
I might dish out some NCO stripes to some of these - I've been a bit stingy with promotions lately!:smile2: johnnybach
trooper
Command Sergeant Major
- Joined
- Aug 15, 2007
- Messages
- 2,173
johnnybach
Major General
- Joined
- Nov 24, 2010
- Messages
- 13,663
Four or six? - four or six? - what's it to be?
Well - I was always taught that six of the best - was good for you - so I think that's what it will have to be.
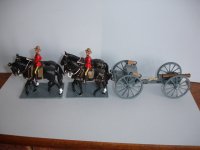
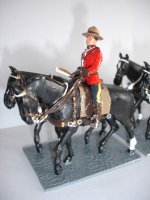
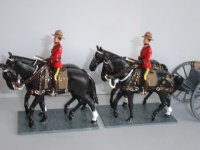
However, I still have this project to finish - A load of Canadian mounted bagpipers and drummers to collect around the end of this month, and about 50 or so Napoleonic troops in my "stash" who have been on hold for the last eight months to finish off - before I get to these! On top of that I have ordered a bi-plane and another load of goodies from Dorset - oh yes - and a Crusaders Chess set!!
Man! - I just can't keep up with the projects being thrown at me! And people are now accusing me of being " Quick!!!!!" ME - QUICK! " La Commandante is larfin' her socks off!".
Seriously - I love them - and I will have them - but probably around October/November-time. I have NEVER had so many castings hanging around in my "pending" drawer (should say drawers - as they have overflowed - and I don't like rushing painting - as it always shows.
So thanks chum for showing me - they will go with my band superbly - and I promise to show them once I have finished them - but not just yet!
Mind you - they are more than nice - so the French Dragoons could wait a bit longer, I s'pose. Hmmmm......
I will just have to see when I can fit them in..........
"NURSE -- The screens - I need a lie down!" You naughty Trooper, you!
Well - I was always taught that six of the best - was good for you - so I think that's what it will have to be.
However, I still have this project to finish - A load of Canadian mounted bagpipers and drummers to collect around the end of this month, and about 50 or so Napoleonic troops in my "stash" who have been on hold for the last eight months to finish off - before I get to these! On top of that I have ordered a bi-plane and another load of goodies from Dorset - oh yes - and a Crusaders Chess set!!
Man! - I just can't keep up with the projects being thrown at me! And people are now accusing me of being " Quick!!!!!" ME - QUICK! " La Commandante is larfin' her socks off!".
Seriously - I love them - and I will have them - but probably around October/November-time. I have NEVER had so many castings hanging around in my "pending" drawer (should say drawers - as they have overflowed - and I don't like rushing painting - as it always shows.
So thanks chum for showing me - they will go with my band superbly - and I promise to show them once I have finished them - but not just yet!
Mind you - they are more than nice - so the French Dragoons could wait a bit longer, I s'pose. Hmmmm......
I will just have to see when I can fit them in..........
"NURSE -- The screens - I need a lie down!" You naughty Trooper, you!
johnnybach
Major General
- Joined
- Nov 24, 2010
- Messages
- 13,663
The last two - Cornet players - have now had their wings added to the shoulders. Just to remind you what they are made of - I have shown the foil "pill" blister pack with the corners cut off. Two corners give what look remarkably like a small nail clipping (see a spare between the feet of the front pair). When carefully bent to shape ( between mark 1 thumb and forefinger) they make a wing. Carefully scrape off a bit of paint - add a smear of super-glue - and using a pair of tweezers liberated from some old medicine chest - carefully place the new part in position. Hold for a few seconds and slide gently to re-position - if required - and another one bites the dust! A bit fiddly, this part.
[This material also makes good belts, webbing and horse reins, by the way, and cuts easily with small sewing scissors - but don't tell La Commandante!]
Tomorrow - a swipe of filler goes in between wing and shoulder of the figure ( I have found it easier to use than milliput) - let dry - tidy up - and ready for a spot of paint - just like the trombone player has had done at the rear.
No expense spared for materials here! Ha!^&grin - johnnybach
Users who are viewing this thread
Total: 2 (members: 0, guests: 2)