
You are using an out of date browser. It may not display this or other websites correctly.
You should upgrade or use an alternative browser.
You should upgrade or use an alternative browser.
Battle for Arnhem.... (31 Viewers)
- Thread starter panda1gen
- Start date


panda1gen
Colonel
- Joined
- Jul 29, 2005
- Messages
- 8,474

panda1gen
Colonel
- Joined
- Jul 29, 2005
- Messages
- 8,474


panda1gen
Colonel
- Joined
- Jul 29, 2005
- Messages
- 8,474
Re: battle for arnhem....
http://www.pegasusarchive.org/arnhem/frames.htm
Moving along the lower "Lion" Route, Lieutenant-Colonel John Frost's 2nd Battalion did not experience the heavy opposition that the rest of the 1st Parachute Brigade had encountered. Krafft did not have enough men to completely screen Arnhem from the British and so he had based his defence between the Railway line and the Utrechtseweg, leaving the river road undefended but for the light patrols of his reconnaissance units.
Opposition was still encountered, but Major Tatham-Warter's "A" Company, who had been given the lead, cut their way through this with great speed and skill. They had barely left the drop zones before Lieutenant McDermont's No.3 Platoon ambushed a convoy of lorries, likely carrying the reconnaissance troop of Battalion Krafft's No.2 Company, killing and taking prisoner the thirty Germans inside them. In the woods beyond, "A" Company were attacked and lightly mortared by minor opposition, but these were immediately put to flight when Lieutenant Grayburn's No.2 Platoon charged the position under the cover of a smokescreen.
In Oosterbeek the Battalion received an ecstatic reception from the local Dutch people, who dashed out in all their orange paraphernalia to greet the paratroopers and thrust all manner of food and drink upon them. Officers and NCO's politely prevented them from inadvertently halting the advance, although the sound of gunfire ahead persuaded most to return to their homes.
The tasks assigned to the 2nd Battalion were considerable. Not only did they have to reach the Bridge and capture it, but they also had to seize the Railway Bridge, four miles to the west of Arnhem, and a small Pontoon Bridge in the town itself. "C" Company split-off from the Battalion in Oosterbeek and headed to the Railway Bridge; their intentions were not merely to capture it, but also to cross to the other side of the Rhine so that they would be in a position to attack the southern end of Arnhem Bridge, enabling the Battalion to comfortably secure both ends.
With No.8 Platoon providing covering fire and laying down a smokescreen with the Battalion's mortars, Lieutenant Barry's No.9 Platoon began their advance on the bridge in good order. The ground that they had to run across, however, was of a considerable distance and completely devoid of cover, and the Bridge itself was no small structure; so much so that the Platoon had only just reached it when, out of breath, they came to a halt for a few moments and crouched down in case of enemy fire. It was most fortunate that they did this because, moments later, the centre span of the bridge was demolished by a troop of Battalion Krafft; the Platoon's attacking section would have surely been wiped out had they continued, but in the event nobody was hurt. A German sniper opened fire moments later, however, and succeeded in wounding Barry and killing another man. With no hope of salvaging anything from the situation, John Frost ordered "C" Company to withdraw and rejoin the rear of the Battalion's column, proceeding instead to capture a German Headquarters in Arnhem. Although there was to be no force on the opposite bank of the Rhine to capture the southern end of Arnhem Bridge, Frost was nevertheless a little relieved to have all of his rifle companies on the northern bank and not separated by the River.
As "A" Company drew near to Arnhem they suffered some casualties under the fire of an armoured car, which promptly withdrew when it observed an anti-tank gun being brought forward. The Company pressed on but was again halted shortly after, this time by a machine-gun position sited on an area of high ground known as Den Brink. To prevent the 2nd Battalion's vanguard being delayed by this menace, "B" Company were ordered to advance on Den Brink and clear it. Lieutenant Cane's No.6 Platoon began to move into position, but as they did so they came under fire from another machine-gun and Cane and three other men were killed with several more wounded. "B" Company fought their way onto Den Brink but were not able to clear it of the enemy dug in there. They were, however, able to keep them occupied until darkness fell, after which the troublesome machine-gun post could not observe the British troops moving in the streets below.
"B" Company slipped off Den Brink during the night and headed to the Pontoon Bridge, their own objective, located a mile to the west of Arnhem Bridge. Before they had left England, the Company had learned from aerial reconnaissance photographs that the centre span of the Pontoon had been detached and was moored alongside the riverbank. With no means of reconnecting it, the Company hoped to locate boats or improvise some other means of crossing to enable them to assault the southern end of Arnhem Bridge.
"A" Company entered Arnhem just as it was getting dark. Occasional light resistance was met but all comers were rapidly dealt with. Armoured cars began to appear sporadically in an attempt to hinder the advance, but rather than become bogged down in tackling these, Major Tatham-Warter chose to side-step them by moving his men through houses and back gardens in order to avoid unnecessary confrontation. Frost himself used this method; on one occasion marching the entire Battalion through the rear of a house and out of the front door into the street beyond, much to the displeasure of the owner.
"A" Company arrived at the northern end of Arnhem Bridge at 19:30 and proceeded to occupy positions on either side of the ramp. They were very pleased with themselves, having killed or captured one hundred and fifty Germans en route at the cost of a single man killed and a small number wounded. Lieutenant-Colonel Frost had been worried that by the time his Battalion had reached the Bridge the Germans would have destroyed it, but he was most satisfied to arrive and find that it was intact and now under his control. Various German commanders had called for at least some of the vital Bridges in the Market Garden area to be destroyed to put an end to the Operation there and then, however Feldmarschall Model insisted upon leaving them undamaged as he had plans to use them to stage a counter-offensive of his own.
"A" Company made two attempts to capture the southern end of the Bridge during the night. The first was a token effort mounted by a vanguard of just seven men, but when these encountered German soldiers on the Bridge they had to fall back as their numbers were insufficient for the purpose. Lieutenant Grayburn's No.2 Platoon attempted a more substantial effort, but they came to an abrupt standstill and suffered eight wounded when a machine-gun opened fire from a pill-box position at point-blank range, later joined by the fire of an armoured car from the other end of the Bridge. Further attempts to cross were rendered impossible when Royal Engineers attempted to silence the pill-box with a flame-thrower and their aim fell wide and set fire to several huts alongside. This turned out to be an ammunition and petrol store, and the subsequent explosions set fire to the paint-work on the Bridge, which continued to blaze throughout the night. Some time later, several German lorries attempted a nervous crossing of the burning Bridge, only to add to the inferno when they were destroyed by heavy fire from the paratroopers dug-in ahead of them. Needless to say, a further assault was now impossible; not only was the whole area lit up as if it were daylight, but the heat from the fires was immense, rendering the Bridge unapproachable.
Although he had little idea of what was happening elsewhere, Lieutenant-Colonel Frost understood that resistance in the Arnhem area was a great deal stronger than briefings had led them to believe, and he therefore sent out a radio message asking for assistance. Despite the poor performance of the radios, the 1st Battalion received it with perfect clarity. Lieutenant-Colonel Dobie was known to dislike his allocated task of capturing the high ground to the north of Arnhem, and he also recognised that resistance was becoming increasingly determined, making it ever more likely that his objective was unreachable. He therefore decided to ignore his orders and ordered his "T" Company to lead the way to the Bridge. The 1st Battalion kept moving through the night and did all they could to avoid the attention of the enemy, even switching off the engines of their Jeeps and manhandling them and their anti-tank guns silently past German patrols.
Resistance, however, continued to be encountered and casualties were increasing. By far the biggest problem were the small groups of men becoming lost in the dark after being delayed by such actions. With various parties coming under fire from snipers and isolated machine-gun posts, along the full length of the mile-long column, the Battalion gradually fragmented and it became easy for the Germans to mop up the stragglers. By morning, the 1st Battalion had lost contact with half of the five hundred and forty-eight men that it had taken into battle.
panda1gen
Colonel
- Joined
- Jul 29, 2005
- Messages
- 8,474
Re: battle for arnhem....
Thanks for the comments about the pics, but the web link says it all............
The pics are fantastic Panda, I must say, you know your stuff about the battle. Thank you for the spaceing on the story, saves the eyes.")
Thanks for the comments about the pics, but the web link says it all............
panda1gen
Colonel
- Joined
- Jul 29, 2005
- Messages
- 8,474
Re: battle for arnhem....
http://www.marketgarden.com/2010/UK/frames.html
MY MEMORIES OF ARNHEM 1944
Name: R.H. (Initials only by request)
Rank: unknown
Unit: Phantom (attached to: 2nd Parachute Battalion)
Regiment: 1st Parachute Brigade
I was attached to 2 para at the bridge as a member of the "Phantom" unit. I was to work with unamed members of the British and Belgian S.A.S and further our contacts with the resistence. These plans never got off the ground. There were other members of "Phantom" at Oosterbeek, they had the only full working radio link back to the UK. Like many others during Market Garden, transport drivers etc, our work could not be carried out so we pitched in with the true soldiers.

I left out the rest of this account, but you might want to read it yourself under the veterans histories on the above website.
http://www.marketgarden.com/2010/UK/frames.html
MY MEMORIES OF ARNHEM 1944
Name: R.H. (Initials only by request)
Rank: unknown
Unit: Phantom (attached to: 2nd Parachute Battalion)
Regiment: 1st Parachute Brigade
I was attached to 2 para at the bridge as a member of the "Phantom" unit. I was to work with unamed members of the British and Belgian S.A.S and further our contacts with the resistence. These plans never got off the ground. There were other members of "Phantom" at Oosterbeek, they had the only full working radio link back to the UK. Like many others during Market Garden, transport drivers etc, our work could not be carried out so we pitched in with the true soldiers.
I left out the rest of this account, but you might want to read it yourself under the veterans histories on the above website.
panda1gen
Colonel
- Joined
- Jul 29, 2005
- Messages
- 8,474
Re: battle for arnhem....
http://www.marketgarden.com/2010/UK/frames.html
MY MEMORIES OF ARNHEM 1944
Name: John Aitken
Rank: unknown
Unit: 7th (Galloway) Bn.
Regiment: Kings Own Scottish Borderers (KOSB)
I enlisted into the Army in Edinburgh, the year 1941. After induction I was posted to Cameron Barracks Inverness for my basic training. My first posting was to 7 KOSB at Kirkwall, in the Orkney Islands. The Battalion was part of the Orkney and Shetland Defence Force, to be used on coastal defence duties. I remember well, during this time and much to my embarrassment, that one of my tasks was to pick up the mail from the mainland every morning. This entailed traveling by boat and every day on this journey I was seasick, (much to the amusement of the children who made this same trip every morning as well and were never sick!)
Life was to change quite dramatically though when we were relieved from this quiet, boring, remote post and sent south to Woodhall Spa in Lincolnshire. We were to become a glider borne unit in Airborne Forces. It was 1943, the 1st Airlanding Brigade had lost two Battalions to the newly formed 6th Airborne Division and we were to join 2nd South Staffords and 1st Border Regiments in the reformed three Battalion Brigade. We did our training on Salisbury Plain and I believe that was where we paraded to receive our 'Red Berets'.
The training is all a bit sketchy now (50 odd years ago is a long time to remember) but I believe the initial glider training consisted of approximately 12 trips (26 men to a glider).

September 1944 and 'Operation Market Garden' was given the green light. We were ferried back and forward to the take off point about half a dozen times. (each time we were given a tot of rum).

Then came the big day, I believe the airfield we left from was called Brize Norton. Shortly after crossing the coast, we came under enemy anti-aircraft fire. The 1st Air-landing Brigade were in the lead in the 'Air Armada'. The only Airborne troops before us were the men of the Independent Company whose job it was to mark the landing and dropping zones. We were earmarked to land on the northern landing zone, LZ-S. Our initial task, along with the rest of the Air-Landing Brigade, was the defence of the dropping and landing zones for the second lift due to arrive the following day, Monday. 7 KOSB was allocated the defence of DZ-Y, (Ginkel Heath) a task which left the companies exposed and separated from one another, as well as the rest of the Division, by thick woodland. We were also nearer the German forces who eventually assembled on this flank of the landing areas. The Battalion was to lose two officers and thirteen men in their attempt to keep the area clear of Germans during the second lift.

When we finally cast off from our tug aircraft we arrived on the LZ in a text book landing. We disembarked rather sharply and saw some Germans running away from trenches which we immediately occupied. Almost straight away we came under fire and were more or less pinned down in these trenches for the next two days. During this period two of the lads in my trench were wounded by mortar fire, (Privates J. Boyle and Willie Cant). The scenario of these and the following days is, and always has been, very difficult for me to recall. This has obviously as much to do with the passage of time as anything else. When we eventually left the trenches we made our way to somewhere near Oosterbeek, taking up positions in (I believe it was a hotel or maybe a hospital) We held out there till our ammunition finally ran out and we were taken prisoner. I believe the whole exercise took between five or seven days, from landing to capture. My first POW camp was Limburg, a make shift camp, fully tented but with no toilet or washing facilities. We were there for approximately three months before moving on to another camp, at Halle (near Dresden). Whilst there we were made to clear the rubble from the bombed areas. This job we didn’t mind, as we occasionally came across a bombed tobacconist shop. We took cigarettes, etc but on returning to the camp, we were searched by the guards, who took most of the contraband back from us. They did allow us to keep a little for ourselves though. They were mostly old men and some were missing the odd limb. They really weren’t too bad at all though. One of the other, sadder, details that I remember being placed on, was the burying of the children who were killed in the air raids........a very sorrowful task!! We were on the move again, this time to a camp at Nuremberg. I remember we marched most of the way, being strafed a couple of times by our own aircraft, ( they obviously thought we were Germans). We remained there until we were liberated by the 'Yanks'. Great Guys! they couldn’t do enough for us! I returned home to a warm reception from the neighbours who thought I was some kind of hero - 'NUTS'. I was then demobbed but have a lot to remember!
My thoughts always go to all the lads who didn’t make it back, may they 'Rest In Peace'.
http://www.marketgarden.com/2010/UK/frames.html
MY MEMORIES OF ARNHEM 1944
Name: John Aitken
Rank: unknown
Unit: 7th (Galloway) Bn.
Regiment: Kings Own Scottish Borderers (KOSB)
I enlisted into the Army in Edinburgh, the year 1941. After induction I was posted to Cameron Barracks Inverness for my basic training. My first posting was to 7 KOSB at Kirkwall, in the Orkney Islands. The Battalion was part of the Orkney and Shetland Defence Force, to be used on coastal defence duties. I remember well, during this time and much to my embarrassment, that one of my tasks was to pick up the mail from the mainland every morning. This entailed traveling by boat and every day on this journey I was seasick, (much to the amusement of the children who made this same trip every morning as well and were never sick!)
Life was to change quite dramatically though when we were relieved from this quiet, boring, remote post and sent south to Woodhall Spa in Lincolnshire. We were to become a glider borne unit in Airborne Forces. It was 1943, the 1st Airlanding Brigade had lost two Battalions to the newly formed 6th Airborne Division and we were to join 2nd South Staffords and 1st Border Regiments in the reformed three Battalion Brigade. We did our training on Salisbury Plain and I believe that was where we paraded to receive our 'Red Berets'.
The training is all a bit sketchy now (50 odd years ago is a long time to remember) but I believe the initial glider training consisted of approximately 12 trips (26 men to a glider).
September 1944 and 'Operation Market Garden' was given the green light. We were ferried back and forward to the take off point about half a dozen times. (each time we were given a tot of rum).
Then came the big day, I believe the airfield we left from was called Brize Norton. Shortly after crossing the coast, we came under enemy anti-aircraft fire. The 1st Air-landing Brigade were in the lead in the 'Air Armada'. The only Airborne troops before us were the men of the Independent Company whose job it was to mark the landing and dropping zones. We were earmarked to land on the northern landing zone, LZ-S. Our initial task, along with the rest of the Air-Landing Brigade, was the defence of the dropping and landing zones for the second lift due to arrive the following day, Monday. 7 KOSB was allocated the defence of DZ-Y, (Ginkel Heath) a task which left the companies exposed and separated from one another, as well as the rest of the Division, by thick woodland. We were also nearer the German forces who eventually assembled on this flank of the landing areas. The Battalion was to lose two officers and thirteen men in their attempt to keep the area clear of Germans during the second lift.
When we finally cast off from our tug aircraft we arrived on the LZ in a text book landing. We disembarked rather sharply and saw some Germans running away from trenches which we immediately occupied. Almost straight away we came under fire and were more or less pinned down in these trenches for the next two days. During this period two of the lads in my trench were wounded by mortar fire, (Privates J. Boyle and Willie Cant). The scenario of these and the following days is, and always has been, very difficult for me to recall. This has obviously as much to do with the passage of time as anything else. When we eventually left the trenches we made our way to somewhere near Oosterbeek, taking up positions in (I believe it was a hotel or maybe a hospital) We held out there till our ammunition finally ran out and we were taken prisoner. I believe the whole exercise took between five or seven days, from landing to capture. My first POW camp was Limburg, a make shift camp, fully tented but with no toilet or washing facilities. We were there for approximately three months before moving on to another camp, at Halle (near Dresden). Whilst there we were made to clear the rubble from the bombed areas. This job we didn’t mind, as we occasionally came across a bombed tobacconist shop. We took cigarettes, etc but on returning to the camp, we were searched by the guards, who took most of the contraband back from us. They did allow us to keep a little for ourselves though. They were mostly old men and some were missing the odd limb. They really weren’t too bad at all though. One of the other, sadder, details that I remember being placed on, was the burying of the children who were killed in the air raids........a very sorrowful task!! We were on the move again, this time to a camp at Nuremberg. I remember we marched most of the way, being strafed a couple of times by our own aircraft, ( they obviously thought we were Germans). We remained there until we were liberated by the 'Yanks'. Great Guys! they couldn’t do enough for us! I returned home to a warm reception from the neighbours who thought I was some kind of hero - 'NUTS'. I was then demobbed but have a lot to remember!
My thoughts always go to all the lads who didn’t make it back, may they 'Rest In Peace'.
panda1gen
Colonel
- Joined
- Jul 29, 2005
- Messages
- 8,474
Re: battle for arnhem....
http://battlefieldsww2.50megs.com/st_elisabeths_hospital.htm
ST ELISABETH'S HOSPITAL ARNHEM
St Elisabeth's Hospital was the main medical facilitity on this side of Arnhem, and medical units from 1st (Airborne) Division quickly began to use it as the battle for Arnhem began.


16th Parachute Field Ambulance established itself here on 17th September, and wounded continued to be brought in while the confused battle for the ground around it raged.

The hospital remained in use until the end of the battle, and many Arnhem 'personalities' were treated here.
hospitalmarker01.JPG (136068 bytes) hospitalarnhem02.JPG (129340 bytes)
Airborne marker outside the hospital. Hospital facade.
The building was closed and turned into apartments in 2000, but retains its original facade. Outside is an Airborne Marker, and inside the main hallway, which is not always open, are several commemorative plaques.
http://battlefieldsww2.50megs.com/st_elisabeths_hospital.htm
ST ELISABETH'S HOSPITAL ARNHEM
St Elisabeth's Hospital was the main medical facilitity on this side of Arnhem, and medical units from 1st (Airborne) Division quickly began to use it as the battle for Arnhem began.
16th Parachute Field Ambulance established itself here on 17th September, and wounded continued to be brought in while the confused battle for the ground around it raged.
The hospital remained in use until the end of the battle, and many Arnhem 'personalities' were treated here.
hospitalmarker01.JPG (136068 bytes) hospitalarnhem02.JPG (129340 bytes)
Airborne marker outside the hospital. Hospital facade.
The building was closed and turned into apartments in 2000, but retains its original facade. Outside is an Airborne Marker, and inside the main hallway, which is not always open, are several commemorative plaques.
Attachments

Harrytheheid
Banned
- Joined
- Apr 19, 2007
- Messages
- 4,672
Re: battle for arnhem....
Kevin,
I don't know if this (and the previous post) came out of your head, but if it did then I'll tell you wot, your impression of an Arnhem vet is spot on.
Thanks
H
http://www.marketgarden.com/2010/UK/frames.html
MY MEMORIES OF ARNHEM 1944
Name: John Aitken
Rank: unknown
Unit: 7th (Galloway) Bn.
Regiment: Kings Own Scottish Borderers (KOSB)
I enlisted into the Army in Edinburgh, the year 1941. After induction I was posted to Cameron Barracks Inverness for my basic training. My first posting was to 7 KOSB at Kirkwall, in the Orkney Islands. The Battalion was part of the Orkney and Shetland Defence Force, to be used on coastal defence duties. I remember well, during this time and much to my embarrassment, that one of my tasks was to pick up the mail from the mainland every morning. This entailed traveling by boat and every day on this journey I was seasick, (much to the amusement of the children who made this same trip every morning as well and were never sick!)
Life was to change quite dramatically though when we were relieved from this quiet, boring, remote post and sent south to Woodhall Spa in Lincolnshire. We were to become a glider borne unit in Airborne Forces. It was 1943, the 1st Airlanding Brigade had lost two Battalions to the newly formed 6th Airborne Division and we were to join 2nd South Staffords and 1st Border Regiments in the reformed three Battalion Brigade. We did our training on Salisbury Plain and I believe that was where we paraded to receive our 'Red Berets'.
The training is all a bit sketchy now (50 odd years ago is a long time to remember) but I believe the initial glider training consisted of approximately 12 trips (26 men to a glider).
View attachment 13106
September 1944 and 'Operation Market Garden' was given the green light. We were ferried back and forward to the take off point about half a dozen times. (each time we were given a tot of rum).
View attachment 13105
Then came the big day, I believe the airfield we left from was called Brize Norton. Shortly after crossing the coast, we came under enemy anti-aircraft fire. The 1st Air-landing Brigade were in the lead in the 'Air Armada'. The only Airborne troops before us were the men of the Independent Company whose job it was to mark the landing and dropping zones. We were earmarked to land on the northern landing zone, LZ-S. Our initial task, along with the rest of the Air-Landing Brigade, was the defence of the dropping and landing zones for the second lift due to arrive the following day, Monday. 7 KOSB was allocated the defence of DZ-Y, (Ginkel Heath) a task which left the companies exposed and separated from one another, as well as the rest of the Division, by thick woodland. We were also nearer the German forces who eventually assembled on this flank of the landing areas. The Battalion was to lose two officers and thirteen men in their attempt to keep the area clear of Germans during the second lift.
View attachment 13107
When we finally cast off from our tug aircraft we arrived on the LZ in a text book landing. We disembarked rather sharply and saw some Germans running away from trenches which we immediately occupied. Almost straight away we came under fire and were more or less pinned down in these trenches for the next two days. During this period two of the lads in my trench were wounded by mortar fire, (Privates J. Boyle and Willie Cant). The scenario of these and the following days is, and always has been, very difficult for me to recall. This has obviously as much to do with the passage of time as anything else. When we eventually left the trenches we made our way to somewhere near Oosterbeek, taking up positions in (I believe it was a hotel or maybe a hospital) We held out there till our ammunition finally ran out and we were taken prisoner. I believe the whole exercise took between five or seven days, from landing to capture. My first POW camp was Limburg, a make shift camp, fully tented but with no toilet or washing facilities. We were there for approximately three months before moving on to another camp, at Halle (near Dresden). Whilst there we were made to clear the rubble from the bombed areas. This job we didn’t mind, as we occasionally came across a bombed tobacconist shop. We took cigarettes, etc but on returning to the camp, we were searched by the guards, who took most of the contraband back from us. They did allow us to keep a little for ourselves though. They were mostly old men and some were missing the odd limb. They really weren’t too bad at all though. One of the other, sadder, details that I remember being placed on, was the burying of the children who were killed in the air raids........a very sorrowful task!! We were on the move again, this time to a camp at Nuremberg. I remember we marched most of the way, being strafed a couple of times by our own aircraft, ( they obviously thought we were Germans). We remained there until we were liberated by the 'Yanks'. Great Guys! they couldn’t do enough for us! I returned home to a warm reception from the neighbours who thought I was some kind of hero - 'NUTS'. I was then demobbed but have a lot to remember!
My thoughts always go to all the lads who didn’t make it back, may they 'Rest In Peace'.
Kevin,
I don't know if this (and the previous post) came out of your head, but if it did then I'll tell you wot, your impression of an Arnhem vet is spot on.
Thanks
H
panda1gen
Colonel
- Joined
- Jul 29, 2005
- Messages
- 8,474
Re: battle for arnhem....
Harry - no it did not and I would not presume - I put the weblink in as this is where I have obtained the text, I am not plagerising!
I would encourage anyone to visit the websites through the link as the accounts are amazing.
You will be able to tell probably when they are my pathetic ramblings as there will be no link (unless I forget!).
Kevin,
I don't know if this (and the previous post) came out of your head, but if it did then I'll tell you wot, your impression of an Arnhem vet is spot on.
Thanks
H
Harry - no it did not and I would not presume - I put the weblink in as this is where I have obtained the text, I am not plagerising!
I would encourage anyone to visit the websites through the link as the accounts are amazing.
You will be able to tell probably when they are my pathetic ramblings as there will be no link (unless I forget!).
Harrytheheid
Banned
- Joined
- Apr 19, 2007
- Messages
- 4,672
Re: battle for arnhem....
Well, given the excellent commentaries that you add to your photos, I thought that you had made up the story yourself - that's why I commented that it was spot-on. Certainly wasn't suggesting that you'd copied the account, which as you say is pretty amazing.
Must get around to following those links, and thanks for posting them.
Cheers
H
Harry - no it did not and I would not presume - I put the weblink in as this is where I have obtained the text, I am not plagerising!
I would encourage anyone to visit the websites through the link as the accounts are amazing.
You will be able to tell probably when they are my pathetic ramblings as there will be no link (unless I forget!).
Well, given the excellent commentaries that you add to your photos, I thought that you had made up the story yourself - that's why I commented that it was spot-on. Certainly wasn't suggesting that you'd copied the account, which as you say is pretty amazing.
Must get around to following those links, and thanks for posting them.
Cheers
H

panda1gen
Colonel
- Joined
- Jul 29, 2005
- Messages
- 8,474


panda1gen
Colonel
- Joined
- Jul 29, 2005
- Messages
- 8,474
Re: battle for arnhem....
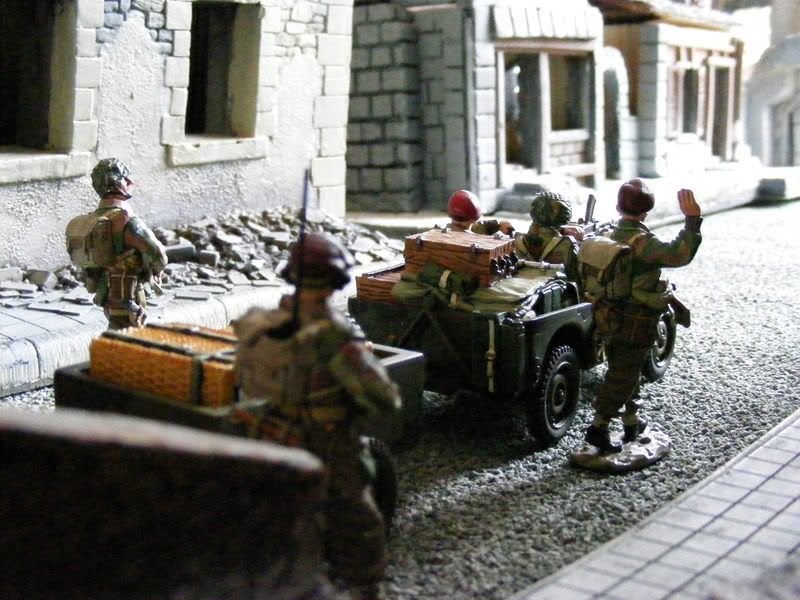
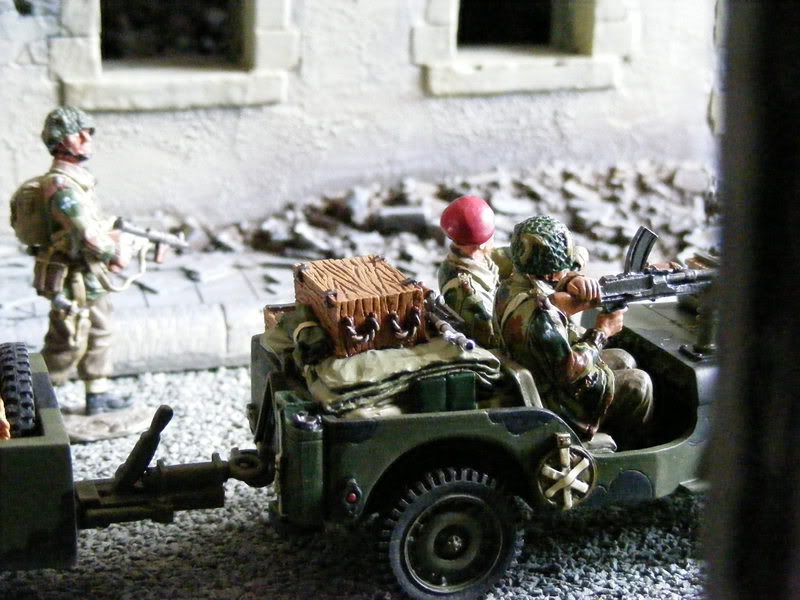
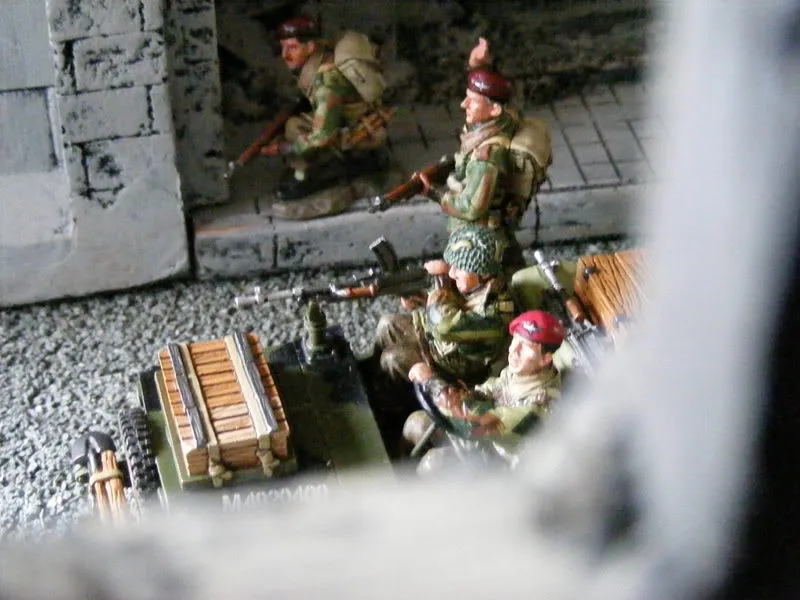
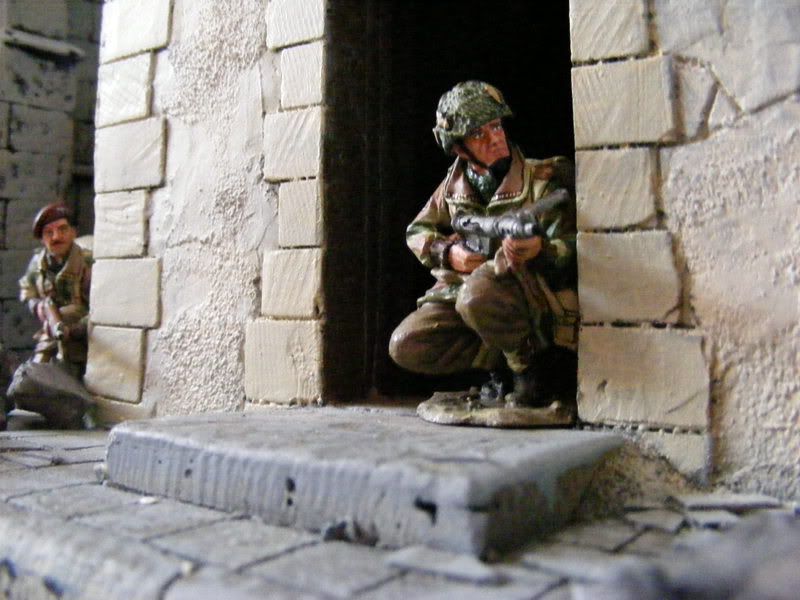
1st Battalion of the Parachute Regiment were still trying to reach 2 para at the bridge, but taking (and giving) heavy casualties in the confused street fighting ..............
1st Battalion of the Parachute Regiment were still trying to reach 2 para at the bridge, but taking (and giving) heavy casualties in the confused street fighting ..............
Attachments


Users who are viewing this thread
Total: 32 (members: 0, guests: 32)