
You are using an out of date browser. It may not display this or other websites correctly.
You should upgrade or use an alternative browser.
You should upgrade or use an alternative browser.
Battle for Arnhem.... (14 Viewers)
- Thread starter panda1gen
- Start date
panda1gen
Colonel
- Joined
- Jul 29, 2005
- Messages
- 8,474
panda1gen
Colonel
- Joined
- Jul 29, 2005
- Messages
- 8,474
Re: battle for arnhem....
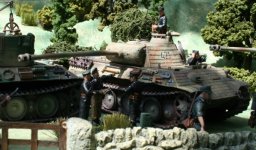
I like the HB stuff, it is different. I don't think the figures were as good as KC at that time, but they were very good against a general standard and 'different'. I liked the difference, especially in the Barkmann sets which had really good figures in my opinion.
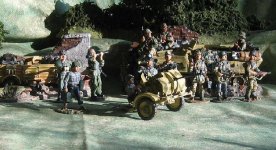
I enjoy shots like this for example, the panther is still the best around, the bergepanther supports it superbly and the figures are 'different', but really good - not as good as KC though IMO.
I like the HB stuff, it is different. I don't think the figures were as good as KC at that time, but they were very good against a general standard and 'different'. I liked the difference, especially in the Barkmann sets which had really good figures in my opinion.
I enjoy shots like this for example, the panther is still the best around, the bergepanther supports it superbly and the figures are 'different', but really good - not as good as KC though IMO.
Attachments
panda1gen
Colonel
- Joined
- Jul 29, 2005
- Messages
- 8,474
Re: battle for arnhem....
Thanks for the feedback and hope you enjoy the forum.
WOW! This is a brilliant thread. Beautifully executed photographs and excellent naration. Truly informative and enjoyable.
Thank you Panda for all you efforts. Well done!
Regards,
Wayne
Thanks for the feedback and hope you enjoy the forum.
arnhem44mad
1st Lieutenant
- Joined
- Sep 23, 2006
- Messages
- 4,665
Re: battle for arnhem....
I thought that might have been a beard
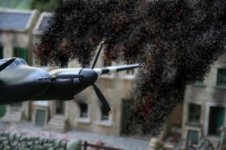
The campaign around Arnhem began with a number of low level precision bomb attacks on key installations.............here a Mosquito flies over a target hit by a leading aircraft.................
I thought that might have been a beard
panda1gen
Colonel
- Joined
- Jul 29, 2005
- Messages
- 8,474
Re: battle for arnhem....
I haven't figured out the special effects yet - can anyone help with drawing smoke????
I thought that might have been a beard
I haven't figured out the special effects yet - can anyone help with drawing smoke????
panda1gen
Colonel
- Joined
- Jul 29, 2005
- Messages
- 8,474
Re: battle for arnhem....
from http://www.defendingarnhem.com/SS-Pz-Gr-AuE-Btl-16.htm
The SS – Panzer-Grenadier Depot and Reserve Battalion 16 was originally a training and replacement unit for the 12th SS-Panzer Division ‘Hitlerjugend’. Under the designation of SS-Panzergrenadier-Ausbildungs und Ersatz-Battalion 12, it fed it last trained soldiers (2500 replacements) to the Hitlerjugend in August 1944. In September of 1944, the Allied Armies had advanced so fast through Belgium and Lower Holland that it became necessary to form a defensive line along the River Waal. This force was hastily made up of various Waffen SS and Wehrmacht units (some of them still under training) and inserted piecemeal along the Waal under the command of Gen.Lt Hans Von Tettau.
One of these training units was the SS – Panzer-Grenadier Depot and Reserve Battalion 16 which was taken from positions on the coast of Holland and brought under command of ‘Division’ Von Tettau as the divisional reserve. In September it was situated in the Oosterbeek area and had a strength of 13 officers, 73 NCOs and 349 ORs. Not only did it have its standard 3 Infantry Companies (numbered 2, 4 and 9) but also had its own integral HQ Defence Platoon, Anti-Tank Section, Flamethrower section, 2 x reconnaissance sections, a Heavy Mortar section and a Trench Mortar. This was a formidable force on paper under Von Tettau’s command especially against lightly armed airborne troops.
panda1gen
Colonel
- Joined
- Jul 29, 2005
- Messages
- 8,474
Re: battle for arnhem....
17th September 1944
Krafft’s unit was in the Oosterbeek/Arnhem area on the day of the landings. His 2nd Company was located at the Hotel Wolfheze providing security for Field Marshal Model’s Army Group B Headquarters. Battalion Headquarters, Bn Spt sections and the 4th Company were located only 2-3 kilometres away in Oosterbeek Hoog with the 9th Company located in Arnhem itself. With the Allied heavy preparation bombardments in the Arnhem-Deelen-Wolfheze area at 1130 h, the SS – Panzer-Grenadier Depot and Reserve Battalion 16 was placed on alert by its commander SS- Hauptsturmführer Krafft. Whilst the Germans were used to Allied attacks in 1944, Krafft had the intuition to have unit ready to move at short notice.
http://www.defendingarnhem.com/SS-Pz-Gr-AuE-Btl-16.htm
panda1gen
Colonel
- Joined
- Jul 29, 2005
- Messages
- 8,474
Re: battle for arnhem....
http://www.defendingarnhem.com/SS-Pz-Gr-AuE-Btl-16.htm
At around 1330 Krafft’s unit would have seen the Aerial Amanda approaching their positions which proceeded to drop the British 1st Parachute Brigade and 1st Airlanding Brigade between 1340 and 1430h. Krafft assumed quite quickly that the enemy landings were to capture the Arnhem Road Bridge and hold it until allied reinforcement from the south. In his after action report he says: “We know from experience, that the only way to draw the teeth of an airborne landing with an inferior force is to drive right into it. From a tactical point of view, it would be wrong to play a purely defensive role and let the enemy gather its forces unmolested”. This is exactly what he did. As the 2nd Company was approximately 1500m from the landings, Krafft send orders for this company to move into the attack without reconnaissance. The Company Commander did not know the precise location of the DZs due to the height of the trees in the area. In order to protect the company’s right flank, the OC 2 Coy deployed the Hvy Machine Gun Section to the North of Wolfheze which encompasses the area directly East of LZ ‘S’. Here the Machine Gun section engaged Gliders and soldier who were landing with deadly accuracy. The section engaged the enemy for 20 minutes before withdrawing back to Hotel Wolfheze due to fear of encirclement. The section claims to have hit 4 gliders and wiping out the troops inside and ‘causing great confusion amongst the enemy’.
At the same time the 4th Company and elements of the support sections started to arrive in the Hotel Wolfheze. Evacuated by FM Model only hours before, Krafft made this his new Headquarters in order to concentrate his efforts against the airborne troops. Krafft now deployed his two companies to block two possible routes into Arnhem – The Railway cutting and road running parallel (Route ‘Leopard’ – designed route for 1st PARA and Recce Sqn), and the Utrechtscheweg (Route ‘Tiger’ – designated route for the 3rd PARA). Krafft’s 4th Company was deployed north of Hotel Wolfheze which covered and had fields of fire down the railway line. A platoon (Zug Wiegand) was deployed on the far side of the railway line which covered the road that ran parallel to the railway line with the sole mission of right flank protection. The 2nd Company was deployed from the Hotel Wolfheze south along an extended line that reached the Utrechtscheweg. Here the company had the important task of holding the crossroads in order to block the British advance into Arnhem. Headquarters was located centrally at the Hotel Wolfheze where SS- Hauptsturmführer Sepp Krafft could control the battle quickly and effectively. Krafft deployed 2 x Anti Tank Guns at the Hotel and a third at the disposal of 2nd Company at the Crossroads. The Battalion Mortars were located 300 metres south of the Hotel which could cover all elements of the Battalion with the Battalion Flak Section located in the vicinity of the Hotel.
panda1gen
Colonel
- Joined
- Jul 29, 2005
- Messages
- 8,474
Re: battle for arnhem....
http://www.defendingarnhem.com/SS-Pz-Gr-AuE-Btl-16.htm
In his after action report, Krafft claims: “From maps found on a captured British DR, we discover that the enemy have two main lines of advance. One along the railway cutting and one in the direction of Hotel Wolfheze to the NW of Oosterbeek. To be forewarned is to be forearmed”. By 1530 hrs, only 2 hours from the landings and with this information at hand, Krafft had deployed all of his Battalion (including the 9th Company just arrived from Arnhem) in a defensive line that blocked two of the three approaches planned by the British 1st Airborne Division. The first part of the defensive line to be bumped by the British was North of the railway cutting held by ‘Platoon Wiegand‘. At 1540, Lt Bucknall’s C Troop of the Reconnaissance Squadron has crossed the level crossing and turned right and drove down the road that ran parallel to the Railway line. The leading section was ambushed by well sited German positions from the embankment and aside the track. Major Gough, the commander of the Reconnaissance Squadron moved back to the crossing and informed the Battalion Commander of the 1st PARA, Lt-Col David Dobie, that the planned axis of advance was blocked by German Troops and alternate route would need to be found. Dobie decided that he would move the battalion to the north and then turn east and move into Arnhem along the Amsterdamscheweg (Route ‘Leopard’).
panda1gen
Colonel
- Joined
- Jul 29, 2005
- Messages
- 8,474
Re: battle for arnhem....
http://www.defendingarnhem.com/SS-Pz-Gr-AuE-Btl-16.htm
Gough received orders from General Urquhart to disengaged and to reconnoitre forward of the other main routes into Arnhem. After two hours of receiving sustained accurate Machine gun and mortar fire as well as a number of causalities, the Squadron disengaged and moved back across the crossing into Wolfheze. The Glider pilots defending the East side of LZ ‘S’ took over the Recce Squadrons old positions. Krafft’s 9th Company reported to his headquarters at 1530h and remained for a time as Battalion reserve. After receiving reports that the British were moving north to south in front of their positions, Krafft ordered the 9th Company to provide a Platoon of Shock Troops that would push west into the British Line of advance to cause maximum disruption. At 1555 the platoon advanced between the 4th and 2nd Company and attacked the flanks of the British line of march. Even though the German shock troops sustained heavy casualties including the platoon commander and his successor, it had the desired effect of causing maximum disruption and delaying the British advance for a considerable time.
At 1715h the Stadtkommandant Arnheim, General Kussin arrived at Krafft’s Headquarters. This was around the same time the shock troops from the 9th Company returned from their attack. General Kussin receives the latest intelligence by Krafft and he asks of Krafft’s Battalion to show all endurance possible for the upcoming battle. He leaves via the same way he came, much to the reluctance of Krafft’s staff. A few minutes later, machine gun fire riddles Kussin’s staff car killing all 4 occupants. The vehicle had run into the lead platoon (Lt James Cleminson) of B Coy, 3 Para Bn. Now aware that the British were on his left flank, Krafft ordered the remainder of the 9th Company to move south in support of the 2nd company and protect the battalion left flank.
As the 9th Company started to move out, the British attacked the cross roads held by the 2nd Company. Suffering heavy casualties, the British took he crossroads and drove the 2 Company back. Now threatened with encirclement, the 9th company went into the attack to retake the crossroads. It had in support a Hvy MG section from 2 Coy, the Bn mixed mortar section (8 mortars), a flak gun and two 3.7cm Anti-tank guns. By 1740 h, the company attacked stabilising the German defensive line but could not advance any further towards the crossroads. With the British concentrating at the crossroads, the Hvy Trench Mortar was instructed to fire HE shells into the concentration. On the receiving end was Lt-Col Fitch’s 3 Para Bn who at the time was with General Urquhart who had come forward to urge his battalion commanders to move to the bridge regardless. The HE shells ripped into the majority of the battalion causing casualties including Urquhart’s driver and radio operator. The 9th Company’s attack had managed to get behind Urquhart and the 3 Para Bn and engaged them from the rear. However A Coy, 3 Para Bn under the command of Maj Mervyn Dennison went into the counter attack causing 20 German causalities and the loss of 18 prisoners and some Hvy Machine guns. The 9th Company had not succeeded in re-capturing the crossroads but had once again delayed the British advance into Arnhem.
By 1825h, Krafft was receiving enemy pressure along the whole of the battalion line. Krafft knew that he had to delay the British from advancing into Arnhem at all costs so High Headquarters had time to bring reinforcements into Arnhem. He decided to withdraw his battalion after dark and fight through to the East. With reports of heavy small arms fire 1 – 2 kilometres behind their positions, Krafft believed he had been completely encircled. Krafft’s SS-grenadiers were able to repulse estimated company attacks by 1 Para and 3 Para Bns on both flanks around 2000h. At 2100 the Battalion moved out under the cover of darkness moving in ordered file along the railway line. Krafft’s Battalion managed to overcome resistance along the route suffering only light casualties. The Battalion reached the Oosterbeek-Hoog Railway station and moved now under the railway bridge to the North. At 2230h, Krafft’s leading elements met up with Spindler’s Battle Group on the Amsterdamscheweg (Route ‘Leopard’). The SS – Panzer-Grenadier Depot and Reserve Battalion 16 had held up the British advance into Arnhem for 7 hours and had escaped encirclement by the British. At 2245h, Krafft’s Battlion comes under command of the SS Pz Dv ‘Hohenstaufen’. The Bn proceeds to Schaarsbergen to defend the North and North-West approaches.
panda1gen
Colonel
- Joined
- Jul 29, 2005
- Messages
- 8,474
Re: battle for arnhem....
http://www.defendingarnhem.com/SS-Pz-Gr-AuE-Btl-16.htm
18th September 1944
After a heavy days combat, Krafft’s battalion spends all of the 18th September reorganising and replenishing his command. The 2nd Company was detached to Kampfgruppe Moeller early in the morning to strengthen their infantry element attacking in the East. The rest of the battalion replenishes fuel, munitions and rations as well as preparing vehicle and weapons for the next engagement. Apart from some minor skirmishes and witnessing some more reinforcements arrive around 1500h; the day was quite uneventful for the unit. The veterans of the unit knew that the rest and relaxation would not last much longer.
panda1gen
Colonel
- Joined
- Jul 29, 2005
- Messages
- 8,474
Re: battle for arnhem....
http://www.defendingarnhem.com/SS-Pz-Gr-AuE-Btl-16.htm
19th September 1944
With the failed attempt by the British to reach their colleagues at the bridge signalled the German to take the offensive. The British withdrew into a perimeter within Oosterbeek with the Headquarters located at the Hartenstein Hotel. To close the Northern lid of this perimeter, Krafft was ordered to attack on a wide front from North to South. To achieve this, Kampfgruppe Krafft was formed with 642 Marine Regt, 1st Marine Cadre Regt, the 10th Company, 3rd Police Regt as well as his original unit minus 2nd Company. Attacking from the north, on the far right flank was the 1st Marine Cadre Regt, then the 642 Marine Regt and Battalion Krafft on the far left flank with 10th Company, 3rd Police Regt in reserve. Their first objective was to attack and capture the Ede-Arnhem Road driving the British back to the South with a final objective of capturing the wood 800metres to the South. The 1st Marine Cadre Regt was to keep in contact with Von Tettau’s units attacking from the west with Battalion Krafft in contact with Kampfgruppe Spindler.
At 1600 hrs the attack begins making some progress. Shortly after the attack begins, the British receive further supply drops on the left flank direct ahead of Battalion Krafft. The 4th and 9th Company move into attack and cross the road inflicting heavy casualties. However during the attack the 9th Company suffers heavy casualties including its commander, SS-Obersturmführer Leiteritz, who is killed due to “some bad luck with his tactics”. During the supply drop, the Battalion Krafft’s Flak section shoots down two aircraft. By the end of the night, Kampfgruppe Krafft had either captured or dominated by fire the Ede-Arnhem Road and had contacted the left flank of Division Von Tettau thus closing the pocket.
Attachments
panda1gen
Colonel
- Joined
- Jul 29, 2005
- Messages
- 8,474
Re: battle for arnhem....
20th September 1944
During the early hours of the 20th, elements of Kampfgruppe Krafft attacked the British positions without rest causing them to retreat south. By 0600 hrs, the British had withdrawn south over the railway line leaving only small pockets of resistance and the odd sniper to take care of.
By 0830 hrs, elements of Division Von Tettau had leapfrogged past so that parts of the Kampfgruppe were temporarily out of action. Krafft used this time to move his units around and reinforce areas within his line where he thought the British may try and breakout. The Marines have a hard time advancing due to the high sniper activity in the area. By 2200 hrs that evening, the Kampfgruppe had achieved must success in their area of operations. The British had withdrawn further to the south and the group had achieved all objectives set out. Because of the reduced size of the pocket, Kampfgruppe Krafft is relieved and sent towards Arnhem. The 4th Company leaves first at 2200 hrs with the task of reaching the Arnhem Railway Station. SS- Hauptsturmführer Krafft requests command of his original unit which is granted in the early hours of the next day.
Attachments
Users who are viewing this thread
Total: 15 (members: 0, guests: 15)