Bloody Tarawa (1 Viewer)

I 've started making some of my own Palm trees for my diorama, two down another dozen or so to go !
I've taken several ideas and mixed them together using off cuts of electric cable, which means you can make the tree pretty much how you want it. While not as nice as Harrie's Palm trees, mine work out pretty cheaply.
Roughly converting UK to US prices for the items needed I 'd say a 10" high one as the two I've done so far works out at about $5 each and most of that would be if you have to buy the cable !
Definitely faster doing the second one. First one took about 50 minutes all told, though you have to add some drying time on top, but then you get on with other things !

I'm pleased with the end result for the money, which I would much rather spend on figures !

Steve
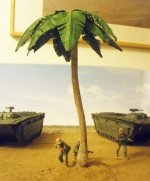
F.jpg
 
Nothing wrong with those trees, Steve. ;)

When you say ... " using off cuts of electric cable" ... I assume you mean like [12-2 Romex or 12-2 Romex style?]

What a the Palm leaves made from?

Looks good,
--- LaRRy
 
Steve you got the man, looks beautiful!πŸ‘πŸ‘πŸ‘πŸ‘
I like your sea water too! And Steve where are the Palm leaves made from?πŸ‘πŸ€”


Harrie
 
Hi guys

Here some pictures from the update tarawa diorama.
I have bought the KnC01 D DAY SHERMAN (thank you Andy was a great idea) I rebuild a few things. paint him.
Last week I got the background for the diorama. Now I have to paint the base in a sand color.
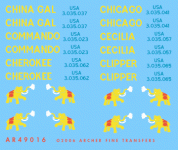
Hope get the Archer Fine Transfers 1/35 USMC M4A2 Sherman Tank Markings from C Company / 1st Marine Amphibious Corps at Tarawa on Saturday.
Then I can going to make the sea water


View attachment 221069

View attachment 221070

View attachment 221071

View attachment 221072

View attachment 221073

HarrieπŸ‡³πŸ‡±

I just was surfing the web and came across this website:

www.tanksontarawa.co

Tanks on Tarawa ... very interesting pictures and story about 1st Marine Amphibious Corps at Tarawa

--- Larry
 
Hi Guys

Thanks for the likes and comments Guys

Well, I typed up the instructions to making your own trees but because of this new sign in again after 9 minutes it was all lost for some reason.
I'll do it again this evening time permitting. Main instruction to follow is wrap trunk with masking tape from the top to get the lines right.

Larry I don't know the brand names but it was 16mm cable of the sort that goes between your fuse box and electric meter.

In the meantime
Here's some photos that you may be able to follow and figure out what I've done yourselves.

Steve


View attachment 221279View attachment 221280View attachment 221281View attachment 221282View attachment 221283
 
Third time Lucky !

So to run through the procedure for making a 10" high Palm tree. Higher or lower just add or subtract a bit.
I took a 16" piece of 16mm2 Cable, but reflecting on it 10mm2 would do just as well.
The cable I have is 7 core, so 7 fronds, extra ones are added.
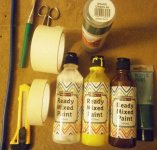
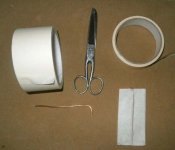
Photos show what you'll need.

Strip back PVC sheaths to expose copper inner cores 4" at top which will be the Palm fronds and 2" at bottom for the base.

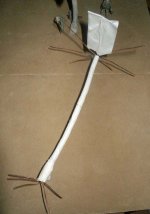
Starting at the top of the PVC sheath work you way down to the bottom winding the narrower of the two masking tape rolls creating the look of the sections on Palm trees (Thanks Gordon !) at the bottom wind several more layers to create the bulb like bottom of the Palm tree.

Splay the copper wire strands out fan like and stick masking tape over each strand as per photo. repeat for the rest of the fronds.
To add extra fronds, take a piece of wire approx. 4.5 " long and bend 1/2 " degrees to make the right angle. With these extra fronds I fond it easier to cut them to a leaf shape now. The fix them to the trunk under the already splayed wires with more masking tape wrapping just one piece per time as this helps build up the bulge at the top of the trunk.

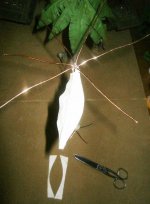
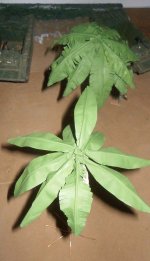
Cut leaf shape out of the masking tape as per photo these will be your fronds.

Now paint trunk Brown and undercoat fronds Green. Allow to dry.
Dry brush trunk a light sandy colour and paint the leaves you chosen shade of green. I used a spray can for this. Just using a brush does just as well.
Allow to dry.

Using scissors cut the leaves feather like to mimic Palm fronds.

Adjust your fronds to the shape you want and you're done !

Final tip use latex gloves when painting !

Steve


A.jpgB.jpgC.jpgD.jpgE.jpg
 
Steve you got the man, looks beautiful!��������
I like your sea water too! And Steve where are the Palm leaves made from?����


Harrie

Hi Harrie
Thanks for your words. Leaves are made from decorators Masking tape that I cut to shape, painted and then using scissors added the feather like effect of palm fronds.
Hope to see some in your Diorama !{sm4}

Steve
 
Steve, what a super and detailed tutorial ... thank you soooooooo much.

You make it look (sound) so easy that I think I can do this .... {sm2} well we'll see ....:confused:

--- LaRRy
 
Steve, what a super and detailed tutorial ... thank you soooooooo much.

You make it look (sound) so easy that I think I can do this .... {sm2} well we'll see ....:confused:

--- LaRRy

Thanks !
You'll do fine Larry and after you've done the first one you'll see how easy it is and soon have your very own coconut tree plantation in miniature !^&grin

Steve
 
Third time Lucky !

So to run through the procedure for making a 10" high Palm tree. Higher or lower just add or subtract a bit.
I took a 16" piece of 16mm2 Cable, but reflecting on it 10mm2 would do just as well.
The cable I have is 7 core, so 7 fronds, extra ones are added.
Photos show what you'll need.

Strip back PVC sheaths to expose copper inner cores 4" at top which will be the Palm fronds and 2" at bottom for the base.

Starting at the top of the PVC sheath work you way down to the bottom winding the narrower of the two masking tape rolls creating the look of the sections on Palm trees (Thanks Gordon !) at the bottom wind several more layers to create the bulb like bottom of the Palm tree.

Splay the copper wire strands out fan like and stick masking tape over each strand as per photo. repeat for the rest of the fronds.
To add extra fronds, take a piece of wire approx. 4.5 " long and bend 1/2 " degrees to make the right angle. With these extra fronds I fond it easier to cut them to a leaf shape now. The fix them to the trunk under the already splayed wires with more masking tape wrapping just one piece per time as this helps build up the bulge at the top of the trunk.

Cut leaf shape out of the masking tape as per photo these will be your fronds.

Now paint trunk Brown and undercoat fronds Green. Allow to dry.
Dry brush trunk a light sandy colour and paint the leaves you chosen shade of green. I used a spray can for this. Just using a brush does just as well.
Allow to dry.

Using scissors cut the leaves feather like to mimic Palm fronds.

Adjust your fronds to the shape you want and you're done !

Final tip use latex gloves when painting !

Steve


View attachment 221285View attachment 221286View attachment 221287View attachment 221288View attachment 221289


good idea! Thanks for sharing. I'm building some trees myself too. I do not use Tape for the trunk but Milliput works very well too. but your palm leaf is brilliant πŸ‘πŸ‘πŸ‘πŸ‘πŸ‘πŸ‘


Harrie
 
good idea! Thanks for sharing. I'm building some trees myself too. I do not use Tape for the trunk but Milliput works very well too. but your palm leaf is brilliant ������������


Harrie

Thanks very much, you're most welcome Harrie. I like your idea too, I'll give that a go myself as I'll be wanting shell damaged tree stumps.

Cheers

Steve
 
This is looking great. Well done m8!

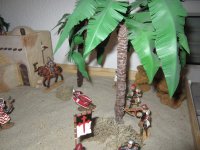
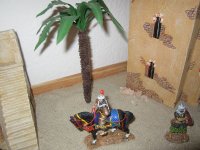
Made the Palm Trees for my Crusaders Diorama also by myself.

I tried 2 different ways on working on the trunk. First I used some Kind of air drying clay for the first trees and then switched to some pipe cleaners and painted them.

Tree_001.JPG

Tree_002.JPG
 
Well done El Pippo !
Great innovations and thanks for sharing !

Steve
 

Users who are viewing this thread

Back
Top