Britains Heavy Howitzer re-make (2 Viewers)

johnnybach

Major General
Joined
Nov 24, 2010
Messages
13,663
Some may remember, about a year or so ago, I advertised that I wanted some spare parts for a Britains Heavy Howitzer (No 9740). The bit I wanted - was the bit that went "BANG!" ( i.e the barrel and firing mechanism). You see, I already had the large wheels and the trail parts - which came with one of my job-lots.

Well, I found one - or to be more precise - some bits that also included the piece I wanted ( barrel and mechanism).

Here's a pic - which shows the disassembled parts I now have.
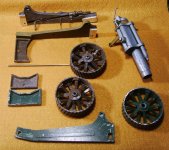

PIC_4566.JPG

From the above pic. you can see that I have all of the parts now - but maybe you can also see that I have had to make some modifications to the trail (now in four parts). The very "Green" trail and wheel at the bottom are some of the new parts that arrived with the barrel (which I won't actually need) - and the barrel and mechanism is top right. What I didn't know - was that there is more than one version of this model - and some of my newer parts are of a slightly different size than the original, older version.

In short - the barrel wouldn't fit the carriage - as it's slightly wider than the original one! As my old Granma often used to say to me - "Boy, life wasn't made to be easy!" (She always called me Boy BTW).

So........I began by disassembling the four parts of the carriage - which also included taking the wheels off first. The old parts were rather crudely soldered together, which was easy enough to saw through to remove front and back cross-plates. You can see the 7mm difference in width of the new and old cross-plates in the picture above. The Green plate is from the newer version - which also came with my "new-bits". The old axle was almost rusted through anyway, and I'm replacing it with the brass rod also shown in the picture.

I then fitted spacer pieces of cut alloy to the inside of each carriage side, where the cross -plates were originally. I made up the new plates to fit the space, and each plate is 3.5mm thick - and will widen the frame of the carriage - so that the connecting plates could be refitted by glueing and pinning. This will make the original old carriage bed 7mm wider - which will allow the "trunnions" on each side of the barrel mechanism, to fit into their receivers. (You can see the newly added plates in the pic above on both carriage sides - which show up as new silver metal. Note also the hole drilled through the front end plates - which the axle will go through.

I'm now in the process of repainting parts that would be difficult to get at - if I just put it together again first.

Watch this space for more pics of the re-build. jb
 
Great project, John! Your necessary modifications will be virtually invisible to any but the most die-hard Britains artillery fan. This is going to be quite a jewel for your collection, when you get it finished. Do you have a crew for it already, too?

Prost!
Brad
 
Great project, John! Your necessary modifications will be virtually invisible to any but the most die-hard Britains artillery fan. This is going to be quite a jewel for your collection, when you get it finished. Do you have a crew for it already, too?

Prost!
Brad

Yes, that's what I thought Brad. Mine will be really a hybrid version, incorporating parts from old and new versions. As for crew - well, no Brad - I don't (yet).

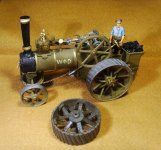
However, the reason that I wanted a really "Heavy" Artillery piece - is because I have a Steam Traction Engine ( which is also unfinished, as yet), which I want to tow the beast. This is it - along with one of the wheels from the Howitzer.

PIC_4568.JPG

My idea is that these pieces will be working in an Artillery Park as the centre-piece - around which will be various other guns - which I have also been quietly collecting over the last year or so. It doesn't matter whether they are complete or not - as there were many such Artillery Parks during WW1 - where bits and pieces were repaired and refurbished and put back into action again.

Just like me, and what I'm doing, really{sm4}:salute:: jb
 
Neat stuff JB. Will it be able to shoot shells when complete?

The firing mechanism looks to be complete - but I don't have any of the shells for it as yet. I'm not all that bothered about that really though, as I don't really want to shoot at anything with it anyway.

I spend a lot of my time nowadays, putting back together lots of things that I think this sort of thing bust up in the first place!;) jb
 
Well, now, that tractor is suh-weet!! That gives me an idea-you should see about recreating the steam effect of an operating steam engine.

We have a toy manufacturer right here in the Lehigh Valley, in Allentown, the Conestoga Company: https://www.bigbangcannons.com/

They make cast metal cannons and other toys, which have a firing mechanism that sets off a powder and makes, as the name suggests, a big bang. The idea and the formula originated with a professor at Lehigh University, who was looking for a safe alternative to gunpowder fireworks. The toys were sold from the Aughts of the last century, and into the Twenties and Thirties, they were popular with boys for use with their toy soldiers.

I wonder, too, if you could use something like the Germans have for their smokers and other incense burners, popular at this time of year. The smokers use incense cones, but there are also little stoves that use a liquid, and give off smoke. That would look pretty cool!

Prost!
Brad

I don't cast things - because I would probably set the house on fire!!! ;) - and don't tell me you're allowed to play with matches too????{eek3} You big boys have all the fun!:D

I'm a quieter sort of chappie now Brad - and just like to mend things that look nice in one of my cabinets. So.......no smoke or fire for me. La Commandante would throw a wobbly anyway!

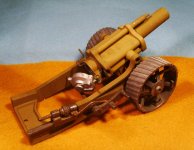
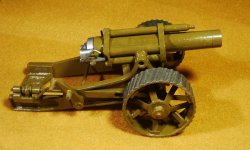
I've just put most of the bits back together - and loosely popped the wheels on to see how it all fits - so here's a quick pic. Note the wheels look pretty good now they are stripped of the old paint and grunge. I've left the breech open, to show that this is a fully functional gun, once again.{sm2}

PIC_4569.JPG

If you look at the rear cross-plate (between the two sides) you may be able to make out my extra plate which was inserted on each side to make the bed of the gun 7mm wider, to accomodate the barrel and recoil mechanism of the later version of the gun. The barrel sits sweetly on its trunnions, and the elevate mechanism (though well worn) still works okay. But - as you said Brad - if you didn't know a lot about this model - you would never know it's a slightly altered repair - and I haven't completed the paintwork yet. Once that is completed - it should look pretty good, I think.

(Both gun and tractor will be Glossy BTW). jb:salute::
 
Last edited:
Well, now, that tractor is suh-weet!! Prost!
Brad

I recognise that tractor too ..... I've assembled and painted a couple of them, and still have another on to do next year for a local collector.

tractor.jpg

John
 
I recognise that tractor too ..... I've assembled and painted a couple of them, and still have another on to do next year for a local collector.

View attachment 224057

John

It was seeing one of yours (I think you did one for Luiz) - that prompted me to get one myself John:cool: I thought it looked so cool - I just had to have one too. I obtained the base part of the gun around the same time - and had been looking for the "BANG!" bit for quite a while. I saw one about 6 months ago on e-bay - but was pipped at the last moment by another bidder. Snipers!!:mad:

I got this one - with the other bits last week - this time they were in a job lot of various broken Artillery pieces - so I'll be on the lookout for more parts soon to repair some of them too (if possible). If you ever need a wheel, side of the carriage or a connecting plate for a broken one of these - just give me a shout John.

Still, got one in the end John. Thanks once again for the inspiration you provide, which I'm sure is not just me either!

Have a cool yule chum - jb
 
The howitzer looks great, John! I can't wait to see it with its finish coat.

Prost!
Brad
 
The howitzer looks great, John! I can't wait to see it with its finish coat.

Prost!
Brad

I've started it Brad - but it's a big beast - and it's swallowing lots of paint. I have re-painted the inside of the wheels - but have the treads to do yet. I'm hoping that I may have the Gun completed by tomorrow - but it will just take as long as it takes. Shouldn't be long - as it's only two colours required.

Looking good Bro'.................jb:D
 
I've started it Brad - but it's a big beast - and it's swallowing lots of paint.

I have found that for painting big artillery pieces and vehicles I now use a spray can to get into those hard for reach spots, and to cover the large flat areas.

To give it a glossy finish I do use a brush because I still can't get a good gloss coat when using a spray can.

For a matte finish, they get a matte spray as that seems to work OK ???

Hope that helps, and keep up your great work,

John

As I only do glossy John, (cos that's what I like), I too will stick to my brushes. I did try a can of primer a few times, and I too think it's okay for large surfaces, but I wasn't so happy with it on smaller figures - too many runs (probably me being heavy-handed with the stuff). With a brush, I think there is more control.

I must say - I have loved all of the stuff that you send out to Luiz - and it was this that tempted me into the Artillery area - which I must admit, I don't know a lot about. The Steam Tractor, limber and big howitzer you assembled and painted for him - tipped me over the edge, and that's when my search really started.

You gave me the lead to find the Tractor - and e-bay did the rest. Half the fun is in the chase anyway, though it did take me quite a while to find all of the bits for Britains big 'un. It's also nice to know - that I managed to find the parts to put one together - and saved yet another bunch of bits - which might eventually have ended up in someone's bin!

So thanks once again John - I'll give it my best shot!! ( even without any shells!):D

Have a good Xmas (in some sunshine) which is much needed here at the mo' :salute:: jb
 
I use Future for a gloss sealer, and I apply it with a hand brush, but I have airbrushed it was well. That's especially useful with scale models, applying the gloss coat before applying the decals. But yes, to get in all of the little tight spots, applying by hand works better. The only other way would be to dip the piece, like some of the dimestore makers did with their toy soldiers.

Prost!
Brad
 
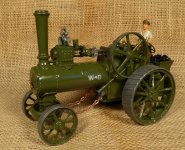
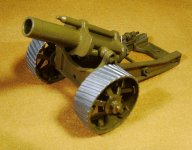
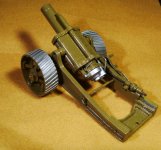
I think this is more or less completed now ( but for a few touch-ups - when everything painted is absolutely dry) - so here's a few pics of my complete Britains Howitzer - ready to see action once more.

Okay, it's a "bitsa" - but it's all mine!:D Hope you like her too. :salute:: Now to get on with finishing my Steam Tractor - and think about how I'm going to connect them up.{sm2}jb


PIC_4572.JPGPIC_4574.JPGPIC_4573.JPG
 
Looks great Johnny! So the big question is will is shoot?

Dave


Having had a good look at the mechanism - I'm in no doubt that it could.

However, I don't have any shells for it yet - so can't positively say - YES.

So................... to be continued ...................maybe.....................one day.............perhaps?

{sm4}jb
 
I like where your head is at! Have to sort out some shells for a this beauty. 😜

Dave
 
I like where your head is at! Have to sort out some shells for a this beauty. 😜

Dave

I'll keep looking for sure - but it took me over a year to find the missing part that I wanted.

The one thing that repairing figures has taught me to value - is patience. I have loads of things on "the back burner", for want of a special part. Sometimes it's possible to use something else - or something like the original part that's gone missing - and thank goodness for the few British Toy Soldier companies that still offer parts for repairers! I can't thank some of them enough for continuing with the good work.

However, when it comes to things like this - there's really only one way to go. You just have to find that spare part you want from a broken example, somewhere - and then go for it!

I've been watching many such Howitzers on e-bay for a very long time, in various states of repair - and they are neither cheap - or easy to win, as competition for these guns is keen.

But................in the end...........I got the part I needed .........and I adapted it, and couldn't be more pleased with the outcome

Glad you like her too, Dave jb
 
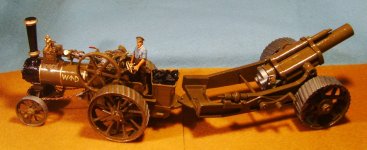
Not quite complete yet - but I think I've solved the "towing" problem.

My solution was to fit triangular plates to the rear of the tractor - and to the trail of the gun. I then fitted a "post" to the Tractor tow-plate - which the hole in the tow-plate on the gun simply slots over. The weight of the gun simply holds it in place. jb

PIC_4576.JPG
 

Users who are viewing this thread

Back
Top