Broken Bayonets (2 Viewers)

Obee

Captain
Joined
Aug 27, 2009
Messages
5,945
I recently purchased a K&C French Grendier of the Imperial Guard (NA060)knowing that he was missing his bayonet and that it wasn't in the box. I decided that I'd have a go at reprairing it back to the original, and seeing it was sold a very resonable price, I had nothing to loose.

When he arrived, I inspected the offending wepon, and saw that the end of the musket barrel was intact, so only the bayonet blade was missing.

What I neede was a replacement bayonet blade, so I rummaged amongst my spares and noticed that a Prince August musket I had cast looked the right length, even thouh is wasn't the correct shape. I then filed down the PA bayonet to match a K&C bayonet from another figure, NA063, and with some careful work, I achieved my goal.

Next problem, how to attach the blade?

I realised that Supa Glue wouldn't hold the join, so I decided to pin the parts together. As I do not a drill that fine, I used a sewing pin ( borrowed from my wife's quilting table) I managed to force a hole into the barrel from the side, and then inserted a fine wire, and secured that with Supa Glue.
picture.php


Next I used the same pin to make a hole in the bayonet blade and then it was joined again using Supa Glue, see the wire showing through.
picture.php


Finally the bayonet blade is painted with silver paint, and the black highlight painted to reproduce the K&C style of painting.
picture.php


The use of pinning the parts helps add strength to joins and use that quite often with many parts, including arms to bodies, feet to bases, and plumes to hats.

I hope that helps those of you wanting to repair you damaged figures.

John
 
*
John,

Thanks very much for the valuable "how to" on bayonet restoration.

Broken bayonets have not been easy to fix in my experience.

I would imagine a good deal of force is needed to create a hole in the barrel tip and bayonet with a sewing pin.

Can you please elaborate on your technique in securing the barrel and bayonet for the creation of the hole/s ?

If a finger hold method is used, is there not a risk of piercing one's own fingers ?

Raymond.
 
I've done something similar to this, but I use a hand drill and mini bit to drill the holes. I think this way is a bit less risky to the fingers.

If you can't drill a hole, a reasonable alternative is to score a small groove in the blade and then paint over it after gluing.
 
Yes...please...I would like to understand this better if you could give a more detailed explanation of how you got a sewing needle to pierce the lead.
 
I've done something similar to this, but I use a hand drill and mini bit to drill the holes. I think this way is a bit less risky to the fingers.

If you can't drill a hole, a reasonable alternative is to score a small groove in the blade and then paint over it after gluing.
Yes and what size bit and wire do you use for the pin?
 
Raymond & Michael,

you have both asked me to futher expalin my pin hole method, so this is what i do.

The pin I use has a big bead on the end, so its got something to push against. An ordinary meatl pin with just a flat top is a bit hard to push, so these pins my wife uses for quilting are better.

I start by making a small hole in the centre of the part, usually scoring a cross into the metal, and then I force the pin in, rotating the pin with thumb and finger, much like I'm drilling in. If the metal is reasonably soft (i.e. high lead content as oppposed to pewter) it goes in OK. You need to be carful not to go too hard as it can fracture the part, because unlike a drill, it doesn't remove the metal its displacing.

If you think you are going to peirce your finger, put the part onto some wood and push down but it does depend on the pressure you exert. Try not to bend the part, hence something hard to push against.

I'll try and show the pin pushing in when I do another repair.

I'd love to have a pin sized drill, as that would give a better hole, but the smallest I have is 1mm, the same size as the barrel, so that wouldn't work.

regards,

John
 
John...

thanks for the more complete explanation...

it makes more sense now...

I would love to see a "step by step" on your next repair...

they do sell smaller bits...they are very expensive...

when I saw the price...I could have almost bought a new Frontline 24th for the price of the bit....:eek:
 
*
John,

Thanks very much for the additional technical details.

Yes, a pin with a big bead on the proximal end would afford the necessary leverage to exert force on both the barrel tip and bayonet distally.

I think this method requires a fair bit of skill and experience to be successful.

The parts involved are small by any measure, so a steady hand and good eyesight are a must.

Raymond.
 
Yes and what size bit and wire do you use for the pin?

The bit and wire sizes vary with the job - I usually just rummage my bits box until I find the right combination. I have one mini-bit set (actually I have about 3 sets - most of them have one or more broken bits!!) with bits from 0.135 to 0.38, and I just select the bit that fits the area best. I also have a variety of small spools of wire acquired from hobby shops over the years and I just find a wire size that fits. My most frequently used wire is a paperclip or one of those "T" shaped push pins used for modeling. Just cut them to size. The pushpins are particularly useful since they are very strong and quite thin. The pointed end is sometimes useful.

As for mini drill bits (and probably most of the other gizmos mentioned above), you can find them at the "tool guy" table at most major figure shows, e.g. MFCA, MMSI or LIHMCS (probably those on the W coast too, but I have not been to these shows - there's ALWAYS a "tool guy!"). Cost for a set of mini bits is somewhere around $1, and perhaps another $8 for a hand drill.

I think if you are interested in doing any of this type of work, it's worth a small investment in the right "equipment." I really enjoy fixing figures; and I'm delighted to pick up broken figures at a discount and repair them. Once on the shelf, only I know where the repairs are.
 
Ok, so as I'm writing the post below, I can hear you all saying - "whatthehell is he talking about?"

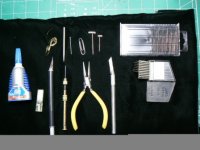
So, since a picture is worth a thousand words, here's what I'm talking about.

tools_Treefrog.JPG

Items from L to R:

Lock-tite gel* super glue, spool of wire - unknown size, toothpick, straight sewing pin, regular size paperclip, "T" pin -large, "T" pin - small **

lower: Xacto knife w/ #11 blade, hand drill, needle nose pliers, Xacto hand saw, drill bits (large case top) #80-60, drill bits (small case open) .135 - .39.

Now you can certainly get more elaborate, but I think that as you start working on repairs you'll quickly find what works and what does not. Then just go browsing at a hobby store, train store or the site below and get what you need.

Also consider a magnifier of some sort - either clip on to your glasses or the visor type.

Purveyors of micro tools (and you thought boys only collected BIG tools!) are:

MicroMark: www.micromark.com

Papa John's Toolbox: www.hobbytool.com

I've dealt with both by mail and have always been treated well. Papa John is at the LIHMCS Show in November for those of you in NY/LI.

Hope this sets some of you on an exciting new path to our hobby. Disclaimer: I have a full-size tool box full of this stuff, acquired by chance and by choice over 30 years of doing this sutff, but you dont want to see it all. :)

* IMHO the gel superglue is easier to work with on small pieces. Also makes a great filler.
** Called "Model Maker's T Pins" - available at MicroMark and elsewhere.
 
PJ,

thanks for all your information about the tools that you use in your repairs. It makes my setup look quite basic when comapred with your kit.

Still it sounds like you enjoy the repairing as much as me, and only the repairer knows whats been done.

I'm glad that this post of mine has generated some valuable comments, like yours, for members, and they will have 'fun' fixing thier damaged troops.

John

Whatever works for you, John, is all that matters. :D

Yes, I find it very satisfyling (and sometimes challenging!) to repair broken figures and buy ones that need a little help to return to duty. I have also ventured into major restorations and conversions, but that's another story.

BTW, I just noticed that in my post below I left out a "0" on the price of the mini-bits. They are $10 not $1. It's not my fault - the electronic gremlins are at it again!
 
An inexpensive fix in an article I read suggested a flat toothpick cut to the correct length would work very well. Painted silver of course. Just a quicky fix for toy guys!
 
Another approach to broken bayonets: I have replaced bayonets with flattened wire.

I use a silversmith's chasing hammer, but you can get by much more cheaply with a tack hammer from the hardware store. I have a small anvil but a metal block, the harder the better, from a scrap dealer, works fine. If you have a workshop with a bench clamp, use the flat surface on top of the clamp. Any smooth, flat, hard surface should work. You can get various sizes of brass or soft metal wire on spools from the hobby store. Straight lengths of soft floral wire can also be obtained from floral supply shops and some hobby shops.

Flatten the wire, flipping it over every few taps, to keep it from curving as it flattens. (Use a piece of wire with extra length for easier handling). Then give it a few passes with a fine grit piece of sand paper. Trim the edges to the right shape with a fine needle file or sandpaper. The more shaping that you can accomplish by filing or sanding along it's length rather than crossways, the less likely it will bend or break.

With a file, flatten the side of the rifle barrel. Glue the bayonet to the flat of the barrel. Take a piece of the finest wire you can obtain, (or a piece of sewing thread dipped in Elmer's glue and sqeejeed between your fingertips). Wrap the wire or thread around the barrel and bayonet connection. Work a bit of the super glue into the wrap. The trick to using the wire or thread wrap is to keep it neat and compact. It is possible to hold the figure in your palm while securing one end of the wrap between your finger tips but if you can secure the figure so that both hands are free, it will be much easier.

You may need to play with a few pieces of bayonet wire before you get the knack of shaping it. I've found that different scales and makes of figures call for different repair methods.

Have fun,

Ron
 
For broad spear points, (ie. Dervish), I like to cut two spear heads from a piece of wine cork foil. Then I glue them together on each side of the end of the spear. It works better if you glue the metalic side rather than the coloured side. (Another reason to drink the good stuff.)

Ron
 
we use a soldering iron.
Take your soldering iron, solder, and the solution ZnCl2.
Apply a drop of solution on both surfaces, take solder. by soldering iron. Contact both parts and touch them for 1 second by soldering iron.
Do not be afraid
The solution is instantaneous boil and evaporate, but the details will connect
 
Last edited:

Users who are viewing this thread

Back
Top