
You are using an out of date browser. It may not display this or other websites correctly.
You should upgrade or use an alternative browser.
You should upgrade or use an alternative browser.
Hedgerow Country (1 Viewer)
- Thread starter fmethorst
- Start date
Phantom Warrior
Major
- Joined
- May 1, 2009
- Messages
- 6,881
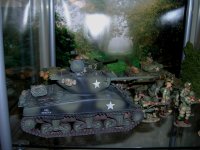
A little fun with Photoshop Elements.


Very Creative. The same photo makes a great background shot by blowing it up to the correct scale. I wonder if there is anywhere to upload generic background photos to share? I have several good ones.
Terry
Attachments

bromhead
Sergeant Major
- Joined
- Aug 7, 2008
- Messages
- 1,712
A little fun with Photoshop Elements.
Well done
fmethorst
Command Sergeant Major
- Joined
- Feb 18, 2008
- Messages
- 2,496
That is really well done mate.How did you cut out your figures so accurately? I have found using the mouse to cut and paste images is no mean feat.
Thanks guys. I've had my eye on that hedgerow picture for a while and I finally got around to trying to insert some of my figures. This was my first attempt so there is still much to learn but it was a lot of fun.
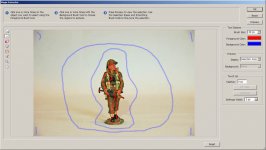
To create this picture I took an individual picture of each figure in front of a solid white background (poor man's version of a green screen). The individual pictures were required to deal with the reduced depth of field available in macro photography. I then reduced the color saturation of each picture by about 50% (those K&C figures are pretty bright). I probably could have reduced it even further. After determining who was going to go where I applied a fog layer (essentially a layer of translucent solid white). Working from the farthest guy away I progressively reduced the opacity from 15%, 10%, 5% and the front guy hase no fog applied. I then extracted each figure from the solid white background using an extraction feature of Photoshop. Basically you identify foreground and background elements and Photoshop does the rest (see picture). I used the white background to ensure Photoshop could easily identify the background and remove it. I then touched up the few areas the software missed and removed the base by hand. From there I took the background picture of the bocage and layered on each figure working from the guy furthest away to the guy in the front. I eyeballed the foreshortening and sized each figure accordingly. Once everything was where I thought it should go I merged all the layers into a single picture. For the aged picture I applied a sepia colored filter, reduced the color saturation by 50% and applied one final layer of translucent white to give it that faded look.
I realize the lighting could have been done better on the figures and the focus probably could have been softened a tad so they aren't so stark but overall I thought the result was satisfactory. It has definitely given me some ideas for future pictures.
Attachments
Users who are viewing this thread
Total: 2 (members: 0, guests: 2)