How I Create Desert Scenics (1 Viewer)

mestell

Colonel
Joined
Feb 12, 2008
Messages
8,150
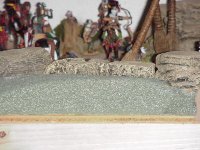
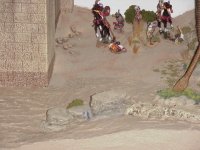
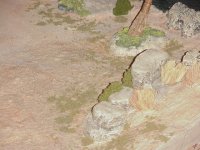
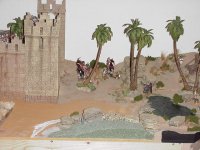
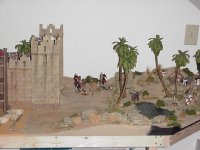
I have found some time to work on my "Fall of Acre, 1191" diorama today and have been busy landscaping the northeast corner of my "Acre" facade. While I am at it, I thought I would take the time to share with forum members how I make my desert scenics. Please note that almost everything I am going to share I learned from Ken Osen (Hudson & Allen) and I would like to give him credit for making this technique very easy with great results.

To begin, always prime your base on both sides to prevent warping. I like to use 3/8" plywood (Ken recommends 1/4" MDF).

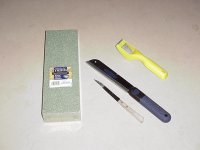
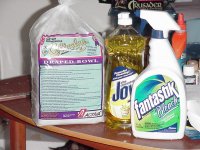
Also, all of the "artist" materials I will show I purchased from Michael's Craft store. The tools shown were purchased at The Home Depot other than the simple kitchen utensils.

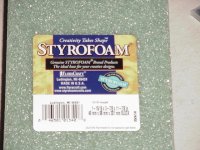
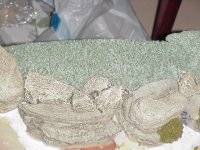
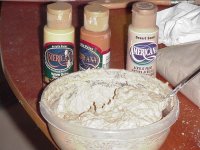
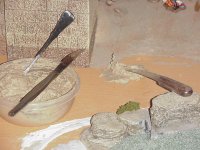
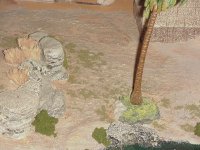
For elevate/raised landscape features I use open cell Floral Foam (what I use is made by Styrofoam which comes in a variety of sizes and shapes, in both green or white). This material is so much easier to work with that beadboard (what a mess) or pink or blue foam board (can be hard to shape). The floral foam is light weight yet strong and is easily glued in place with white glue (Elmer's). I shape it over a trash can with a serrated steak knif, a pull saw (Marples) and a Surform rasp/shaver (Stanley).
 

Attachments

  • MVC-001S.JPG
    MVC-001S.JPG
    30.7 KB · Views: 708
When I first used Floral Foam I was really surprised how much easier it was to use than beadboard (what a mess) and either pink or blue foam board (can be hard to obtain the desired shapes). By just using some very simple tools, Floral Foam is easily shaped over a waste basket with minimal cleanup. Here I have shaped a 12"x4"x2" piece of Floral Foam to create a ridge line with an exposed rock outcropping (JG Miniatures).
 

Attachments

  • MVC-002S.JPG
    MVC-002S.JPG
    63.9 KB · Views: 343
  • MVC-003S.JPG
    MVC-003S.JPG
    64.6 KB · Views: 351
  • MVC-004S.JPG
    MVC-004S.JPG
    67.6 KB · Views: 335
Once the landscape is "roughed in" I cover it with a prepared mixture of Celluclay made by Activa. Celluclay is a fiberous dry product described as instant paper mache which has a bonding agent mixed in with it - simply add water. When making a batch of Celluclay mix, I add a tiny bit of soap detergent (surfactant agent) and a tiny bit of Fantastik all purpose cleaner w/bleach (mildew and mold retardent).

I like to work with a mixture that is the consistancy of gooey oatmeal. The Celluclay mixture will be grey. However it will except paint very easily. I use simple water based acrylic paints (raw sienna, yelow ocher, desert sand) to get the color blend I desire.

Mike
 

Attachments

  • MVC-005S.JPG
    MVC-005S.JPG
    66.4 KB · Views: 301
  • MVC-006S.JPG
    MVC-006S.JPG
    54.6 KB · Views: 307
  • MVC-007S.JPG
    MVC-007S.JPG
    55.7 KB · Views: 319
  • MVC-008S.JPG
    MVC-008S.JPG
    59.8 KB · Views: 290
After the Celluclay is prepared I use a wide and a narrow butter knife (or an artist pallet knife) to spread the Celluclay over the landscape features, like icing a cake.

Mike
 

Attachments

  • MVC-010S.JPG
    MVC-010S.JPG
    60.9 KB · Views: 348
  • MVC-011S.JPG
    MVC-011S.JPG
    52.9 KB · Views: 377
At this point, I smooth out the wet Cellucaly with a damp 3/4" paint brush, working the cellucaly in and around the landscaping features as I desire. I also use a damp 1/2" artist flat brush to add additional color texture to the scenic - raw sienna, yellow ocher, desert sand. This works best when the Celluclay is still wet - after it dries everything blends together well as if air brushed.

This is also when I apply Woodland Scenics burnt grass course turf and light green foliage clusters. I also apply a very light dusting of artist's sand (biege and cocoa brown). I lightly "pat" the burnt grass and the artist sand into the wet Celluclay. These will hold fast when the Cellucaly dries.

Mike
 

Attachments

  • MVC-012S.JPG
    MVC-012S.JPG
    60 KB · Views: 310
I have my diorama in my basement "office". I have found that it takes about two days for everything to thoroughly dry. By the third day I am setting up my figures on the new landscaped area.

Here are before and after pics. Hope this brief outline has been helpful.

Mike
 

Attachments

  • MVC-009S.JPG
    MVC-009S.JPG
    56.4 KB · Views: 295
  • MVC-013S.JPG
    MVC-013S.JPG
    49.1 KB · Views: 325
  • MVC-014S.JPG
    MVC-014S.JPG
    65.5 KB · Views: 357
Thank you
Probably the best directions & pictures I have seen.
Excellent work
Thanks again
Andy
 
Thank you for the tips I intend to do a similar project but on a smaller scale your info has been very useful indeed, thanks again for sharing.
Regards John
 
Thanks Mike for the excellent explanation and photos. I am about ready to start a diorama. I have to get the foam and then I will be ready to start. I got the tools at Home Depot Saturday. Nice work. John
 
You are all very welcome. One thing I forgot to mention - when I am mixing up the Celluclay I also add some extra white (Elmers) glue to it. This was recommended by Ken Osen - helps to improve adhesion for things like grass, sand, etc that are added to the wet surface.

Mike
 

Users who are viewing this thread

Back
Top