Indian wall foam background - advice needed (3 Viewers)

Mardasson

Sergeant
Joined
Sep 14, 2008
Messages
644
Hi All,
Since I joined this forum I've been really impressed by the dioramas and figures displays of other members.
The more I looked at these pictures, the more I found my troops a bit sad in their bare shelves.

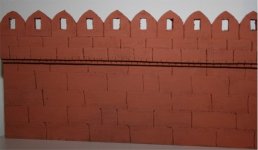
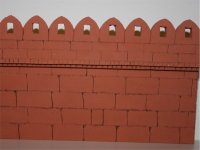
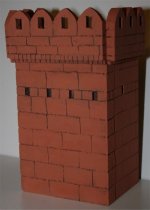
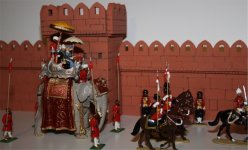
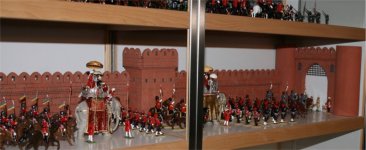
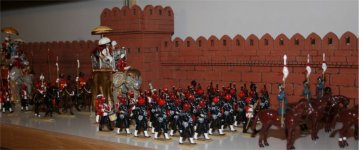
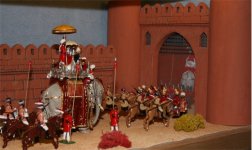
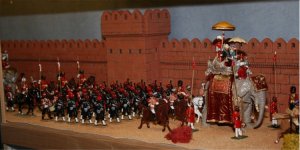
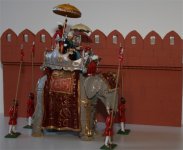
So I decided to built some background to display them and here is my first try : an indian wall to put behind my Durbar display. Well at least the first section of the wall as I will need some of them .

Before I make the other ones I'd like to receive advices from forum members as I see that I could improve the result a lot.

I used foam (as I've seen made on the forum) marked with a ball pen and painted with a paint usually used for wall (real ones).
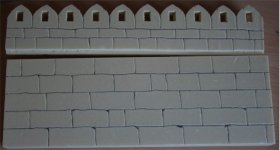
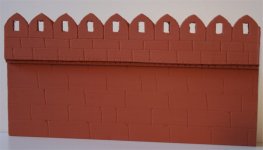
Here are 3 pictures : the 2 part of the wall cut but before assembly, the painted wall with and without figures.

My questions (not exhaustive list) are:
  • What kind of foam to use? With this one the result of the ball pen is different vertically than horizontally.
  • How to cut curved forms in the foam ? That was the hardest part and the result is not what I expected.
  • How to make the stones joints more realistics ?
  • How to achieve clear cut holes in the wall ?
  • How to avoid the small grains in the foam to be visible ? (instead of a clear cut)
  • .....and any other advice

Thanks !
Michel
 

Attachments

  • Mur01.jpg
    Mur01.jpg
    62.7 KB · Views: 330
  • Mur02.jpg
    Mur02.jpg
    48.1 KB · Views: 310
  • Mur03.jpg
    Mur03.jpg
    93.7 KB · Views: 314
Last edited:
Hi, Michel, as far as the joints are concerned, I would use a straight edge to make the seams, both horizontal and vertical. And after making a first pass, as with the ball-point pen, I would go back over each seam with a slightly larger point, for example, with a slightly blunt pencil. That would have the effect of making the masonry joints a little broader, as they might looked with the dressed stones of a city or fortress wall.

Then I would paint the whole wall with a basic color, and then go over it with some highlighting colors, drybrushing those over the base colors. That would help to emphasize the seams.

I would also consider using a fine point to make small holes or dents in the faces of the individual stones in the wall. Look at a stone wall, even one that is made of finely dressed stones, and unless we're looking at a polished granite or marble wall, we'll see small imperfections in the face. Those inperfections can be reproduced with a fine point, and then, you can use a wash over the face of the wall, to put a slightly darker color into those little recesses, and the seams, and help provide contrast.

If you want to get really fine with your detail, then you would want to weather the wall, too. Look at a stone wall, or the side of a house, and notice how the wall is discolored closer to the ground, from where rain has fallen and splashed dust and dirt up from the surface onto the wall. My own house, for example, is made of red brick. But all along the back wall, for a band about 20 cm high, this is discolored, with a lighter color, from rain drops hitting the dirt of the flower beds and splashing soil onto the brick.

Hope those tips help!

Prost!
Brad
 
Looks pretty good to me Michel.

The first question I would ask, is what kind of 'look' are you after for your wall?

What I mean by that, is that if I were doing a battle damaged wall or building for matt WWII figures, it would be irregular, different layers of dry brushing, weathering paint etc.
That said, for a gloss Durbar display such as this, you may want a cleaner, simpler look, to show off the figures.

With that in mind and in relation to your questions,

What kind of foam to use? With this one the result of the ball pen is different vertically than horizontally.

Blue or Pink stryrofoam, is what I would use. It looks like you're using the blue styrofoam. With regards to indenting the foam, as Brad has said, you can use a ball point pen, blunt pencil, anything really. You seem to have gone in fairly lightly with the pressure. Not quite sure why you've got different results vertically and horizontally. There are some different methods you could use though - For absolute precision lines, use a ruler and mark in to the foam along that. For neat, but not quite symetrical lines, you could lightly mark out your lines with a pen, and then press in along the lines free hand, and for irregular patterns, ditch the rular and do it all free hand.

How to cut curved forms in the foam ? That was the hardest part and the result is not what I expected.

I use a craft knife with a snap off blade, since this gives me a reasonable length edge to work with. I would mark out your shape and then cut around it (common sense I know), but what can be done afterwards, is to smooth the curves, and iron out any inaccuracies, by using various grades of sand paper. The foam responds pretty well to this, and can leave a smooth surface or rough, depending on grade of sandpaper used.
Another thing to be borne in mind, is the thickness of the foam. It's far easier to get clean cuts and shapes in 10mm foam, than it is in 25mm foam. There fore, if you can get away with a thinner foam for this sort of detail, I'd go for it.

How to make the stones joints more realistics ?

As Brad has already written, the way in which you paint the wall, is what will bring out the detail. I would (personally), always start with an all over dark coat of paint. I tend to use black if the end colour is greyish, or dark brown (burnt sienna or similar), for all others, as it's a slightly 'warmer' base coat. This first coat can be thinned, and it benefits by getting it in to all the nooks and crannys. It doesn't need to be a neat uniformed finish, as you will be putting on further coats anyway.

Then, I would dry brush the main colour on to the wall. I would tend to use a fairly heavy drybrush so that a lot of the colour gets on, but you should still see the dark basecoat showing through around the indented lines and the bits poking through elsewhere on the wall. Again, neatness and thoroughness isn't too important.

You could if you wished, add a further layer, via very light drybrushing, to add highlights to the raised edges (such as the corners / edges of each 'stone'). For the terracota type colour used on your wall, I would use a light buff or tan. If the highlight is too close in colour to the second coat, it will be hardly recognisable.

How to achieve clear cut holes in the wall ?

With difficulty.:rolleyes: Again, the thinner the foam, the cleaner the cut is likely to be. This is one of the reasons I use the snap off blades, as they offer you a couple of inches cutting edge. I mark out the shape with a pen and then using a metal ruler, cut along the mark. This can leave a bit of a mess the other side, as you may need to 'saw' through the line with the blade. This can be made good, to some degree afterwards, by sanding down the area. The other advice I would give would be to change the blade on a fairly regular basis. The edge soon bluntens, and therefore doesn't give quite as clean a cut.

How to avoid the small grains in the foam to be visible ? (instead of a clear cut)

I would use fine sandpaper to take these off prior to painting. Then, once you've painted your basecoat on, it will probably raise some of the bits you've missed, in which case, give those bits a quick sand down.
Another route you could take, although not a first choice, would be to heat up a blade (knife / screwdriver or whatever) over a naked flame and then use the balde to melt down any troublesome areas. BUT, firstly, it's a bit time consuming and secondly, I can't imagine the fumes from melted styrofoam are particularly good for your health, so therefore the usual precautions (vented room, face mask etc) ought to be taken.

.....and any other advice

Write off a few pieces of scrap foam for doing nothing other than ar**ing around with, so you can mess around with different instruments, sandpaper, files, paint effects, to see what works for you, rather than try it out on your main piece of work.


Gawd, that was a long reply :eek: Hope theres something there that might help

Look forward to seeing the backdrop for the whole procession!

Cheers
Simon
 
Dear Brad and Simon,
Many thanks for the very detailled explanations.
I will try to use these advices as best as I can and will come back to you with my next wall section (some time will be needed as I'm away for a few days).
Kind regards,
Michel

PS: my foam is yellow, so I guess that first step for a great result should be to paint it blue or pink first :D
 
All the tips are great. Michel, I was also inspired to look on-line at the buildings in India and images of the Dehli Dubar. Fun project and display.
 
Hi,
Here are my next try with the benefits of Brad and Simon advices for shaping the form and painting it.

- First pic is the first wall on which I've applied a thinned dark colour then dry brushed with the wall colour. Problem here is that I haven't first marked enough the joints. I've also discovered that dry brushing such a large area is not that easy (take a long time and too much colour on the brush will mask the joints)

- Next pic is my second section made. Joints were marked deeper with the pen and I then applied a very very thinned dark colour before dry brushing with the brick colour. Problem here the colour was too thinned and didn't cover the foam enough : its colour is still visible in some places.

- Third pic is a try at a tower. Deeper joints and first a coat of dark paint before dry brushing. My preferred result so far. I think I'll continue with that method.

I will try also dry brushing with a lighter colour stones corners.
Thanks in advance for further advices....(do you think varnish is required ?)

The good thing is that I still have some pieces to produce, each of them an opportunity to improve the result. After that I guess that I will need some base for that display..

Cheers,

Michel
 

Attachments

  • Mur01.jpg
    Mur01.jpg
    35.8 KB · Views: 184
  • Mur02.jpg
    Mur02.jpg
    41.2 KB · Views: 142
  • Mur03.jpg
    Mur03.jpg
    37 KB · Views: 149
  • Mur04.jpg
    Mur04.jpg
    69 KB · Views: 164
Nice work Michel.

I'm with you on the third pic. Having the dark base coat really picks out, and shows off the details. I'd also do as you suggest and get that light drybrush on the edges of the stonework and corners / edges of the building. I think that will pick out the detail even further and give it a natural look. Worst case is you don't like the look, in which case you just dry brush over the terracota colour.

Looks impressive with the three pieces together, and is a great backdrop for the display.

Simon
 
Very nice job Michel, thank you for sharing it with us. As you add the pieces in front of the walls they will help to cover up and parts that you are not happy with. Looking forward to seeing more.

You could seal the walls if you wanted to, a cheap trick is to use white glue(add some water to make it easier to paint with) It will give it a shine but not make it too glossy.
 
Hi Michel that wall looks impressive with your Delhi Durbar collection. When dry bushing large areas like that, I find a large flat headed artist brush is ideal, you can get them quite cheaply from an art supply shop no need to buy expensive ones because dry brushing tends to ruin brushes anyway. When you mix the paint on your pallet keep it slightly thick, then load the brush by just touching the end of the bristles in paint and then lightly brushing it off on clean kitchen roll prior to brushing on the model, with walls and roads I gently brush in all directions all over the area then repeat the procedure making the paint lighter in colour each time until you get the desired effect (usually 3-4 shades lighter). Dont worry if you go too light you can always give areas a thin wash with the darker colour later. I find this works on all stonework,roadways and wooden areas such as doors and wooden equipment.
Regards John
 
Looks good, Michel, looks authentic. That is, the stone blocks have the look of dressed stones, but old and weathered. So the edges wouldn't be as crisp as on new construction, but the seams would be plumb and true.

Prosit!
Brad
 
Hi All,
Here are pictures of my latest buildings and how they will appear in my display shelves.

If you have ideas on what kind of background I should put behind the walls and also what to use as floor, that would be welcome.

Cheers,
Michel
 

Attachments

  • Durbar 1.jpg
    Durbar 1.jpg
    71.3 KB · Views: 81
  • Durbar 2.jpg
    Durbar 2.jpg
    89.2 KB · Views: 80
  • Durbar 3.jpg
    Durbar 3.jpg
    72.4 KB · Views: 80
Very nice Michel, The walls certainly are a nice addition to your collection. For the background how about maybe just some sky blue paper or perhaps a picture of the real sky. For the road you could use very fine sandpaper or perhaps the sheets of cobblestones that can be found in model railway stores.
 
Wow!

That looks brilliant Michel. The painting really brings out the detail in the walls and towers, and it the whole thing works very well as a backdrop to the display.

I'd echoe Scott's advice for the background. I'd suggest going to a big DIY store and getting a long-ish sample of sky blue / light blue wall paper and trim it to size. Quick, easy and free sky background, with (as long as you take a long enough sample!) no breaks or joins in the paper.

I think the sandpaper would work well as well. You can get it on a roll, so, again, no breaks. If the sandpaper looks a bit to clean and 'clinical', you could use it as a base, spray on some PVA adhesive, and scatter patches of fine sand on it, to give a more uneven look.

Great work!

Simon
 
Scott and Simon,
Thanks !
I will try wall paper and sandpaper and will post the result !
It will take some times (finding time to go to the DIY store but also to remove all the figures from the shelves).
Thanks, Michel
 
Hi All,
Here are pictures of my latest buildings and how they will appear in my display shelves.

If you have ideas on what kind of background I should put behind the walls and also what to use as floor, that would be welcome.

Cheers,
Michel

Michel,

Wow! nice collection you have there.

Jeff
 
Hi Michel,

I am truly impressed with your Durbar display. You have arranged the figures in a great eye-pleasing display. The foam background adds a great touch to the atmosphere of the parade. My highest compliments for a job well done!

Warmest personal regards,

Pat :)
 
Hi All,
Thanks for the kind words on previous posts.

Here is the next step in the diorama setup following the advices received here.
Changes are:
- Blue background : I've found a texture wall paper with different tone of blue. I think it give a nicer touch than a plain flat blue background.
- Floor : again I used a textured wall paper. Originally it was white/grey but I painted it with sienna colour. I should probably add some different shades to have a better effect.
- I've also put a picture in the gate opening at the end of the display. The idea is to add depth to the diorama. I still have to find the right angle and size of the figures. When I'm happy with the result I will order some photo quality print for this.

Another change is that I've installed some LED lights in the shelves. It's maybe not visible in the pictures but the change is dramatic when you see the display live.

Thanks for your further advices to improve the display (I'm already thinking about finding some rocks, some palm trees and bushes...)
Cheers,
Michel

Ps: I've also posted this pictures and few more in a new album
 

Attachments

  • durbar02.jpg
    durbar02.jpg
    86.9 KB · Views: 74
  • durbar04.jpg
    durbar04.jpg
    94.1 KB · Views: 74
  • durbar05.jpg
    durbar05.jpg
    77.8 KB · Views: 76

Users who are viewing this thread

Back
Top