
You are using an out of date browser. It may not display this or other websites correctly.
You should upgrade or use an alternative browser.
You should upgrade or use an alternative browser.
King & Country Conversion (1 Viewer)
- Thread starter Panzer
- Start date
sceic2 said:Very nice job on the Panzer I conversion. I have too have done some K&C conversions but nothing so cool. I have taken the back panel on the GMC truck bed and made it as if it were in the down position to unload the vehicle and I have replaced the Krupp truck's windshields with clear plastic.
I hope Andy takes notice. We do need more SPA. The Grille is great and needs a AK brother. Perhaps he will get your permission to use some old credits cards and do the same model. I'd buy it.
Michael
Mike:
Do you have a picture of your Krupp with clear windshield? How did you cut up the windshield frame? What tools did you use. I've been planning to do the same thing but want to do research on the strength of polystone when being cut.
Thanks
N-P
S
sceic2
Guest
noli-poli said:Mike: Do you have a picture of your Krupp with clear windshield? How did you cut up the windshield frame? What tools did you use. I've been planning to do the same thing but want to do research on the strength of polystone when being cut.Thanks N-P
N-P, I am not proficient at camera work so I do not have a picture, yet. Maybe my daughter can do it when she gets here in a couple of weeks.
I first practiced cutting polystone on the Lemax crates. Lemax makes a Christmas Village Series like Department 56 but less expensive. I used about 5 sets of the crates to practice on. The sets come with three crates stacked together at obtuse angles so I got lots of experience with holding the tool at odd angles. My goal was to separate the crates with as little damage or waste as possible. I managed to get one set separated enough to satisfy my likes. I threw the others in the trash. Lots of weird cuts and frustration with working with polystone.
I used a dremel with a medium sized steel cutting wheel (with a stone wheel to polish the finished cut area) and many hours of patience. I did just a bit each day so that my frustration would not come out and ruin the work. The polystone is very hard to cut and is not easy to work with. I did make a few mistakes, but I used spackling compound of all things to repair it (the kind that looks and feels like whipped cream). Repainted it in Panzer gray and if I did not know where I screwed up I would not be able to find it.
I used a small vice grip with two small wooden strips to hold the top of the windscreen. This helped, I think, with vibration and the wood strips gave me a guide to follow. I did the same on the each of the other cuts (placed the wooden strips near the area to be cut and held them on with the vice grips). I was very conscience of the fact that the vice grips would crush the polystone if I compressed them too much so I was very careful in applying the brake. It took about 20 hours. Gave me something to do on some cold Minnesota winter nights. I will try to get some pictures posted when my daughter comes home. Cameras and me are a bad match up.
Michael
desk11desk12
1st Lieutenant
- Joined
- Nov 18, 2005
- Messages
- 4,894
Panzer
Wow, I wish I could do that. Great work on the conversion. Yes, we do need more SP's for the Germans and the Americans (M7, M12) and the British Commonwealth (Sexton).
Again Panzer, great job. How long did it take you construct the set?
carlos
Wow, I wish I could do that. Great work on the conversion. Yes, we do need more SP's for the Germans and the Americans (M7, M12) and the British Commonwealth (Sexton).
Again Panzer, great job. How long did it take you construct the set?
carlos
sceic2 said:N-P, I am not proficient at camera work so I do not have a picture, yet. Maybe my daughter can do it when she gets here in a couple of weeks.
I first practiced cutting polystone on the Lemax crates. Lemax makes a Christmas Village Series like Department 56 but less expensive. I used about 5 sets of the crates to practice on. The sets come with three crates stacked together at obtuse angles so I got lots of experience with holding the tool at odd angles. My goal was to separate the crates with as little damage or waste as possible. I managed to get one set separated enough to satisfy my likes. I threw the others in the trash. Lots of weird cuts and frustration with working with polystone.
I used a dremel with a medium sized steel cutting wheel (with a stone wheel to polish the finished cut area) and many hours of patience. I did just a bit each day so that my frustration would not come out and ruin the work. The polystone is very hard to cut and is not easy to work with. I did make a few mistakes, but I used spackling compound of all things to repair it (the kind that looks and feels like whipped cream). Repainted it in Panzer gray and if I did not know where I screwed up I would not be able to find it.
I used a small vice grip with two small wooden strips to hold the top of the windscreen. This helped, I think, with vibration and the wood strips gave me a guide to follow. I did the same on the each of the other cuts (placed the wooden strips near the area to be cut and held them on with the vice grips). I was very conscience of the fact that the vice grips would crush the polystone if I compressed them too much so I was very careful in applying the brake. It took about 20 hours. Gave me something to do on some cold Minnesota winter nights. I will try to get some pictures posted when my daughter comes home. Cameras and me are a bad match up.
Michael
Thanks, Michael. I have 2 Krupp and Patton's Command Car to work on. Looking forward to seeing your pictures.
N-P
Panzer
Corporal
- Joined
- Jul 30, 2005
- Messages
- 562
Carlos,
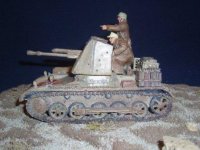
I'd say I put in around 30 hours for both the Pazerjager and the modifications to the two figures. I didn't have a Dremel tool (have one on order now) so most of the work was done with mini-files, drill, cut-off hacksaw and coping saw blades.
Hard to tell by the pictures but I also cut in and around the wheel assemblies to make them see-through. Look closely at the wheels of the first and second photos. Oz should like that.
Noli-poli,
If you are going to modify your windshield, my advice would be to be very carful and use as fine a saw blade as possible. Drill a small pilot hole first. Polystone is as hard as a rock in thick proportions but very brittle when your working with thin parts.
I've thought about modifying my Krupp windshield but at the price I paid for it on Ebay, I can't bring myself to do it right now.
This is my first attempt at a conversion of a vehicle but has opened up my mind to several other possibilities. I primarily collect Afrika Korps/ British 8th Army so the rolling stock used by both sides opens up a long list of possibilities.
Semper Fi!
Rick
PS: The shot below was taken with flash. The color is off but maybe it will show the daylight around the wheels a little better. Lost a lot of detail with these small compressed photos.
Attachments
Panzer said:Carlos,
I'd say I put in around 30 hours for both the Pazerjager and the modifications to the two figures. I didn't have a Dremel tool (have one on order now) so most of the work was done with mini-files, drill, cut-off hacksaw and coping saw blades.
Hard to tell by the pictures but I also cut in and around the wheel assemblies to make them see-through. Look closely at the wheels of the first and second photos. Oz should like that.
Noli-poli,
If you are going to modify your windshield, my advice would be to be very carful and use as fine a saw blade as possible. Drill a small pilot hole first. Polystone is as hard as a rock in thick proportions but very brittle when your working with thin parts.
I've thought about modifying my Krupp windshield but at the price I paid for it on Ebay, I can't bring myself to do it right now.
This is my first attempt at a conversion of a vehicle but has opened up my mind to several other possibilities. I primarily collect Afrika Korps/ British 8th Army so the rolling stock used by both sides opens up a long list of possibilities.
Semper Fi!
Rick
PS: The shot below was taken with flash. The color is off but maybe it will show the daylight around the wheels a little better. Lost a lot of detail with these small compressed photos.
Thanks for tip Rick.
N-P

jazzeum
Four Star General
- Joined
- Apr 23, 2005
- Messages
- 39,008
It's a rather unique piece so value would be hard to fix. For anybody looking to buy the original Panzer, they're not going to buy this. If you try to sell it, saying it's a conversion of a K & C piece, it's obviously going to have interest. I'd certainly be interested in it. Just for argument sake, I'd say a couple of hundred.
Users who are viewing this thread
Total: 2 (members: 0, guests: 2)