Making a Palm Tree (1 Viewer)

Horus

Brigadier General
Joined
Nov 20, 2015
Messages
12,249
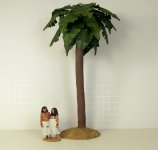
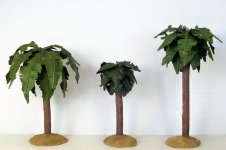
Procedure for making a 10" high Palm tree. Higher or lower just add or subtract a bit.
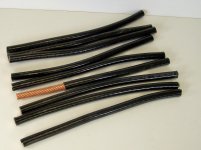
I took a 16" piece of 16mm2 Cable, but reflecting on it 10mm2 would do just as well.
The cable I have is 7 core, so 7 fronds, extra ones are added.
Photos show what you'll need.

Strip back PVC sheaths to expose copper inner cores 4" at top which will be the Palm fronds and 2" at bottom for the base.

Starting at the top of the PVC sheath work you way down to the bottom winding the narrower of the two masking tape rolls creating the look of the sections on Palm trees (Thanks Gordon !) at the bottom wind several more layers to create the bulb like bottom of the Palm tree.

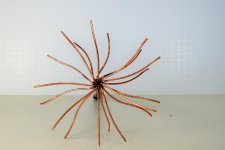
Splay the copper wire strands out fan like and stick masking tape over each strand as per photo. repeat for the rest of the fronds.
To add extra fronds, take a piece of wire approx. 4.5 " long and bend 1/2 " degrees to make the right angle. With these extra fronds I fond it easier to cut them to a leaf shape now. The fix them to the trunk under the already splayed wires with more masking tape wrapping just one piece per time as this helps build up the bulge at the top of the trunk.

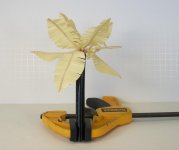
Cut leaf shape out of the masking tape as per photo these will be your fronds.

Now paint trunk Brown and undercoat fronds Green. Allow to dry.
Dry brush trunk a light sandy colour and paint the leaves you chosen shade of green. I used a spray can for this. Just using a brush does just as well.
Allow to dry.

Using scissors cut the leaves feather like to mimic Palm fronds.

Adjust your fronds to the shape you want and you're done !

Final tip use latex gloves when painting !

Steve
A.jpgB.jpgC.jpgD.jpgE.jpg
 
I'm reminded now of Tamiya's 1/35 T-rex kit, because it includes some cycads for a diorama, and the leaves are made this way, too. The base of the plant is molded in styrene, and the kit includes fine wire and textured green paper to make the fronds. Works pretty well.

Prost!
Brad
 
Interesting, never seen or heard of that set, I only built a few Tamiya kits as a kid, mostly Tanks as they were relatively expensive for me at the time.

Often happens, you think you're coming up with something new but someone has already done years before, just that it's gone out of view for a while and rediscovery brings an earlier incarnation to the front and I wonder who did the leaves/fronds like that before Tamiya !

Steve
 
this is brilliant...
and looks pretty easy...
thanks for the tutorial...
I will be trying some of these soon...

I saw a video a few years ago...
about texturing the trunk of the palm trees...
I don't remember what they used...
but it was a Woodland Scenic's product...
and when dried...
it resembled the bark of a palm tree...

to mass produce these for John Jenkins upcoming Conquest of America series would be cool for me...

GREAT JOB!!!

I have learned so much from the modelers on this forum...
 
Thank you for sharing; it's one of the great aspects of the people who make up this forum.

Steve
 
Horus...

I finally got started on making some palm trees today...
the work is very easy...but a little tedious...
still...even saying that...
I am totally both amazed and pleased with the work so far...
they look very professional and realistic...
but better yet are virtually unbreakable...
I'm amazed at the flexibility and strength each copper wire has...

I bought a 3 foot section of a heavy 19 separate wire....copper wire cable...
each of the 19 copper wires are extremely strong yet flexible...
it makes for an incredibly durable support system for the fonds...
they are bendable but set firmly in place once arranged...
with 19 fonds...the palm is very lush and full...

my first one was 9"s tall...
but I only made the fonds 2 1/2" long...
it took me almost 2 hours as I didn't know what I was doing...

I wish I had made the fonds longer...
but I didn't really know what I was doing...
but I did on the second one...
it is 12"s tall...
and I made the fond 4+"s long...
it only took me about an hour to do this one...
as I kind of know what I'm doing now...
and will hopefully get faster...

and I think on the next one...
I will make even longer fonds to get a really spectacular draping effect...
perhaps 5 inches...
maybe even more...

it was actually easier to do with longer fonds as you can move them out of the way for your scissor work...
and you're not working with tiny fonds...

I spray painted them in a moss green...
textured the trunks with stucco patch...
and will paint and dry brush once it dries...

I have no pictures yet...
but will post some...

your technique is very cool...
thanks for sharing it in detail with pics...
that's my favorite thing about this forum...
the "how to's" that guys share and explain...
thanks again!
 
Thanks Mike and well done ! :salute::
That's really nice of you to take the time to share your experience and as you're finding as you go along they become easier and quicker to make. Like your alterations and may try that myself. I can't take all the credit as it's a mix of ideas including Andy of K&C's brother Gordon with the tape wrap tip from the Palm logs of his Tarawa dio.

If you know any electricians you're friendly with the project becomes even cheaper !

I've seen someone is already making them and selling them on ebay. Good luck to them as it'll help out those who don't have the time or confidence to make their own.

All the Best
Steve
 
Steve...

here are some trees I finished...

the wire I buy is $2.50 per foot...

my best scale results are 12"s tall...
so each tree costs $2.50 for the trunk...
all the unstarted pieces are 12"s...
I used the smaller pieces and made some small trees...
but I think 10 to 12"s is the best size for 54-60mm figures...

they have 19 copper strands which is too many...

the first few trees I made...
I used all 19 fonds...
but it's too cluttered...
they seem too full...
so now I cut off about 10 wires and just use 9 fonds...
which seems very full to me...
I can do one tree in 30 minutes or less...
and have it ready for painting...
I use Design Master's Basil Green spray paint...

the first one I made I thought the fonds themselves were too short...
about 2-2 1/2"s...
so I now make them 3 to 3 1/2" long...

one thing I really like...
these are amazingly sturdy...
once you bend the fonds into place...
they are not going anywhere...
they are not going to move even if you drop one on the floor...
REALLY STURDY!!!

this is a fun easy project that makes a nice custom tree...
here are some pics...
thank you very much for the tutorial...
you can produce a really nice and very inexpensive tree with your method...
 
Steve...

here are the raw pictures...

I cut each strand 12"s...

then open the wire up about 3-4"s...

then trim off about 10 of the copper wires...

each strand has 19...

and 9 finds seems very full...

I tape them as you showed and then trim them and cut the separate leaves...

again it takes about 30 minutes at most to finish one to be ready to paint...
 

Attachments

  • 101_3314.jpg
    101_3314.jpg
    140.4 KB · Views: 91
  • 101_3312.jpg
    101_3312.jpg
    97.3 KB · Views: 91
  • 101_3311.jpg
    101_3311.jpg
    70.5 KB · Views: 91
after I spray paint the fonds...

I use stucco patch for the trunks...

I paint on the stucco patch and the paint them brown followed by a grayish drybrush...

they look pretty good and it's really quick...

this one started at 12"s and has 3 1/2" fonds...

I used all 19 fonds and I think it's too full...

but it looks okay...
 

Attachments

  • 101_3315.jpg
    101_3315.jpg
    73.2 KB · Views: 93
here is the difference of 19 to 9 fonds...

the one on the left has only 9 or 10 fonds......

I think they look better...
less cluttered...

the other 2 have 19...

which I think is too cluttered...

but I will use them all...

the one in the middle was my first one...

the fonds are too short...

the ones on the left and right are 3 1/2 to 4"s...

here is also a group photo including the small ones I made...
I don't love the little ones...but I will use them...

the base is a resin casting I made and hot glued the trunk into...

I flocked them with sand...

I'm gonna make a ton of them...

thanks again for the tutorial...
 

Attachments

  • 101_3309.jpg
    101_3309.jpg
    104.5 KB · Views: 96
  • 101_3308.jpg
    101_3308.jpg
    109.1 KB · Views: 95
Steve...

the best thing about these trees...

it's actually easier to make the taller ones than the shorter ones...

it's the same amount of work...

but the taller length gives you more room to manipulate the leaves...

thanks again for the lengthy tutorial...explanation and pictures...

great inspiration for someone that enjoys modeleing....

Hi Mike

You're trees with the stucco really looks great ! :salute:: I shall be keeping an eye out for the 19 core cable when I want to make some more. I think they would make for nice Pacific area trees as they tend to have a few fronds that stick up, no idea why ! Though having that many fronds will make it easier for Jap Snipers to conceal themselves in !{sm4}
As they say, " Beauty is in the eye of the beholder" !{sm4}
But again you've done a really great job on your Palm trees.

Steve
 
HOW DO I MAKE A PALM TREE
A.How to make the leaves
--------------------------
1.Take two pieces of paper
2.glue the two pieces together with in the middle an iron wire
3.cut out the form of the leave you want
4.cut the leave ( leave one piece/ cut one piece away and repeat this action) to obtain the end result .
5.paint the leaves

B. How to make a natural looking tree trunk
----------------------------------------------
1a.take a small branch from the garden ( natural form)
1b.drill a hole in the top of the trunk (branch) where at a later stage you will insert the stems of the leaves
2.cover the branch with a small layer of milliput
3.model the trunk ( the milliput) based on the real thing and let it dry
4.paint the tree trunk

and the end result looks like this
DSCI0104__1__0a9.jpg

DSCI0105__1__dd3.jpg

DSCI0106__1__699.jpg

DSCI0102__1__b8c.jpg

DSCI0109__1__499.jpg
 
Last edited:
Guy, a good cheaper alternative with the milliput giving greater detail.

Fantastic diorama you have there. It looks like it could be of Operation Flipper, the plan to capture Rommel ?
Years ago I saw the grave of Lt Col Keyes at Benghazi, in the Commonwealth Cemetery there.

Steve
 
Guy, a good cheaper alternative with the milliput giving greater detail.

Fantastic diorama you have there. It looks like it could be of Operation Flipper, the plan to capture Rommel ?
Years ago I saw the grave of Lt Col Keyes at Benghazi, in the Commonwealth Cemetery there.

Steve

Steve, would you like to see more pictures of it ?
It's a very old diorama ( at least 30 years old) all the figures in it are Airfix multipose 1/32 scale.
Even the interior of the desert fort is detailed with a German soldier playing the accordion and a " belly dancer"
Guy:smile2:
 
Yes please Guy and I think a lot of other people would like to see it too !

Steve
 

Users who are viewing this thread

Back
Top