The WETS assembly, painting and finishing guide
This is the method we use when painting our toy & model soldiers
INITIAL PREPARATION
The first job after receiving the metal figure casting is to trim or scrape off the mould lines and any unwanted metal left by the casting process, including the underside of the base. A good quality sharp modelling knife is ideal for this job, or alternatively, a file or sandpaper can be used. Sometimes, a small drill will be needed to re-drill arm or other holes that have closed over a little in the moulding process so a good quality hobby or handyman drill with an assortment of drill bits is a handy asset to the tool box. After the bare casting is clean and smooth, the next step is to wash the figure in warm water with a little dish washing liquid soap added to remove any traces of the mould release agent (an invisible powder) that is left on the surface of the casting after it comes out of the mould. The washed figure should be left for at least a few hours to air dry before the next step which is assembly.
ASSEMBLY
To assemble the figure, we use and recommend a two part epoxy resin based glue called “Selly's Araldite 5 minute everyday epoxy”, available throughout Australia at any hardware store and most supermarkets. This is a resin based two part glue which achieves a very strong bond when the two parts are mixed together and will no doubt be available worldwide under different names and brands. The bonus is that it can also be used as a filler to hide small gaps in parts that don't match exactly. For a quick or instant bond, Superglue (made in many varieties and names worldwide) can also be used for assembly, however, this product eventually weakens and in a few years time the arms may start falling off your soldiers! If you are an advanced modeller, a soldering iron can be used but this method requires experience and care to avoid accidentally melting the casting!
UNDERCOATING
The next step is to undercoat the figure and we use and recommend a good quality spray can metal primer called “Dulux grey metal primer” which is available at hardware stores throughout Australia. There are many brands and types of spray can metal primers on the market but make sure you buy a good quality brand and not a cheap and nasty type which may not give a smooth or even coverage. Remember that any spraying needs to be done outside and not on a windy day for obvious reasons. Just make sure the can is well shaken before you apply the primer in short sharp bursts. The other alternative is to brush on the undercoat and a light grey or white acrylic or enamel paint is good for this. A couple of thinned down even coats are best to ensure any detail on the figure is not obscured.
MOUNTING FIGURES FOR PAINTING
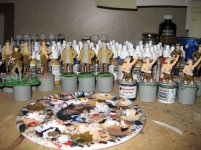
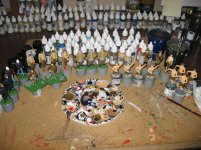
The next step is to mount the figure for painting and this is a very important part of the process and one that a lot of figure painters overlook and end up doing endless re-touching jobs after they keep smearing paint off their figures by direct handling. Constantly touching of the figure secretes a layer of human grease from the hand/fingers which does nothing at all for the model and eventually causes paint to flake off. After a lot of trial and error, we now use empty Humbrol enamel paint tins. Have a look at page 2. of the catalogue and you'll see these little fellows in action! These little gems are a perfect size and weight to accommodate a 54mm figure for painting. The figure is mounted or attached to the tin by putting two small drops of Superglue on either side of the lid and attaching the primed figure by simply sitting him there and waiting a few minutes for the glue to set. This gives you something to hold while the painting is being done and ensures no contamination or repainting due to smudging. When all the painting is finished, use an old blunt kitchen knife, a screwdriver or similar implement to gently prise the figure from the tin and you’ll find he just pops off! Use a sharp hobby knife to gently scrape away the small amount of Superglue from the underside of the base of the figure and also from the lid of the Humbrol tin and presto! You can then paint the underside of the figures base and lay him on his side on something soft until the base is dry.
PAINTING
We use and recommend Vallejo and Games Workshop Acrylic paint for our models. Enamels (Humbrol, Testors, Tamiya etc.) are still very popular and can also be used but our preference is for acrylics due to their quick drying time, their huge range of colours and the fact that they don’t emit any horrible odours which can result in headaches after prolonged use. In relation to the actual painting process, two of the most important things are to ensure your paint is well mixed (or shaken) and that you use good quality brushes. Cheap brushes result in poor results! We always start painting our figures with the flesh first, IE: the face and hands, followed by the upper body of the figure, then the legs, shoes and base. We then tackle webbing, belts, head wear and finally weapons before adding fine details like eyes and buttons. It’s a personal preference where you start painting your figure but this method works well for us. We don’t waste too much time during the initial stages trying to be too careful when applying the colours as it's always easier to cut back in and clean up lines and blemishes a little later and the acrylic paint dries so fast it's usually only a few seconds after each colour is applied before you can do this. Ensure all the main parts of the figure receives at least two nice clean even coats and then you can start worrying about tidying up and applying small details like badges, buttons, shoulder flashes and rank chevrons etc. To be a good painter takes time and practice makes perfect so don’t be deterred or put off by your early results as you will improve with each figure! If you are completely disappointed with early results, the figure can easily be stripped using a good quality liquid paint stripper and re-painted. Obtaining good reference material when painting is also advisable to ensure you are painting your figure in the correct uniform colours. The internet is a great resource for this and there is an endless variety of uniform reference books available like the renowned “Osprey series”, available from book sellers worldwide. Remember to take your time and enjoy the process of watching your bare metal casting come alive as each colour and detail is applied.
FINISHING
When the figure is completely finished (don't forget to paint the underside of the base) it’s time to apply some protection. This is the varnishing process and we use and recommend a spray can product called “Testors Dullcote” which is available from hobby outlets worldwide. This is an excellent product that provides a tough protective finish and does not yellow with age like many varnishes on the market. It's also available in gloss you like your figures shiny! The spraying needs to be done outside and not on a windy day and ensure the can is very well shaken (we shake it 50 times) before you apply it in short sharp bursts. We give our figures two even coats and then let them air dry for a few hours before handling them. And don’t forget to varnish the underside of the base! Varnish can also be brushed on and we recommend Humbrol matt and gloss varnish which comes in a clear glass bottle or container and is a good quality product that does not yellow with age. Once again, don’t forget to mix or shake the container very well before applying the varnish or the results will be streaky and unpredictable. It’s a personal preference, but some collectors like to initial and even date the underside of the base of their finished figures so they can reflect on all their hard work in years to come.
DISPLAY
There are many ways to display your painted figures and the way you go about this is also very much a personal preference. Some people like to purchase purpose built glass display cabinets with elaborate internal lighting which can be considered the ultimate way to display your collection and can be a real eye catcher and a talking point for visitors. Retail outlets like IKEA produce some lovely and very cost effective display options and as far as we know they have stores in every major country in the world. Some enthusiasts like to incorporate their figures into small scenes or dioramas with scenic backdrops or model buildings which can really bring your little men to life. There is an almost endless selection of ready made scenic items and accessories available on the market today making collectors extremely spoiled with variety and choice. Another way of displaying your figures is to incorporate them in or amongst a nice selection of military books or militaria, including hats, uniforms, ammunition or even musical instruments. Figures can also be displayed near military prints or paintings or simply lined up on shelves, sideboards, cupboards, cabinets or the like for visitors (and you) to see and admire. Have fun, enjoy your modelling and remember the words of the founder of the oldest toy soldier company in the world, William Britain, who once said … “Inside every man, there is a small boy who wants to come out and play.”

")