
You are using an out of date browser. It may not display this or other websites correctly.
You should upgrade or use an alternative browser.
You should upgrade or use an alternative browser.
Opel Blitz Conversion- DAK Ambulance (1 Viewer)
- Thread starter wlindsay
- Start date
Stickleback
Private 2
- Joined
- Dec 7, 2006
- Messages
- 91
Great conversion Wayne. I'm especially impressed that it was achieved without ruining the original vehicle. Ingenious!
Adrian
Adrian
wlindsay
Private
- Joined
- Apr 13, 2008
- Messages
- 22
Leadmen,Welcome Wayne to the forum. I enjoyed your wonderful conversion. I imagine you been doing 1/35 modeling for awhile to make such a conversion in 1/30 scale. Leadmen
Thanks to you and all for the welcome. This conversion actually wasn't too much of a stretch for me. I had done a similar one (almost 25 years ago!) and unbelievably I still have it. Photos are attached. This particular one was a maintenance version.
I was heavily into the hobby back then, but it got to be too much with all the other "priorities" in life. I also had fallen into the rut of being a "rivet counter". No detail was too small to include. And the hours of reseach (this was before the internet if you can believe it!) I came to the point where I was never happy with the stuff I was making. This lead to a series of unfinished kits hanging around for years. This great collection that I always wanted never materialized. I eventually dropped it all together. I just wasn't fun anymore.
I find now I have a little more free time, and with 1/30 figures and vehicles that are available now though K&C and the like, I can build my collection and focus on the "special projects" that interest me. My main area of interest is Canadian Military Pattern Trucks from WWII. I have a few of those on the go now (attached photo) I just wish they we 1/30th!
Thanks,
Wayne
Attachments
wlindsay
Private
- Joined
- Apr 13, 2008
- Messages
- 22
Hi Ray,Great job on the ambulance, I think I'd like to try it myself, I take it you bent the roof, what's your tip on doing that?
Ray
I like your spirit. You'll find this is straight forward project.
To start, you'll need to measure the extreme limits of the cargo box of your model, so you can establish the inside size of the van body. You are looking to obtain a snug fit. I made a cardboard mock up before I commited to plastic.
I like to use 1mm (0.040") thick polystyrene , because you can cut it easily by scoring it with a knife and bending it.
The key is to make an egg-crate structure that sits atop the original cargo box. This gives the body the strength it needs. The cross members of the egg-crate will all have the curvature of the roof on them. When you do this, make a template to transfer the curvature, because you want them to be all the same.
After the the egg-crate structure is dry, carefully glue the sides and end panels to it. NOTE: You're going to have to carve away some of the plastic on the inside of the side panels where they touch the shovel and pick-axe that are on the original box. If you don't do this, the van body will bulge out in these areas. It will ruin the appearance. This may require a little work, but it'll be worth it.
The roof is just 0.5mm (0.020") thick, so it is easy to bend by hand to form a rough curvature. When it's glued to the egg-crating, it easily holds its shape. After it's dry, take some 1mm x 1mm strip styrene and glue it to the edgeof the roof overhang. This gives the appearance of a much thicker roof. When dry, sand to eliminate the seam.
Once you have the basic box completed, you can add the doors, windows and hinges with stryene strip.
Front panel - 0.5mm (0.020")
Side and Back Panels - 1.0mm (0.040")
Egg-crate - 1.0mm (0.040")
Roof - 0.5mm (0.020")
Top Roof Panel - 1.5mm (0.060")
I've attached a picture of the plan I drew before starting the project. I hope this helps.
Good luck with your project. I look forward to seeing the results.
Regards,
Wayne
Attachments
Ray, that's a pretty neat 'dabble'
Jeff
Thanks Jeff, I put it on a thread a while back, don't mean to steal Wayne's thunder, i like his job much more.
Capitolron
Lieutenant Colonel
- Joined
- Jan 6, 2007
- Messages
- 7,717
Wayne
What an outstanding job !
Congrats - How are you with Napoleonic Wagons ? Just a thought !
Welcome to the forum.'
Ron
What an outstanding job !
Congrats - How are you with Napoleonic Wagons ?
Just a thought !Welcome to the forum.'
Ron
wlindsay
Private
- Joined
- Apr 13, 2008
- Messages
- 22
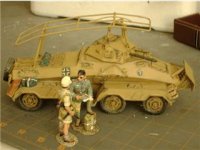
Hi Ray,Thanks Wayne, what a wealth! one last question, the red crosses hand painted or decal? if decal brand?
By the way I dabble a bit in the conversions, though not as precise as you. Here's a NMA 232 I converted to large array antenna and front push bar.
Ray
Nice model. That antenna really completes that model. Excellent work. I love all this conversion stuff.
To answer your question. The red crosses were painted. I masked them off with tape and spray painted them ( I just used Testors spray cans for these). It really helps if you can get a small blade for a compass. It will make cutting out the tape for the white roundels a lot easier. Painting these, for me, was probably the most difficult part of the whole conversion.
Regards,
Wayne
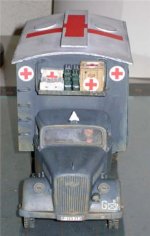
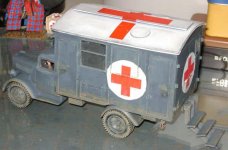
I want to give credit where credit is due, thanks Wayne for the guidance on this one.
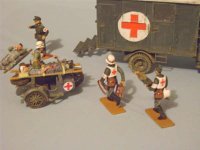
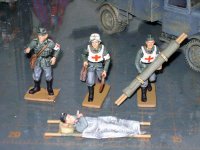
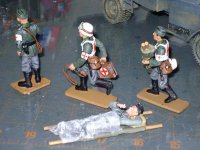
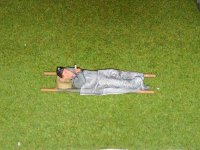
Didn't want to do exactly the same thing so I went toward an early war version and converted some Del Prado figs. for crew.
Didn't want to do exactly the same thing so I went toward an early war version and converted some Del Prado figs. for crew.
Attachments

desk11desk12
1st Lieutenant
- Joined
- Nov 18, 2005
- Messages
- 4,895
Hi Guys,
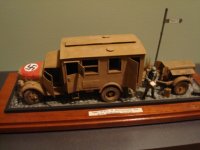
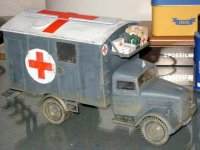
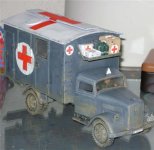
Here's a modification I've made to AK037. I've been wanting to give it a try ever since the Opel Blitz was released last year.
The van body is completely scratch built from polystyrene. The body actually slips over the existing cargo box, thereby preserving the integrity (and value) of the original. I was really hesitant about cutting into an $80 piece not knowing how it was going to turn out.
I had to make some concessions with scale in order to make it work, but I think it still looks proportional.
I feel it turned out reasonably well, although the hardest part for me was the painting. I found it difficult matching the tone of the desert yellow (it's still a little dark). The Red crosses were masked and painted. I weathered it with pencil lead and pastels. I still may paint the rest of the truck to match ( the 1/35th modeler in me is not 100% happy with the color tone difference)
I hope you enjoy the photos,
Wayne
Great job Wayne!
How did I miss this gem the first time around? Again, great jon conversion job.
Carlos
desk11desk12
1st Lieutenant
- Joined
- Nov 18, 2005
- Messages
- 4,895
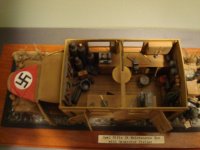
Some more
Wow, didn't miss this one this time around. Outstanding job Ray!
Merry Christmas,
Carlos
Louis Badolato
Lieutenant General
- Joined
- Apr 25, 2005
- Messages
- 18,491
Wayne and Ray,
It must be nice to be talented! Great job, and merry Christmas!
It must be nice to be talented! Great job, and merry Christmas!
Tiger Tank
Private 1st Class
- Joined
- Jul 9, 2008
- Messages
- 179
Looks great...
wlindsay
Private
- Joined
- Apr 13, 2008
- Messages
- 22
I want to give credit where credit is due, thanks Wayne for the guidance on this one.
Didn't want to do exactly the same thing so I went toward an early war version and converted some Del Prado figs. for crew.
wow! Excellent job Ray! It turned out really well. Good choice on the grey finish. The extra details like the steps, ladder rungs and stowage platform complete the model nicely. The figures look like they were made for it. What a great set.
I'm glad that I could help.
Regards,
Wayne
Users who are viewing this thread
Total: 2 (members: 0, guests: 2)