Ophelia (3 Viewers)

blaster

Captain
Joined
Sep 10, 2008
Messages
5,937
I promised myself that I won't start another piece until I've finished the present lot.
But this was starring me in the face. Ophelia by Millias, one of the PreRaphaelites..
A single figure, potentially compact piece and with a chance to use up the casting resin....

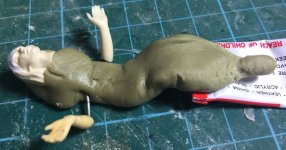
So I selected a 1/24 head (Preiser) and two hands (Tamiya) and made up the armature here. Hope that this doesn't take up too much time and effort.
 

Attachments

  • az.jpg
    az.jpg
    77.2 KB · Views: 258
I sculpted the head and hair. I opened the mouth a little with the knife as Ophelia was singing while drowning.
Changed the hands a little and sculpted most of the dress.

a5.jpg
 
I added hair to her locks. She looks like she had a bad hair day. Kinda creepy too {eek3}

aa.jpgaa2.jpgaa4.jpg
 
I added more locks of hair and then started to paint the figure.

a2.jpg
 
She's coming along nicely Victor ... just like the real on in Tate Gallery, London.

Ophelia.jpg

I've seen her a couple of times ... lovely gal :)

John
 
Hi John,

thanks for posting the Tate painting. Still lots for me to do, huh?...:rolleyes:

I've touched up on painting the figure a little bit more. Now just waiting for the paint to dry before I try another technique tomorrow.

Rgds Victor
 
Here's the new technique. I added white glue and pasted some polythene on the dress. So far, a total mess...grrr.

az4.jpg

I selected a larger frame to hide the edges of the stream. I made a box to fit the frame. Then it occurred to me that trying to make this box leakproof when I pour the casting resin might result in a disaster!

So I created a small cardboard insert and folded it. Less joints for leaking.

az3.jpg

Also made a cutout frame for this piece.

And I posed the figure inside the box to test for fit.

az2.jpg

Then I added two side pieces.

az5.jpg
 

Attachments

  • az.jpg
    az.jpg
    69.7 KB · Views: 194
As the glue was drying, I added some UHU to finish wrapping up the polythene plastic around her dress.

I studied the painting further. Ophelia is floating by under an uprooted tree trunk with roots. So I have knocked up an armature for this tree trunk.
I sealed the glued edges of the inner box with acrylic varnish.

a3.jpg
 
Pretty obvious I had a near disaster with the inner tub. The dimensions were quite tight to fit into the shadow box and I had to quickly resize the tub with liquid resin in it!!! Luckily it all held together...

Here's the uprooted tree with some detailing added.

a2.jpga3.jpg
 
Polyurethane resin slowly drying. Stinks like hell! Anyway, I've painted the tub mostly dark brown/black before I add on the foliage. The figure is tested for positioning. I will have to do part foliaging and part pouring the casting resin. Interesting traumatic journey this....

aa.jpg
 
A bit late for that... I'm now a dope sniffer..ack!{eek3}

I painted the rest of the foliage background black and the sky in light blue.

a3.jpg
 
OK. I've now checked into therapy for this....

I painted the black a matt overcoat. Then I added the foliage in sections. Some grass flock on the water edges and then some mosses.
Added more small branches and roots to the tree trunk. I sprinkled green sponge on the mosses. Added a few plastic leaves. The figure was glued into place and then I poured in a first bottom layer of about 50 ml resin tinted almost black. This is a larger amount than what I had used on the Susanna piece. I just hope it sets and doesn't leak.

Now making continuous propriations to the resin spirit.

a.jpga2.jpga3.jpga4.jpga5.jpg
 
I combed the scatter grass in the foreground and then painted in highlights on the foliage with yellow. I also painted the sky in a lighter colour.
I inserted grass stalks into predrilled holes. The second layer of casting resin was poured.

Now also making offerings to the Egyptian God Set.

a2.jpg
 
Oh yes, that green grass makes it look SO better ... keep on going ...

John
 
Watching the grass grow, John? ...:)
The dress was touched up with a little purple and white highlights.
I poured in the 3rd layer , added less tint. As you can see, the resin is starting to cover part of the figure and also submerging the grassy knoll.
The next two layers will be clear casting resin only, with the final layer being to embed in any flowers floating on the surface.

aa5.jpg
 
I carefully tinted the head and hands with indian yellow. This is a very transparent colour.

Here's the next layer of clear resin. It has set quite well and very hard. I notice that if there is no tint added, this casting resin cures reasonably fast.

I therefore added yet another layer. Almost submerged the figure. I'll sprinkle some foliage and flowers on top before adding yet another layer later.

a.jpga2.jpg
 

Users who are viewing this thread

Back
Top