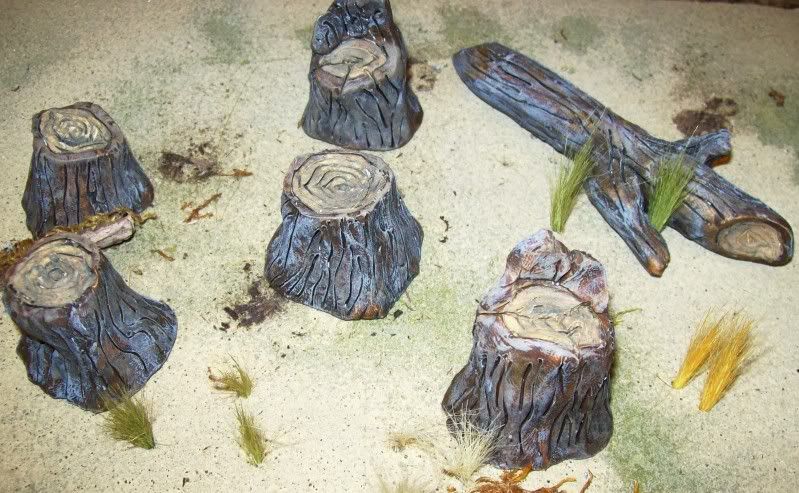
scratch built tree stumps (1 Viewer)

Tim,

I can't get that link to open, but you've probably given me enough info to work with.

I got some Sculpey and some soft self dring clay in the closet, I'll give it a shot.

The hydrostone mold is a good idea, mass produce, lol.

Again, the link wouldn't open, if you can remember the thread name, I'll pull it out of the archives myself, thanks,

Michael
Mike the link is to this thread were on now. I copy and pasted it from the message I left you on your user page message, I figured it might just be easier to just add the message right to the post to bring it back up again on the forum. Sorry for the confussion.
 
Yea, I figured that out.

How brittle are they with the self hardening clay?

Did you just wash them in black and then shade them?

They are really nice, as good as any I have seen for sale.

A mold should be easy in Hydrostone from silicone rubber.

I have it Tim, thanks,

Michael
 
Yea, I figured that out.

How brittle are they with the self hardening clay?

Did you just wash them in black and then shade them?

They are really nice, as good as any I have seen for sale.

A mold should be easy in Hydrostone from silicone rubber.

I have it Tim, thanks,

Michael

There not that brittle and should be fine as long as there not handled rough but if you drop these its all over, they,ll break or chip.
There great if your just going to leave them on a shelf but if your going to be pulling them in and out for use in various dioramas like me, they are a bit to fragile, but I still haven,t broken them yet????

As far as painting, You,ve got it. Paint black and dry brush.
I added two colors of brown. A darker color first then a second lighter color over that.
That,ll give it a little more highlight.
 
My origanal plan was to get a real stick on the thick side and just snap it in half kinda jagid and then cut it down to stump size and add a little clay around the outside and add the bark detail.
This would give me a better looking center to the stumps wich are harder to carve a good looking snapped tree detail into but I was pretty happy with the way it turned out using just the clay.

I,d like to give this silicone molding stuff a try. I could think of hundreds of things I could do with that!:cool:
 
You did a good job on the center of the stump, it looks real to me. Joe sent me some photos of Britains wood tree stumps, I like yours just a smuch.

The problem with the rubber silicone is the cost, it's not cheap.

Google a product called OOMOO25 or OOMOO30.

I got about 6-7 different molds from the trial size rubber silicone jar on the Hirst blocks for $25, a pretty good deal as he sells them for $34.

It does work good and gives perfect detailed molds. Would be good for producing pieces in mass, like gate sections or fence, but really, how many identical tree stumps would you want on one diorama?

Michael
 
Tim, my clay, when soft is kind of hard to detail.

The tools cutting into it, leave some overhang in the clay grooves.

Did you carve yours after they dried?

How long does it take to dry?

I have some "Super Dough", air hardening.

Can you speed up the air drying method anyway?

Michael
 
Tim, my clay, when soft is kind of hard to detail.

The tools cutting into it, leave some overhang in the clay grooves.

Did you carve yours after they dried?

How long does it take to dry?

I have some "Super Dough", air hardening.

Can you speed up the air drying method anyway?

Michael

I sculpted the detail into the clay before it dried. A little practice may be needed before you get the hang of it.:rolleyes: Don,t give up it,ll come with practice, Try using a bit of water also with it like I showed in the photo. This can get a little messy but it,ll make the clay easier to work with.
Just be careful not to add to much water or you,ll have a real mess and make it harder to work with.
It,s a trial and era thing.
You could give it a shot at trying to add detail after it has dried???? I,d just be afraid of not being able to fix a mistake like that, something you don,t have to worry about working with wet clay.

I might have said these aren,t that hard to make but I never said they were easy!:p

How long does this stuff take to air dry and can I hasten the process anyway?

Mine look okay, I think, paint should make a difference, but everytime I pick one up to see if it has hardened, I do more damage.
 
How long does this stuff take to air dry and can I hasten the process anyway?

Mine look okay, I think, paint should make a difference, but everytime I pick one up to see if it has hardened, I do more damage.

You,ll have to leave them at least a day. Dry time wight vary a bit, I,m not 100% sure how long mine took to dry it was awhile ago now and I just kinda put them aside, when I got back around to them a couple of days latter they were hard as a rock. Hope this helps??? Be patient I guess is the best advice I can tell you. And stop touching the **** things!!!!:p
 
You,ll have to leave them at least a day. Dry time wight vary a bit, I,m not 100% sure how long mine took to dry it was awhile ago now and I just kinda put them aside, when I got back around to them a couple of days latter they were hard as a rock. Hope this helps??? Be patient I guess is the best advice I can tell you. And stop touching the **** things!!!!:p

Patience, PATIENCE, PATIENCE!!!

You might as well ask for $.

I put them up on a shelf in the kitchen and baked some Sculpey stumps.

I'll check on them next month, see if they have dried, I think I have a bad batch of clay, lol.

I've washed them already (the Sculpeys) and will paint them in a little bit.

They look okay, no overhang, no foam packing on them and right side up (unarched) :D.

I'm getting better.

I'll post them tonight if I finish them.

Thanks again Tim,

Michael
 
Tim,

Thanks for your help on the tree stumps.

They turned out okay for the first attempt.

I'll do better on the bark on the next set.

Just a handful of Sculpey and some paint.

By the way, use Sculpey next time, easier to carve, much firmer than the clay, 15 minutes in the oven and done.

Thanks again,

Michael

100_1939.jpg
 
Great job Mike! Not bad for a first shot!!!:cool: That was quick also, your becoming quite the DO IT YOURSELF type.:cool:

Whats next on the list????:rolleyes::cool:
 
Thanks Tim,

Teach me, teach me.

Give me some ideas I can steal.

Michael

To bad you don,t live closer we could get together and bounce around some ideas and make a big plaster and foam mess and see what we could come up with.:p
On your stumps, you should try adding some finer lines between the larger bark lines on the next attempt, This will give them more detail. I really like the center detail you got on them it looks great!:cool:

I was working on some civil war era type scenic stuff tonight, just messing around with some sticks from the back yard making some fencing and another earthwork type piece kinda like my redout that I built.
I also made a few more of those baricades type things I can never remember the name of???
They have some kind of french name I can never remember that starts with a C???? There kinda like civil war eras answer to barbed wire. I just take a stick and drill it out and add tooth picks through it and add a little paint to them and it looks just like them. I,ll have to post a picture so you know what the hell I,m talking about.:p
 
To bad you don,t live closer we could get together and bounce around some ideas and make a big plaster and foam mess and see what we could come up with.:p
On your stumps, you should try adding some finer lines between the larger bark lines on the next attempt, This will give them more detail. I really like the center detail you got on them it looks great!:cool:

I was working on some civil war era type scenic stuff tonight, just messing around with some sticks from the back yard making some fencing and another earthwork type piece kinda like my redout that I built.
I also made a few more of those baricades type things I can never remember the name of???
They have some kind of french name I can never remember that starts with a C???? There kinda like civil war eras answer to barbed wire. I just take a stick and drill it out and add tooth picks through it and add a little paint to them and it looks them. I,ll have to post a picture so you know what the hell I,m talking about.:p

You're right, the bark needs some help. I saw that too. Next batch will be better. Try the Sculpey, much firmer and easier to carve than air drying, no comparison. By the way, did my air dry around noon, 13 1/2 hours later, still soft.

Michael
 

Users who are viewing this thread

Back
Top