Shawnee Scout (1 Viewer)

whdamon

Corporal
Joined
Sep 22, 2009
Messages
446
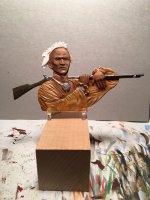
Continuing with the theme of painting flats and mounting to a visual backdrop
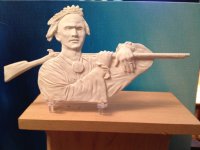
In this case it is a larger flat in resin vs metal. My guess about 1/10th scale.
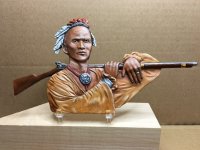
It is of a Woodland Indian (Shawnee?)
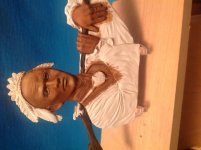
In the following photos you can track from the primer coat , through the acrylic undercoat (Model color) to the final artist oils application
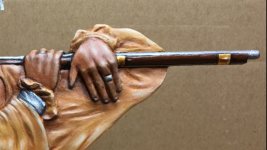
The key with flats is light direction (in this case upper right to lower left) and with a combination of shadows and highlights, add depth
and relief to the subject. Hopefully the close up of the hands shows how the shadows of the shirt and ends of fingers bring the top of the left hand (highlights) to the front
of the piece. That curving of the hand to hold the rifle is what caught my eye when I bought this piece as it would pose a painting challenge in gradient shading
IMG_2265-resize.JPG
IMG_4996-resize.JPG
IMG_0695-resize.JPG

IMG_1044.jpg
IMG_1037-resize.JPG

The next step is to come up with a background to mount the piece on.
I wanted to do something out of the ordinary, something that would standout
and raise questions. What would you do??
Stay tuned for next thread entry and find out how I satisfied my need to display
this piece like nothing else in my collection
 
Last edited:
Very nice! Do you have a formula (even if it's an informal one) for painting Indian skin colors, Walt?

Prost!
Brad
 
Very nice! Do you have a formula (even if it's an informal one) for painting Indian skin colors, Walt?

Prost!
Brad

for the acrylic undercoat I might use Vallejo #303 Yellowish Rust. Couple light coats to darken the white primer. Then maybe a Flat Brown #70984 for shadows ( be careful here not to over do as its a LIGHT skin color you eventually want. For highlights a medium or dark flesh. Then its on to the oils using a wash of M. Graham Transparent Iron Oxide. This is more heavily applied over the flesh. You want the flesh to show through, but not so it looks like flesh but in stead only a lighter tan. Let it dry then touch up deep shadows with Burnt Umber and touch up the highest highlights with a blended flesh and the iron oxide. Dont forget the slightest touch of redish tint on tip of nose, ear lobes and high cheek bones......keep it almost invisible.
I never do 2 pieces the same as I am continually experimenting, so you really need to play around till you get what looks close to your expectations. The combo I have noted here is just a rough starting point
Hope this helps
 
It's a pleasure to see your work. I appreciate the progression. of your work.

Steve
 
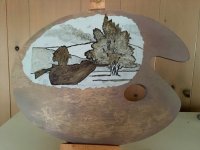
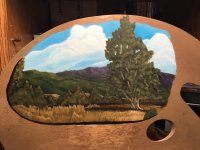
With the flat now painted, I needed to come up with a distinct backdrop to mount him on. At an Artist Preservation Group show in Gettysburg
a while back was an auction piece of a Civil War Zouave painted directly on a wooden artist palette, and the concept never left the recesses of my wee mind.
So out came a palette and down went a splotch of tinted primer where the scene would be painted
IMG_0787-resize.JPG

Next I needed to sketch out a background that not only was appropriate to the environment of the warrior, but also proportionally fit
the forward position of the flat. After a few try's on paper, I made a rough commitment to the palette
IMG_E1102-resize.JPG

And the painting of the backdrop started. I used Heavy body acrylics for the whole scene, beginning to end. constant test fitting the flat, looking for
out of place lighting and other distractions that took away from the flat figure
IMG_1131-resize.JPG

Here is the finished backdrop, less some minor details that would be added later as an afterthought. You will also note I put a black border
on the left side and bottom of the scene just add some dimension, and trick the eye into thinking there were multiple depths in the overall
presentation.
IMG_1202-resize.JPG

And finally the finished piece with the flat securely attached. I did add a bird as another means to draw the eye into the background and add interest.

However as this was in fact an artist palette. it needed a little realism. I ended up adding a series of "value lines" from the paints used in the background and
the flat. Value lines are a common way to lay out the highs and lows and everything in between 2 colors, say like white and blue used in the sky. Having different values of the mixed colors already laid out on the palette helps the artist quickly find the same value vs mixing it exactly over and over, especially when layering like in the sky and clouds.
I later stuck a paint brush in the thumb hold of the palette when it went on display.
IMG_1317-resize.JPG

Hope you enjoyed the process. Stay safe, and keep your brushes moving
Walt Damon
 
Walt,

I cannot tell you how impressed I am with both your process and the finished product. Just spectacular!👍👍
 

Users who are viewing this thread

Back
Top