Sherlock Holmes at the Reichenbach Falls - Step by step (1 Viewer)

Wolfgang_UK

Sergeant
Joined
Dec 5, 2009
Messages
792
Hallo,
After a much too long brake from the hobby I felt it was time for a nice straight forward painting job again.
I just wanted to turn away from my Elastolin's for a while. Not sure about which subject it should be I decided it should be (first of all) "GLOSSY", civilian - most likely Victorian and easy to paint up.
Nothing like that in the "Unbegun Project Box" but the december London Toy Soldier Show came to the rescue.
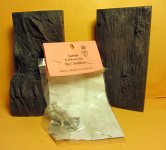
Again Good Luck at the SARUM TOY SOLDIER stand - exactly what I had on my mind, almost like produced on demand. What a nice kit indeed. Well known subject not only for the TOY SOLDIER collector, two figures telling a (well known) story and a fantastic scenic piece with lots of room for the brush to go mad while painting. Oh yes and glossing it all up should be fun.
I decided to take some shots on each step I was to undertake so there are some pictures to be looked at. Since I knew from the start that I was going to try out something new here and there I hope that some fellow collectors might find one or another interesting point in the following.

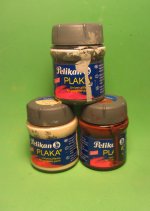
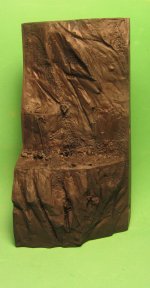
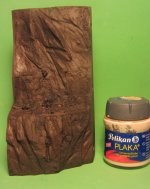
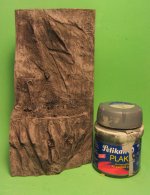
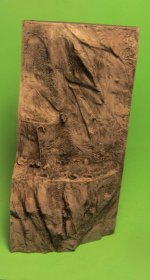
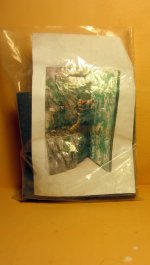
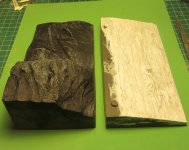
This is what you get - Enjoy
regards
Wolfgang
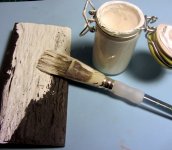
Time for the first pictures:
 

Attachments

  • 3.JPG
    3.JPG
    253.6 KB · Views: 321
  • 1.JPG
    1.JPG
    115.8 KB · Views: 326
  • 2.JPG
    2.JPG
    216.2 KB · Views: 361
Wolfgang,

Thanks for posting. I would like to see photos as you progress, step by step, if it's not too inconvenient.

Brad
 
Excellent Wolfgang - I'll be watching your progress with pleasure, I'm sure. Should be great fun to do.^&grin johnnybach
 
Is the falls scenic base with this set or just the 2 figures?
mark
 
Wolfgang,

Thanks for posting. I would like to see photos as you progress, step by step, if it's not too inconvenient.

Brad

Hi Brad,
I planned exactly to do just this. Just got ordered away from the PC before I could start
putting up more pictures. Myself being german national our chrismas is really on 24th December "Heiligenabend" The 25th being a lazy day off mainly if you do not visit friends and family,
This year it is only me and my wife and some good food.
Attached pictures of what caused the delay in putting up more pics: -- a unfortunate germanized british duck with Knödel - all gone by now.
Haveing said that time to work on my manners:

ANYBODY READING THIS A VERY MERRY AND PEACEFULL CHRISMAS
 

Attachments

  • IMG_1422-1.JPG
    IMG_1422-1.JPG
    235.4 KB · Views: 158
  • IMG_1423.JPG
    IMG_1423.JPG
    194.3 KB · Views: 157
Is the falls scenic base with this set or just the 2 figures?
mark

Hi Mark,

no, no --- the brilliant thing is that it all comes together two figures and two pieces of the scenic base that needs to be assembled after painting
rgds
Wolfgang
 
I will use waterbased paints on this project. As for me waterbased does not automatically translate to Acrylic paint. I will use Gouache, Watercolour and Plaka paints. Alongside with some traditional artists Oil paints - but only very little of this.
What I need to do first to get the paints applied and giving them a firm grip on the metal figures as well as the resin casted pieces is a good undercoat to paint on. No grey primer out of the rattle can here - that might not work since such primer is solvent based. I used artist Gesso. White for the waterfall and black for the rocks and the figures.
 

Attachments

  • 7.JPG
    7.JPG
    199.6 KB · Views: 152
  • 4.JPG
    4.JPG
    170.9 KB · Views: 141
  • 5.JPG
    5.JPG
    215.5 KB · Views: 134
  • 6.JPG
    6.JPG
    209.3 KB · Views: 167
Excellent Wolfgang - I'll be watching your progress with pleasure, I'm sure. Should be great fun to do.^&grin johnnybach

Hi Johnnybach,
very happy to see you being interested, honestly looking forward to your comments on this project since I will basically proceed like you do concerning the gloss-coating over a painted surface.
rgds
Wolfgang
 
Both resin pieces finnished. Ready to be painted. Just a quick note on the Gesso.
It works best diluted with water and a drop of dish washer liquid to reduce the surface tension.
Apply 2-3 coats and wait until each coat has dried completly.
rgds
Wolfgang
 

Attachments

  • 8.JPG
    8.JPG
    191.6 KB · Views: 144
This is the basic selction of paints I am going to use.
 

Attachments

  • 9.JPG
    9.JPG
    230.5 KB · Views: 137
Wolfgang,

You must have had a tasty meal. That looked delicious. I would be asleep, resting ^&grin

Thank you for more photos and look forward to watching the progress.

Regards,

Brad
 
Wow Wolfgang - hope you aren't going to use ALL of those tubes and pots!:wink2:

Looks to be a very nice kit from Patrick at Sarum Soldiers, Wolfgang - good to see you can't wait to get cracking!:D Hope you helped with the washing up!

N.B. Anyone else interested in this nice little scene, can find the kit (or it is available painted) on the Internet, on this link below :

http://www.sarumsoldiers.net/category/view/Sherlock-Holmes
 
In my opinion Pelikan's Plaka Paint is the most "undervalued" paint that relates to our hobby.
It has been around for ages - if not mistaken even since before the first World War. What makes this paint so special? It's covering abilities combined with a smooth matt finish lacking any brushstrokes if applied correctly. It dries fast to a waterproof finish, mixes well and comes in a lot of nice and usefull colours. Plaka stands for "Plakatfarbe" the german term for Poster Paint. To the present date it is produced by the Pelikan company, a german brand that was allready a buisness success when companies like OPEL, MERCEDES and BMW where still produceing sewing machines and potato mashers.
Now why does nobody use them or even know about them? Difficult to answer, perhaps they are simply not "Arty" enough- around for too long - and the colours bear names like "Dark Brown" and "Yellow" not "RLM desert Yellow" or "Zombie Sewer Brown". Give these brilliant colours a try and I am sure you will like non-fade, waterproof velvety matt finnish. Casein is the binding medium and unlike acrylic it sort of brings the colour closer to the object then acrylic resin does, Plaka surface appears smoother and more even. Very important if you "Gloss" your figures AFTER you have painted them. Downside, here in the UK they are quite difficult to get and if so very often beyond their "Best-Before-Date". Some smaller Art stores in London do stock them though. Unlike other Poster Paint Plaka will dry to a waterproof surface, a huge benefit for the painting technique I have choosen here.
Regards
Wolfgang
 

Attachments

  • 10.JPG
    10.JPG
    144.4 KB · Views: 132
Now finally on with painting. From the three shades of Plaka paint from the previous picture I have mixed a basic brown shade. I have diluted the mix with a generous portion of water and applied it to the black-gessoed scenic resin piece. That is basically all I did at this first step of painting. Wait until completly dry - which does not take long - and than I will continue lightening up the rocks.
regards
Wolfgang
 

Attachments

  • 11.JPG
    11.JPG
    143.7 KB · Views: 144
Now useing a small portion of "Skin Colour" to the previous brow basic mix
will lighten up the brown paint dramatically. Not that much diluted than before this lighter colour is painted over the previous coat. Avoiding to cover each and every bit with this mix and gently fethering in the edges the rock formation will start to become to look more natural.
regrads
Wolfgang
 

Attachments

  • 12.JPG
    12.JPG
    204.9 KB · Views: 147
Now while the previous coat of paint is drying up some more light paint is mixed into the paint. Carefully blending the next lighter coat of paint onto the rock formation. Be carefull with the amount of lighter paint you do apply, haveing to go back to darker shades does not look good and will disturb the logic of going from dark to light in order to craete a nice clean 3D rock surface.
 

Attachments

  • 13.JPG
    13.JPG
    226.9 KB · Views: 162
Now the next two pictures just show the succesive steps. Following the same technique as explained.
regards
Wolfgang
 

Attachments

  • 15.JPG
    15.JPG
    133 KB · Views: 101
  • 14.JPG
    14.JPG
    194.3 KB · Views: 103
Now time tio become a bit more artistic. In order to get the rocks surface a bit more exciting I decided to add some "venes" into the rock formations like they can be found in nature.
Since space is limited but I wanted them to be there clear and visible I decided on useing high quality watercolours for this step. The result ought to look more like a glazed colourline so I needed the best possible pigmentation to do this job which can be best found at watercolours.
Now not each and every step could be documented with photgraphs I am sure you get the idea.
Watercolours love the surface left by the Plaka paints and corrections and alterations can easily be done with a wet brush which either fethers in the paint or removes part of it or whatever ... - but remember it only works on a waterproof surface which can not be provided by oil-based paints and does not work very well with acrylics either - you might go back and want to read what I wrote on Plaka paints and why I use them on this job.
regards
Wolfgang
 

Attachments

  • 20.JPG
    20.JPG
    214.9 KB · Views: 150
Now it is time to do the detailing. Leaves and flowers and some grass remain to be painted.
This time I switch to high quality Gouache colours because I like the brightness of these paints.
As for the underground same thing applies as for the watercolours. Gouche loves Plaka. But be aware when the gouche paint meets the watercolour they will mix. So be carefull or use this effect to your benefit.
regards
Wolfgang
 

Attachments

  • 21.JPG
    21.JPG
    237 KB · Views: 149
Now basically it is going into the right direction. Lot of refinement and detailing still to do but nothing that has not allready been discribed before, so it is basically a thing of checking the result and comeing back with one or the other step as discribed. No to complicate things a little bid more I wanted to add some mor highlights to the rocks only. A friend once told me that DRYBRUSHING in the true sense of the meaning is only possible with ouil based paints. At first I did not see the logic in this since I drybrushed any waterbased paint before on nuerous objects. But when he explained furthermore and when I had the chance to test what he was saying I got to admitt that he had a point. If you are really after a very soft hue in lightening up an object than oilbased paints are really the better choice since the pigements or rather particles of paint that are being transferred in the process are much smaller than those of any waterbased paints. Give it a try - you might agree. Anyway since I DO, I felt the urgent need to mix up a basic paint from -you guessed right- artist oil paint. I think it did the job quite well. Could it been done with say Gouache or Acryllic as well?
Let's at least pretend: - NO! - but honestly try it out yourselves.
Anyway this is my result:

Kind regards
Wolfgang
 

Attachments

  • 22.JPG
    22.JPG
    205.2 KB · Views: 128

Users who are viewing this thread

Back
Top