Three Imrie-Risley hussars-SBS (1 Viewer)

Hi, Jeff,

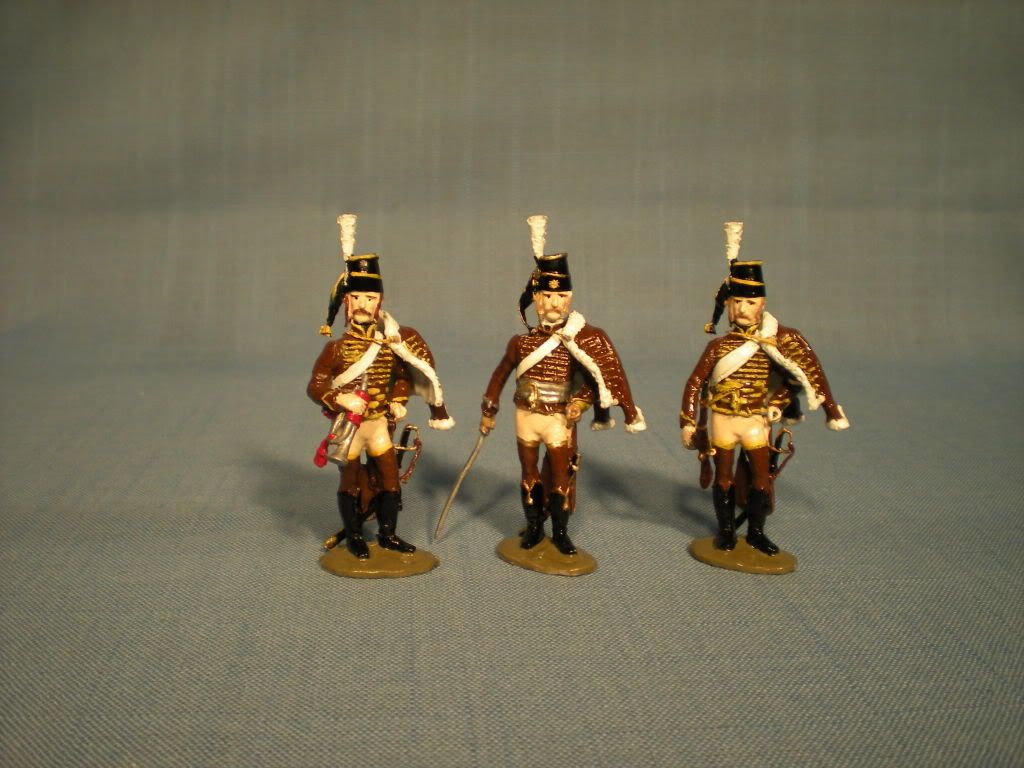
Here's a pic of 2 I/R hussar figures, with a Stadden hussar and a Tradition British grenadier, for a side-by-side comparison:

Imrie-RisleyvsTradition-comparison.jpg


The Imrie hussars scale out at a true 54mm, as does the Tradition grenadier, while the old Stadden is closer to 60mm. To my eye, the slenderness or stockiness of the figures plays a part, too, in the overall impression. I have a couple of the Stadden hussars, but they're just too chunky, so I prefer these Imrie-Risley figures (though not exclusively, as some photos in my other threads will show)

Another installment of the in-progress will follow....

Thanks Brad.

The Stadden is a bit bigger but the other figures fit in well together.

Thanks

Jeff
 
Hello, everyone, here's the latest progress on my three hussars:

3IRhussars8a.jpg


They now have their mirlitons colored in, with only some piping and the cords remaining to be painted. Also, I've made a second pass at painting their eyes; the captain and the hussar with the carbine are done, as far as the eyes go, but I blobbed the cornet's right eye, so that will have to be touched up again.

The officer's barrel sash is also started; as an officer, it will be silver, with the regimental button color (gold) as a highlight. The men will have yellow barrel sashes.

Here is a rear view:

3IRhussars8b.jpg


While I had the black out, I added their pistol and carbine cartridge boxes. And while I had the silver out, I painted the officer's drawn saber, and the Hornist's bugle. In the 18th century, they were often nickel-plated or of German silver, rather than brass.

Another small detail-their neck stocks are roughed in, as a black line above the collars. If the stocks look a little sloppy, it's not a problem, I have to add the piping at the top of each collar, which will cover up the bumps.

And also, for Jeff, I've painted the bases at this point, in the traditional toy soldier GREEN :D

Next time, they'll have boots, and more lace added. After all, it is the "Age of Lace", isn't it?

Prost!
Brad
 
Green is so 18th Century! :D

Looking good Brad, and enjoying the step by step.

Simon
 
Brad, I have to agree with Simon - enjoyable :) Have you ever seen the Funken books on the Lace Wars? These would be right up your street.

Jeff
 
Evening, everybody, here's a quick update, more details added:

3IRhussars9a.jpg


I'm done with the faces on these figures, any more fiddling with the eyes, and I'd never finish them.

For my toy soldiers, I highlight the mouths, not with pink, but with Wood from the Testor gloss enamel. Just a thin line, either hitting the cast mouth, or, if there is no cast detail, to suggest the mouth

Here is a rear view of the figures as they are now:

3IRhussars9b.jpg


Another technique I use is for painting blond hair. The first time I ever painted a figure as a blond, I used yellow. That's fine, if you're painting Aquaman, but it just didn't look right, even for toy soldier style. I took a tip from the connoisseur style, and realized that blond hair is really more of a straw color. So what I do is to use the Wood color again, and drybrush a little of the Cream color on it. The hussar with the carbine has the wood color painted in; next, I'll brush the cream on. I've given the officer block sidelocks, too, although he is also wearing a periwig. I try to vary the hair; it's usual to see figures painted with white for powdered hair, but truth be told, on campaign, the men didn't usually powder their hair, at least not in the Prussian army. In the garrison, on guard duty and parade, then it was applied. Officers, on the other hand, did wear their wigs, or pomade and powder, because it was expected.

I've started on the officer's sabretasche, too. Hussar officers had embroidered and decorated covers for their Tasche, following the same themes, but not necessarily uniform, even within the same regiment. The ranks had either the king's monogram, or even plain covers.

I've also painted in the lace top to the leggings, gold for the officer, yellow for the men, and the piping and lace on the officer's mirliton. The men's caps were plain, with colored cord around the top, but no other lace or tape applied.

Getting close to the finish now, prost!
Brad
 
... Have you ever seen the Funken books on the Lace Wars? These would be right up your street.

Jeff

Hi, Jeff, yes, I have the first volume, which covers the period from the Pharaoh's army, up to Louis XV, so only the last 3 pages cover my period, argh! I have the second volume on my wish list of books, that I take with me to the shows.

Another little book that I've found useful is "Military Uniforms of the World in Color", by Preben Kannick, similar to the various Mollo books, with numbered color plates, referenced to a brief paragraph for each. That one goes from the 1650's up to the 1960's.

Prosit!
Brad
 
Hi, Jeff, the Funcken volume I have is Nr.1 of "Uniforms and Arms of Soldiers of All Eras" (though in French). I'm going to keep my eye open for the books you posted, because I'd rather have the ones specific to the 18th Century.

Prost!
Brad
 
Brad, not wishing to sound impatient, but how are you doing with these chaps?

Jeff
 
Brad, not wishing to sound impatient, but how are you doing with these chaps?

Jeff

No, Jeff, not at all, you are absolutely right! I got sidetracked last week, spending more time on a couple of 1/48th TBF's that I am building for a scale modeling forum. And on Saturday, well, you can see from my other thread how I spent Saturday afternoon :) I've been remiss, but I will post more progress pics tonight, I promise!

Prost!
Brad
 
Ev'ning, everybody, sorry for the little hiatus in posting! Here are some pics of the latest condition.

From the front:

3IRhussars10a.jpg


At this point, it's hard to see what's different from the last post, and that's understandable. I'm almost finished now.

From the back, a little more progress is evident:

3IRhussars10b.jpg


The Säbeltaschen are painted. Officers had more elaborate designs, which were often unique from one to the next, but usually included the Prussian eagle and trophies of arms. The rank and file had more uniform decoration. They had either the royal cypher, in tape or lace of the regimental button color, or more rarely, a plain cover.

At this stage, there's not much left to do, mostly little touch-ups on every figure, and to attach the Pelze. So, the next pics will probably be of the finished figures.

Prost!
Brad
 
Hi Brad,

I love the way their hair queues are sticking out. The officer sabretache is excellent!

Rgds Victor
 
Thanks, guys! That's one of the more fun parts to paint on the hussars.

Prost!
Brad
 
Hello, everyone! I apologize for not getting back sooner, I had some other demands for my attention in the evenings. But here is a quick update. I wanted to capture this step, before I finish these figures.

As you probably know, the hussar's pelisse (the word comes from the French, who got it from the German Pelz, which means simply, a pelt) was usually worn draped over the shoulder, and held in place with a cord and toggle. Imrie-Risley represents this with a piece of braided wire soldered inside the right collar of their pelisses. Here's a shot of one of them; I hope it shows up against the backdrop:

3IRhussars11a.jpg


Well, it's up to the modeler to decide how to attach the pelisse. On other examples of this kit that I've painted, I've pinned the pelisse to the figure's left shoulder, or even just relied on a blob of two-part epoxy and no pin.

For these figures, I decided to drill a small hole in the left breast of the jacket, and thread the wire into it, secured with some epoxy.

Here is a shot of another of the pelisses:

3IRhussars11b.jpg


This one was missing the wire, so I drilled holes in both places.

And here is a shot of what this looks like, when attached to the figure, in this case, the officer:

3IRhussars11c.jpg


All I have to do, with this method, is to paint the cord in the appropriate color, and touch up around the holes.

This is the next-to-last post, the next one will show the finished product. I will try not to let it go as long as this one did :D

Prost!
Brad
 
Here's what I've been working on at the same time:

TBFexterior4.jpg


Actually, I'm working on a pair of these, Monogram 1/48th TBF Avengers. I'm finishing them as TBF1-C's from VT-10 in late 1942-early 1943, intermediate blue over light gray, large circle-and-star national insignia. These are part of a group build over at AgapeModels.com, and part of my own Resolution Build-I've resolved to finish 12 model kits that I had started over the past 3 years but never finished. At the same time, I'm trying to clear my bench of some of the figures that are in the same boat. Enough to keep me busy for a long time.

Prost!
Brad
 
Hello, everyone! I apologize for not getting back sooner, I had some other demands for my attention in the evenings. But here is a quick update. I wanted to capture this step, before I finish these figures.

As you probably know, the hussar's pelisse (the word comes from the French, who got it from the German Pelz, which means simply, a pelt) was usually worn draped over the shoulder, and held in place with a cord and toggle. Imrie-Risley represents this with a piece of braided wire soldered inside the right collar of their pelisses. Here's a shot of one of them; I hope it shows up against the backdrop:

3IRhussars11a.jpg


Well, it's up to the modeler to decide how to attach the pelisse. On other examples of this kit that I've painted, I've pinned the pelisse to the figure's left shoulder, or even just relied on a blob of two-part epoxy and no pin.

For these figures, I decided to drill a small hole in the left breast of the jacket, and thread the wire into it, secured with some epoxy.

Here is a shot of another of the pelisses:

3IRhussars11b.jpg


This one was missing the wire, so I drilled holes in both places.

And here is a shot of what this looks like, when attached to the figure, in this case, the officer:

3IRhussars11c.jpg


All I have to do, with this method, is to paint the cord in the appropriate color, and touch up around the holes.

This is the next-to-last post, the next one will show the finished product. I will try not to let it go as long as this one did :D

Prost!
Brad

Hi Brad,

This is a bit fiddly is'nt it, but the end results look good.

Jeff
 
Hello, everyone, na, endlich! finally, the last post, and the completed hussars. Well, that is, I'm declaring victory and going home!

Here are our three Brown Hussars, all finished, and with a final coat of Future to seal everything in:

3IRhussars12a.jpg


Jeff is absolutely correct, it took a little extra dexterity to thread the wire for the pelisse cords into the holes I drilled. Fortunately, I used a really slow CA glue, so I had time to thread them, and I didn't stick myself to anything, either.

Here's a rear view:

3IRhussars12b.jpg


The next time I tackle a similar kit, though, I think I'll anchor the pelisse on a pin in the shoulder instead. But they look good enough, and they take their place in the display case with the rest of my Prussian cavalry (and clear some space on the bench!)

I'd like to say again that for anyone interested in painting his own, these Imrie-Risley hussars are to be recommended, fitting in to any setting from the Seven Years War, through the Revolutionary War, to the early Napoleonic.

Thanks everyone for following along, especially over the last two posts, coming as they did with brief hiatuses in between. Now I'm going to pick up with the Rose cuirassiers that I started. In that series, the next items are going to be roughing in the standard, and what to do about the Säbeltaschen (the lack thereof).

Thanks again for looking, prosit!
Brad
 
Hi Brad,

Thank you for allowing us to follow along as you finished these figures. I very much enjoyed watching you bring them to life and I look forward to following your next project!

Warmest personal regards,

Pat :)
 
Brad,

Nice finish! The Seven Years War seems to play second fiddle to Napoleonics - so it is a wecolme change to see Hussars from this period.

Looking forward to the Cuirassiers.

Jeff
 

Users who are viewing this thread

Back
Top