Using Flex Foam – Boulders (1 Viewer)

D

Dave@Traverse

Guest
A couple weeks ago, I promised to post a "How To" on using Flex Foam material to create diorama elements. Here's the first installment.

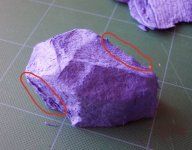
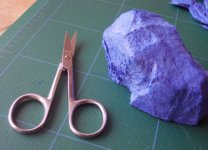
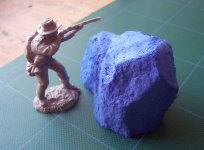
Today, I'll walk through how to make a simple boulder, shaping it out of the foam and then detailing it.

Why make a boulder when you can easily grab a stone from your neighbor's landscaping? Good Question. Real rocks will often do, but if you want to display a large boulder, or a number of boulders, the real thing gets real heavy real quick. The flex foam is much lighter, easy to affix to your substrate, and can have a flat base, an important feature if you want to easily depict a boulder protruding from the earth. You also have more control over size and shape, since you're making it from scratch.

So those are my reasons, and there's more that have to do with the exact nature of the flex foam. I'll post a followup comment that describes the material in more detail.
 
Getting Started

So let's get started. Here's what you'll need:
• a sharp wood chisel or two
• a block of flex foam
• paintbrush
• a toothpick or small wooden skewer
• foam sealer
• acrylic paints
• textile medium (to add flexibility to the paint)
• a soft cloth or rag


Flex_rock_1.jpg

The first step is to shape the block of flex foam with your chisel. Since the flex foam is not nearly as hard or dense as wood, you won't need a mallet; you simply start shaving or peeling away the foam with the edge of the chisel. You might think of the technique as a "guided tear," because you don't slice through the foam as much as you tear or pull the material apart in a controlled manner. It's quite simple once you get the hang of it, and the material is very easy to work with. Remember, it's the tearing that gives the surface the rock-like texture.

Flex_rock_2.jpg

Flex_rock_3.jpg
 
Step Two

Okay, now we've got the basic shape of our boulder complete with realistic texture. One of the quirks of working with Flex Foam is that it will probably leave some shreds hanging off here and there. This is easy to remedy with a pair of small shears. Simply snip off the shreds and you're back in business.

Flex_rock_4.jpg
 

Attachments

  • Flex_rock_5.jpg
    Flex_rock_5.jpg
    94.3 KB · Views: 261
  • Flex_rock_6.jpg
    Flex_rock_6.jpg
    96.3 KB · Views: 240
  • Flex_rock_7.jpg
    Flex_rock_7.jpg
    92.1 KB · Views: 259
Re: Step Two

Okay, now we've got the basic shape of our boulder complete with realistic texture. One of the quirks of working with Flex Foam is that it will probably leave some shreds hanging off here and there. This is easy to remedy with a pair of small shears. Simply snip off the shreds and you're back in business.

View attachment 48061

View attachment 48062

View attachment 48063

View attachment 48064
Sounds interesting but I get an illegal attachment message when I use those links?:confused:
 
Re: Step Two

Spitfrnd,

That's just me fumbling around with the forum tools. Should be fixed now.

Dave
 
The next step is to seal the boulder with the Flex Foam sealer. The sealer is the "secret sauce" of the technique, and creates a durable, flexible "skin" that adheres well to the foam and provides the necessary base coat for detail painting.

I usually impale the subject on a toothpick or skewer so I have something to hold onto when I paint. Allow subject to "cure" for 4-6 hours.


Flex_rock_8.jpg

Flex_rock_10.jpg

Flex_rock_11.jpg

Flex_rock_13.jpg
 
Once the sealer has cured, it's time to apply the base color. I use acrylics you can find at any craft store, and then add Textile Medium to it to increase the paint's flexibility (it needs to flex with the foam and not crack or flake).

The snapshot below shows the boulder with the light base coat already applied, awaiting the final coat of paint: a dark stain that will show the "lowlights."


Flex_rock_15t.jpg
 
More to come...

More to come...gotta run out to a doc apt. I'll be back and finish tonight.

Dave
 
Pretty cool Dave...where do you get this flex foam and sealer...what does it cost and how thick a block can you buy...the idea of fabricating large rocks that are flat on one side to simulate them being embedded in the earth is a big bonus...
 
Spitfrnd,

The links in that now edited post weren't intended to be links. They were photos I was attempting to upload and for some reason couldn't. I've since gotten it to work, so you're seeing all those photos in the other posts and not missing anything.

Dave
 
Okay, final step. Now that I've got the base color applied, I use a darker stain to accentuate the rock-like texture of the foam. I paint the entire boulder with the stain and then wipe most of it off with a soft cloth, leaving it sit in the cracks and crevices. Of course you can dry-brush too if you'd like, but I seem to have better results from the stain and wipe method.

For the stain I again use craft acrylics (Delta Ceramcoat, Folk Art, etc.) and then add a staining medium to it. Both the staining and the textile mediums can be found at your local craft store. I usually stretch it with a bit of water too, which makes it easier to wipe off and saves a few pennies.

Flex_rock_16t.jpg

Flex_rock_17t.jpg
 
Mike and all,

You can get the flex foam (closed cell chemically cross-linked PE or EVA foam...which is why I just say "flex foam") online at a few different places. They actually use blocks of the stuff for Yoga supports. Go figure. So you can find it at www.yogaaccessories.com. Per square inch, it's a bit more expensive than the pink or blue insulation board, but not bad at all, especially considering the final product you get. The main problem is that they don't offer much choice in the way of size or color.

I'm planning to remedy that. I'm in the process of working out a deal with an industrial supplier where I'll buy bulk, have them slice and dice it up and make it available through my website. Look for that sometime in the next month. I'll probably sell samples sizes too if you just want to experiment with a small chunk. I'll post here when I've got inventory.
 
Oh, and the same goes for the sealer. It took me a whole lot of trial and error before I landed on the particular formula I use to seal the foam. The challenge was finding a paint that would adhere to the foam, but would also flex with it. The foam apparently has "low surface tension," resisting many paints and glues. But this combo works great and I'll be making it available on my site.

As far as glue goes, your typical hot gun glue should work fine. I've also had great success using a contact cement designed specifically for the foam – also found at your local craft store (made by a company called Beacon).
 
Dave...

Nice techniques and seems much simpler than casting boulders in moulds which, is what I do. When do you think your website will be up and running??
Mitch
 
Mitch,

My website (www.traversedioramics.com) is up and running now, I just don't have the flex foam or sealer listed yet. But I was giving some thought to this last night, and in the meantime, if anyone wants a small sample of the foam to play around with, I'd be happy to send it out for just the cost of shipping. I'm not sure what that would be for those of you across the pond, but the package would be small and light at least.

The offer is available to anyone here on the forum. If you're interested, go to my site and fill out the contact form. Just say you saw this on the forum and make sure you leave your address, email, and how you want to pay for shipping. Then you can look for the real product on my site in the next month or so.
 
Hi Dave,

I enjoyed talking with you at OTSN Chicago, and I see that your website and SBS here are complete.

I think you're on to a great and unique concept here. I wish you luck in your new business.

Thanks for sharing your techniques. I'm still playing with the "trees" I bought at the show. Might you do an SBS of that next??

Best Regards,

PJ
 
PJ,

It was a real pleasure meeting you at the show; thanks for your interest and best wishes. I think a tree/foliage SBS is a great idea, too. Look for that to come.

Best,
Dave
 

Users who are viewing this thread

Back
Top