Some Very Basic Questions (1 Viewer)

Gentle Friends,

Ha! :D I thought I was asking a simple question that would generate a simple answer! Let me return to the three tentative conclusions I reached in frame #8.

1.) My first tentative conclusion seems valid. The choice of brands of paint is a very personal thing.

2.) My second conclusion seems valid. There is a definite issue regarding the preference for oil based enamels vs. a preference for acrylics. Both types of paint have their fans and, again, we see the matter of preference and experience as important factors in what type of paint we choose to use.

3.) My third tentative conclusion is probably best viewed as a generalization, not a conclusion. In short, there are various ways to create a glossy finish and a variety of ways to create a matte finish, but, generally speaking, one tends to use enamels to create a glossy finish and one tends to use acrylics to create a matte finish.

Are the above items generally correct? If not, please continue to clarify my mistaken notions. If the above items are correct or at least mostly correct, let me know and I will move to my next basic question.

Thanks for all your discussion! It is most helpful to me!

Warmest personal regards,

Pat :)

Pat you would be correct on all three of your points.

My advice would be to go to your local hobby shop and purchase a few different manufacturers' paints and give them a test run. They are usually pretty cheap $1-$3 a piece.
 
Pat you would be correct on all three of your points.

My advice would be to go to your local hobby shop and purchase a few different manufacturers' paints and give them a test run. They are usually pretty cheap $1-$3 a piece.

Hi Scott,

Thanks for varifying that my conclusions and generalizations are not far off the mark. I shall now proceed to ask my second question. However, rest assured I will ultimately return to further discussion of paints, painting techniques, and a few other questions that I am certain will occur to me.

I cannot remember any discussion of paint brushes on this forum. At my last visit to the hobby shop, I examined the brushes available for the hobbiest. My oh my! What a variety of possibilities! There were broad brushes, detailing brushes, pointed brushes, and many others. Logic told me that each brush was designed to meet a specialized need. There were brushes referenced as spotters, rounds, and angulars, etc. Since it is clear that there are many brushes from which to choose, my second basic question is:

What types and sizes of brushes should one have in order to accomodate most needs that a toy soldier hobbiest might encounter? Are certain brands of brushes preferred?

I realize I am entering another of those areas in which preference and experience play a large role. Nevertheless, some information that is based on the experience of others will be of great help to me.

I look forward to any information that members feel free to share with me!

Warmest personal regards,

Pat :)
 
Well for me Pat I have a huge assortment of brushes of all different sizes. I have bought brushes from the dollar store and also from Walmart. Price wise they range from $1 for 5 brushes to $5 for 1 brush. There are more expensive brushes out there as well. I generally tend to stick to the smaller brush heads, less chance of applying to much paint with my clumsy hands :D You can also get animal hair & synthetic hair brushes, I have used both and haven't noticed any difference.

I think if you go to Walmart, you should find what you need at a good price. I believe the brand they sell is Plaid. (They also make acrylic paints).
 
You're right again Pat, I think there is a fair amount of 'what works for me' about paint brush selection. Like Scott, I've got loads of varying quality, that said, I believe it's alot about personal inspection of the brush you intend to buy. It sounds a bit anal, but I have seen plenty of expensive ones which are totally naff, and some of the relatively cheaper ones giving long life.

In terms of sizes, for figure painting, I would recommend sizes (approx) 5/0, 2/0, 0, 2 and 6. The 6 for blocking out large areas of the same colour, the 2 for smaller areas, but where detail isn't paramount, and the others for varying degrees of detail work.

I usually use rounds, although I like a no. 2 size in flat, for some reason unbeknown to myself.

I don't go for specific brands, but rather what looks and feels right.

The other thing I would do is purchase a few cheapish brushes for any drybrushing work, as this process does knacker them out a bit.

Interested to hear what others do.

Great thread Pat!

Simon
 
My approach to brushes is quite simple, I use 000, 00, 0 and 6 pure sable brushes, buy the best quality brushes that can be afforded and if looked after they will last for many a year. There is always the exception of course.

What does wear out brushes quicker is painting on bare white metal castings that is one of the reasons why I undercoat figures before painting.

Jeff
 
Gentle Friends,

It appears that owning five or six brushes of different sizes should accommodate most painting needs. No mention was made of spotters or angular brushes, so I am assuming rounds and flats are the most frequently used. Again, correct me if I am wrong.

Now, for my third question.

I understand that prior to painting a bare casting, it is highly advisable to apply primer to the entire figure. I further understand that the easiest method of applying the primer to the entire figure is by using a spray can. However, when you are dealing with paint chips, is it always necessary to apply primer to the small areas that are being touched up? If it is not always necessary, when and how do you apply primer to a paint chip?

Once again, your input will be highly appreciated! And, once again, I appreciate your patience with my most basic questions!

Warmest personal regards,

Pat :)
 
Pat,

All depends on whether the chip has gone down to the bare metal or the undercoat, if indeed the figure has undercoat in the first place. Just apply the undercoat with a small brush to the required depth and when dry touch in the top colour.

What I have done in the past is to spray the grey primer into an old mug and then dip the brush into that or use a matt white straight from the tin.

I hope this makes sense but it's just the way I do things.

Jeff
 
Pat:

Glad to see your interest in painting! First off let me say that in this area I have little if any talent........I might as well be using my fingers.:D However through time and patience I have developed a fair amount of skill with the old brushes.......certainly not at the level of many other Forum members, but still not bad at all. I will dig out a figure I did a few years ago and post a picture if I can find it.

If you take your time, you can develop a fair amount of skill and have a lot of fun. You need a nice work area, a good lamp, some magnification equiptment, and a nice assortment of paints. I use Tamaya acrylics, mostly flats, I also have some gloss, a bit of oil base, thinner and my favorite clear flat (in case I use a gloss that needs to be dulled) I use teflon cups to hold a bit of water to quickly clean brushes when I switch colors. I also have a smooth plastic panel which I use to mix colors to get exactly the correct shade I might need.

As for brushes I have about three dozen but find I usually use the same friendly handful until they are worn out.:eek: You can spend a lot of money on them, but I recommend you go to Michael's Craft store if you have one near you. I picked up a wonderful pouch of sable brushes that rolls out to expose perhaps 15 different sizes and it was like $6.:eek: Normally you could easily spend that on one brush. If you keep your eyes open you can have a nice assortment of brushes for under $20.

Good luck and have fun!
 
As chips can often be much deeper than just a layer or two of paint, Idon't bother with a primer, but rather build up the layer using the same colour - thin dab, wait until dry, then another thin dab etc. until the paint on the chip is flush with the surrounding paintwork.

Looks like you're not going to get one answer to any of your questions.:D


Hi Simon,

:D:D:D Based on your comment above, I think it is time to take stock of what I have learned in this thread before proceeding to my next question. Now, let me see....

My first question was concerned with knowing why certain brands of paint seemed superior to all others. What I learned was there are two types of paint: oil based paints and acrylics. If one wants a glossy finish, oil based paints seem to be the best choice, unless....

you want to use acrylics. If you want to use acrylics, you may apply some "wonder mist" and cause the colors to shine. If you prefer a matte finish, then the use of acrylics seems to be the superior choice. However, if you prefer oil based paint, but you want a matte finish, you may "dull down" the glossy finish by adding wax to the glossy paint. Of course, if you live in Canada, you dull down the paint by adding baby powder to it. Hmmmmm. I am glad I am only asking basic questions!

Then there is the matter of clean up. If I understand what I have been told, oil based paints stink and cleaning up after using them is a pain, whereas, the use of acrylics results in a stink free environment and the clean up only requires some soap and water. These are excellent points in response to a question I did not ask. However, I will file this information for future use.

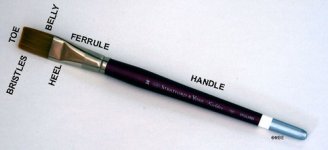
I then asked about the brushes that are necessary in order to meet most needs the toy soldier painter might encounter. From the generous responses I received to my question, I learned that there are expensive brushes and there are cheap brushes. Some expensive brushes are no good and some cheap ones are superior to most expensive ones. However, no one commented on how to tell the difference. Some painters indicated they owned many brushes. I suppose that is because they cannot tell the difference either. Therefore, I have concluded it makes no difference what kind of brushes one uses because you can make an equal mess with whichever brush you desire using at the time.

I also learned Simon frequently uses a #2 Flat, but he has no earthly idea why. Is this a common condition witnessed among painters? Wait! Please don't answer that! The answer might be more than I can handle!

Finally, I asked about the use of primer when touching up paint chips. It seems that you can use primer if you want to, otherwise you simply keep globbing on paint until you tire of doing so.

Is my summary above about right?

Isn't this forum wonderful for gathering much needed information?

Since I am now armed with a body of basic knowledge, I shall forge ahead with my next basic question. According to the Michigan Toy Soldier tutorial on painting metal figures,...

When starting to base coat the uniform we want to make sure that we are painting from the "inside out". In other words, we want to paint the tunic not the belt, the collar not the grenade sandbags. This allows us to fully cover all of the hard to reach areas without risk of slopping paint on items already painted.

My question:

Does the same principle of painting from the inside out also apply to correcting paint chips? For example, should paint chips on the hides of horses be corrected before paint chips on harnesses are addressed?

As you might imagine, I anxiously await your replies. :rolleyes:

Warmest personal regards,

Pat :D;)
 
Hi, Pat, regarding your latest question, yes, generally, I would work from the inside out, or lowest level to highest. So, if I had to touch up a chip on a horse, and the chip removes paint where part of the tack lies over the horse's hide, I'd paint the hide first, then the tack.

One more tip-experience is the best teacher :)

Prost!
Brad
 
Yee Haa!
2 consecutive posts that agree. :D I tend to work inside to out, i.e. skin / face, hair, any showing undergarments, outer garments, base, belt + pouches etc and weapons. I tend to leave the headgear until last (usually), as I can never get on with painting a figure whilst it's sat on something, and have to hold it in my grubby paws, so I tend to hold most by the base and headgear. Therefore to minimise paint wear, I tend to paint headgear last.

That said, Jeff tends to block paint larger areas on his glossys and then go back for things like the faces etc. I've tried this and quite like it for gloss painting, as the oil based paints I find are less easy to control than the matt.

Still haven't figured why I like a No. 2 flat. ;)

Pat, as Simon says I paint in a arse-about-face way! you only have to see some my painting threads to see what I mean.

I find it easier to block paint large areas first then paint the detail over top, then afterwards apply a second coat of main colour with a 000 brush and cut in neatly. I find it easier to paint upto raised detail than away from it, confused yet? Have a look at the Mountford Metal Miniatures thread in the painting forum to see what I mean - I will be posting a couple of photos tomorrow showing how I am painting the elephant.

As Brad says - practice is the only way to achieve your own style.

Jeff
 
Gentle Friends,

In several earlier posts on this thread, mention was made of blending techniques differing between the use of oil based enamels and the use of acylics. Referencing blending techniques and their differences gives rise to my fifth question, which is:

What are these specific blending techniques and how does one skillfully apply them? Also, what specific blending techniques work best with oil based enamels and what techniques work best with acrylics?

Once again, I request your patience with my questions. If there is a position in toy soldier painting that precedes a beginner, that is the position I occupy. Your patient explanations in responding to my previous questions have been a huge help to me and I thank you very much!

Warmest personal regards,

Pat :)
 
Hi Pat,
Interesting thread and I am enjoying reading how others go about the job. I won't add to many of the points as they've been well dealt with.

As to brushes there is no agreed standard for numbering them. I like them small with short bristles as seen next to the penny on the right. Quality is a factor because you don't want the bristles falling out.

What I want to contribute is seen in the attached photo-a magnifying lamp. Without it I could not come close to doing a clean crisp job with any details. I bought mine in an electronics shop for people who weld small pieces. I've seen some in arts and crafts shops. When buying I recommend you bring a toy soldier with you to put under the loop and test the magnification. Of course if you have excellent eye sight you won't be needing one.

If I'm a bit out of sequence with your questions, I'm sorry. :)

IMG_3704.jpg

IMG_3705.jpg
 

Attachments

  • Brush-Parts.jpg
    Brush-Parts.jpg
    21.6 KB · Views: 54
  • Compare320.jpg
    Compare320.jpg
    15.7 KB · Views: 52
Russell's suggestion is a good one. I'll offer a alternative, and that's to get an Optivisor. Sure it looks nerdy on your head, but it's nice to see what you're trying to paint.

Prost!
Brad
 
Hi Pat,

I don't think oils lend themselves to blending like acrylics do. As oils are generally used for "toy soldiers" I doubt that you will need to do any shading or blending.

Regarding acrylics, one method I use is dry brushing. (please see my Jersey cows posted in this thread. The colouring on the body has been achieved using this method. Basically you need cheap brushes (the procedure damages them)with short bristles. (You can buy brushes designed for dry brushing). You paint the object black and then buildup from there, to the lightest colour.

To dry brush dip the end of the brush in a tiny amount of paint and then scrub it off on paper towels until there is hardly any paint left. Then scrub the brush over the area of the figure you want to highlight. You will see the colour show up against the black. Once you have done the first colour allow it to dry before applying another coat or colour otherwise you will rub off what you have just done.

Hope that my ramblings make some sense to you. I will try and do some pics to demonstrate if that would help better.

Scott
 
I think we need to maintain the distinction between oils-artist's oils, and petroluem-based enamel paints.

Artist's oils lend themselves readily to blending, which is a feature that those who use them prize. And as Scott pointed out, they're not really used for painting toy soldiers, though they are used by many who paint in the connoisseur style, and they are popular in Europe.

Petroleum-based enamels, on the other hand (eg, Testor's little square bottles), aren't really used for blending. But they are handy for painting in traditional toy soldier style, especially the gloss enamels.

I haven't heard of anyone blending acrylics-blending being laying a new color on top of a color that is not quite dry, and mixing the two to produce a transition zone between the two. I imagine you could, but acrylics' shorter drying time almost precludes the technique. Acrylics lend themselves more to building up a color by successive washes-applications of the thinned out color.

Scott raises another good point-drybrushing, to get the effect of different colors side by side, or highlights and lowlights, which is the effect a painter using artist's oils is shooting for with blending. I use drybrushing, too, especially on figures that go with my scale models (eg, a pilot in a P-40) and especially for highlights, and washes for lowlights or shadows.

As an example, I painted the pilot I mentioned by washing the kit part first with soap and warm water. Then I primed him with a fine-grained automotive primer (sounds high-falutin', but it was just WalMart's generic brand). Then I laid in my base colors, from the inside out:

flesh for the face
khaki for the trousers
medium brown for the leather jacket, shoes and flying helmet
yellow for the Mae West

Then highlighting/shading. On the jacket, a slightly lighter shade of brown, almost tan, drybrushing to hit the higher areas of the jacket-tops of folds, for example. Same on the khaki trousers, a slightly lighter color (I used the flesh color). I applied some shadows to the trousers by washing with a wash of artist's oils in turpentine (aka an oil wash). For the rest of his body and his face, an oil wash using burnt siena. Just enough to pick out the detail of the casting.

I also used a matte lacquer between applying the basic colors and the oil washes, to keep the thinner from possibly damaging the layers below, since I was using all petroleum-based paints.

The techniques would be similar for larger figures.

For touching up damaged paint, though, you wouldn't need to go through such an involved process.

If I had used all acrylics, I would have painted in my base colors, maybe using lighter shades, then use all acrylic washes to lay darker colors in the lowlights and gradually build up the shadows.

Hope that doesn't confuse things further, prost!
Brad
 
Hi Brad, You must look like some star treck character with that thing on your head. Next time you're at the same show as me, you can put it on so that I'll recognize you :D.

Seriously, I've thought of using one of those but the one I saw, years ago, did not magnify enough for me.

Again Pat, probably totally out of sequence, a symptom of one of my many character flaws, is the question of dust. I paint some, walk away and sometimes don't return to the job for a long time. So I cover the figures being worked on as seen in the photos.

IMG_3708.jpg


IMG_3709.jpg
 
Russell's suggestion is a good one. I'll offer a alternative, and that's to get an Optivisor. Sure it looks nerdy on your head, but it's nice to see what you're trying to paint.

Prost!
Brad

I have used one of these for a few years and find the 2.5 X magnification - just right for the white of the eyes!

Jeff
 

Users who are viewing this thread

Back
Top