12th Century Holy Land; A New Crusader Diorama (1 Viewer)

mestell

Colonel
Joined
Feb 12, 2008
Messages
8,154
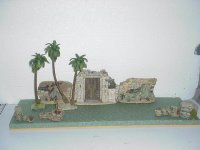
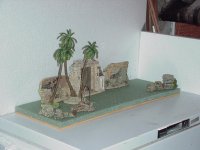
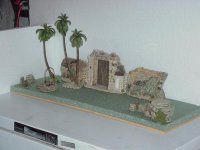
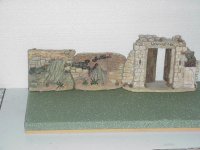
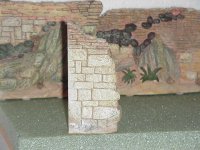
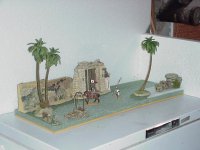
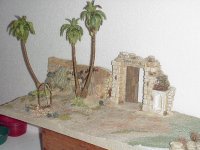
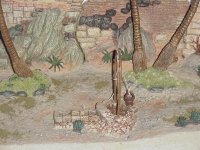
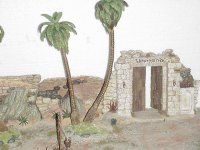
I am now off work until January 5. Its been very cold here in Wisconsin and we have already had 35 inches of snow this month with another 4 to 6 inches of snow predicted for tonight and tomorrow (Christmas Eve). Since I will be inside during my stay away from work I have decided to take this opportunity to build another diorama for my K&C Crusader range. I actually started it this past weekend, but haven't had a chance yet to post pictures. Anyway I thought I would post step-by-step pictures of my progress over the next several days until its finished.

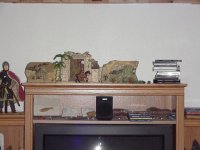
The diorama will be placed above the entertainment cabinet that's in my finished basement office. That's what I like to call my area that my wife allows me to have for "my space". The top of the cabinent is 35 inches across.

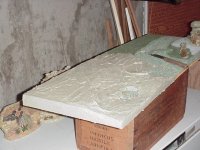
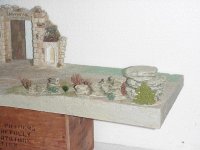
Picture #1 shows the top of the entertainment cabinet.

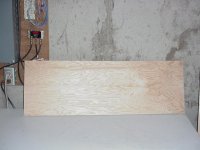
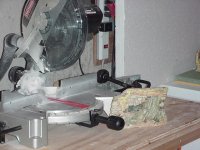
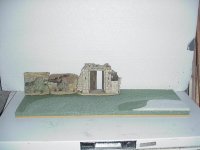
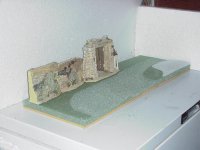
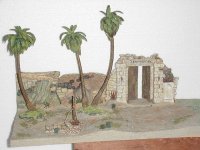
Picture #2 shows the piece plywood that I will use as a base. I have cut this from a piece of 3/8" scrap lumber that I had into a 35" x 12" rectangle.

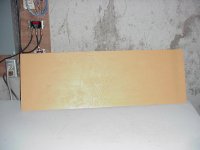
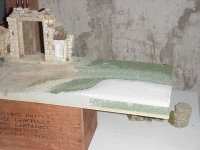
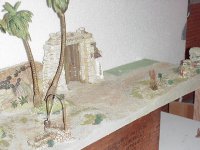
Picture #3 shows the plywood base painted. I used latex interior house paint to cover the top, bottom, and sides of the base with two coats of paint. I did this to prevent/minimize warping from moisture absorption by the wood.

Mike
 

Attachments

  • MVC-003S.JPG
    MVC-003S.JPG
    42.1 KB · Views: 821
  • MVC-004S.JPG
    MVC-004S.JPG
    37.2 KB · Views: 840
  • MVC-005S.JPG
    MVC-005S.JPG
    31.7 KB · Views: 833
Good to see you at work again Mike!
I have been trying to wrap up a few more here myself...but that pesky Richard Walker is always distracting me. (which is a good thing!)
Looking forward to seeing your progress.
Ken

P.S.
Have a great Holiday and stay warm.
 
I like to use Floral Foam to create all of my terrain features. I find it so much easier to use than white bead board or the blue or pink foam board. Floral Foam comes in all different sizes and shapes. It comes in green or white and I find it readily at either Michael's Craft Store or in the craft section of JoAnn's Fabrics.

In picture #1, I have taken a piece of 36" x 12" x 1" green Floral Foam, and cut it to fit the plywood. I literally painted one side of the plywood with Elmer's yellow wood glue and then placed the Floral Foam on top. To maximize adhesion between the plywood and foam surfaces, I pressed them together by carefully placing two boxes of heavy books on top of the foam with the bottom of the plywood on the basement floor. I then let them sit for 24 hours before removing the weights.

I will be using a Dept. 56 Caravansary Gate, and two sets of Dept. 56 Caravansary Wall sections as a backdrop. One set of the wall sections are on their way to me and are not pictured. When finished the wall sections and gate will extend the entire length of the diorama. I will also be using Dept. 56 palm trees, a K&C desert well, and several JG Miniature desert rock outcroppings as part of the landscape. Pictures 2, 3, & 4 show how I plan to place them.

Gotta luv my assembly area. Its amazing how handy the top of that chest freezer can be.

This is it so far. Tomorrow I plan to start contouring the Floral Foam.

More pics to come.

Mike
 

Attachments

  • MVC-006S.JPG
    MVC-006S.JPG
    40.8 KB · Views: 345
  • MVC-007S.JPG
    MVC-007S.JPG
    37.8 KB · Views: 344
  • MVC-008S.JPG
    MVC-008S.JPG
    39.5 KB · Views: 342
  • MVC-009S.JPG
    MVC-009S.JPG
    40.2 KB · Views: 356
Your at it again.Great,looking foward to your progress.
Mark
 
Thank you for such a detailed description.

I noticed that these Dept.56 palm trees are not easily available any more. I think I understand the reason now. :D
 
Thank you for such a detailed description.

I noticed that these Dept.56 palm trees are not easily available any more. I think I understand the reason now. :D

You are very welcome Adanna. The Dept. 56 Village Palm Trees (set of 2), #56.52820, have been retired a number of years along with the rest of the Village of Bethlehem pieces. They are somewhat hard to find, but not impossible. I have 4 complete sets, all of which I got off of eBay. I paid $24.99, $51.20, $70.00, and $77.90 for them in separate auctions. My investment includes the shipping I had to pay for each. That's an average cost of $56.00 with shipping - certainly not unreasonable for the quality of these palms. Anyway, if you do a search on eBay (dept. 56 bethlehem) you should eventually find them listed.

Mike
 
We were greeted this Christmas Eve morning with more snow - yuk! :eek: Certainly going to be a very very white Christmas here. Got lots of things to do today so I won't have much time to work on this diorama. Decided to do something I have never done before :confused: slice/cut one of my Dept. 56 structures with my circular saw. I am going to be using two interlocking sets of the Dept 56 Caravansary Walls (#56.59917). To make these sit flush with the ends of the base I will need to cut two of the wall pieces to fit. Here goes . . .

Picture #1 - The left side wall piece to be cut sitting next to my saw - the moment of truth! :eek:

Picture #2 - By golly it worked!!!! :D:D With the piece in place on the cutting surface, I turned the saw on and very carefully and very slowly I brought the blade down. The saw cut right through the resin casting perfectly. Not one chip, not any unwanted damage. This was easy. :p

Picture #3 - The altered piece in the place where it will be used. Notice how nice the cut end meets the edge of the base.

Picture #4 - The waste piece which I will keep to incorporate into another diorama someday. :)

More pics to come -

Mike
 

Attachments

  • MVC-001S.JPG
    MVC-001S.JPG
    50.8 KB · Views: 308
  • MVC-002S.JPG
    MVC-002S.JPG
    50 KB · Views: 300
  • MVC-003S.JPG
    MVC-003S.JPG
    42.8 KB · Views: 298
  • MVC-004S.JPG
    MVC-004S.JPG
    58.1 KB · Views: 298
Mike,
That little trick took some nerve!!! I would have used a bandsaw, but you did it! Nothing like modifying something to suit your needs. BTW, I love the design, the story and the whole project. Only thing better would be to be there with you!
Merry Christmas!
Mike
 
Mike,
That little trick took some nerve!!! I would have used a bandsaw, but you did it! Nothing like modifying something to suit your needs. BTW, I love the design, the story and the whole project. Only thing better would be to be there with you!
Merry Christmas!
Mike

Thanks Mike. I think your are right, a bandsaw what have done well. The trouble is, I don't have a bandsaw :eek: Merry Christmas to you and yours and may you have a successful new year collecting.

Mike
 
Ok, so I have now shaped some elevation features into the green Floral Foam using a Sur Form rasp/shaper. These are kind of hard to see in the pictures but essentially include a roadway approaching the gate and a pathway leading to the well and off to the right of the gate. I added a piece of 3/8" thick white Floral Foam at the right front corner to provided a slightly higher elevation feature. The first two pictures show this. In the third picture I have once again placed my accessory features in approximately the places they will be used. I have also placed a mounted knight and a man-at-arms on foot so viewers can get a scale perspective.

Having family over tonight so I must now stop. My wife has a lot of projects for me to do before this evening - one of which is clearing the driveway and front sidewalk of snow. I will be back at this the day after Christmas. Until then, I wish you all to make Merry and have a fabulous Christmas and Holiday Season.

Mike
 

Attachments

  • MVC-001S.JPG
    MVC-001S.JPG
    34.7 KB · Views: 196
  • MVC-002S.JPG
    MVC-002S.JPG
    38.1 KB · Views: 201
  • MVC-003S.JPG
    MVC-003S.JPG
    42.4 KB · Views: 194
Mike,

That's looking good already. Looking forward to seeing it progress.

Simon
 
Well I am back at it. Prepared a batch of CelluClay (see my thread "How I Make Desert Scenics" under this same section) and I colored it with Americana "Desert Sand" acrylic paint (obtained at Michael's Craft Store).

These three pictures show the wet CelluClay being spread over the surface of the Floral Foam - similar to icing a cake. They also show the placement of the Dept. 56 gate and wall sections and the JG Miniatures desert rock outcroppings which I have worked the Celluclay up to using a damp paint brush.

Mike
 

Attachments

  • MVC-001S.JPG
    MVC-001S.JPG
    53.5 KB · Views: 160
  • MVC-007S.JPG
    MVC-007S.JPG
    53.3 KB · Views: 163
  • MVC-008S.JPG
    MVC-008S.JPG
    47.8 KB · Views: 160
These pictures show the finishing touches that have been applied. The Dept. 56 palm trees, the K&C desert well, and some JG Miiniature desert foliage (new product) have been placed and the Celluclay has been worked up to them with a wet paint brush. Additional color (raw sienna) has been randomly brushed in "high traffic" areas to highlight those areas. Fine biege artist sand, Woodland Scenics course turf burnt grass, and clay based cat litter has been added to the wet CelluClay surface. I have taken a neatly folded paper towel and lightly "patted" these into the CelluClay.
 

Attachments

  • MVC-004S.JPG
    MVC-004S.JPG
    55.5 KB · Views: 142
  • MVC-009S.JPG
    MVC-009S.JPG
    45.3 KB · Views: 144
  • MVC-002S.JPG
    MVC-002S.JPG
    54.2 KB · Views: 144
More pictures showing how I have finished the wet CelluClay. I should be receiving my second set of Dept. 56 Caravansary Wall sections either today or tomorrow. When I receive these I will add them to the unfinished area that you can still see in these pictures.

A little bit more to do - more pictures to come as I progress with my project.

Mike
 

Attachments

  • MVC-010S.JPG
    MVC-010S.JPG
    60.4 KB · Views: 133
  • MVC-005S.JPG
    MVC-005S.JPG
    71.8 KB · Views: 132
  • MVC-006S.JPG
    MVC-006S.JPG
    58.2 KB · Views: 139
Always a pleasure watching your work Mike. Can't wait to see it finished. Outstanding stuff!!!
 

Users who are viewing this thread

Back
Top