A bid of sculpting, casting and a little magic... (3 Viewers)

Where to attach those sprues is basically a matter of experience. Even though obvious the right place in a mould for pouring the liquid resin into has to be found as well as the right places to vent the mould in order to get good crisp and COMPLETE castings. BTW this goes for metal casting as well.09 (Kopie).JPG
 
As you can see on picture 09 the master-figure setup has developed into a funny shape not allowing for the more classic aproach to create a two piece mold by building a clay-bed for one side of the mold and than pouring liquid rubber to form the first side of the mold. I never liked or used this way of moldbuilding so after numerous trials and errors I came up with my own way of produceing molds. I surly did not invent it but by the aid of one or the other experiment I found it to work best for me.
Now everything has to be "caged-up" in order to find a box into which the liquid rubber can be poured.
 

Attachments

  • 10a (Kopie).JPG
    10a (Kopie).JPG
    65.9 KB · Views: 134
Ah, I think I see. You pour the silicone rubber in, as a solid block, and then cut it into two halves, once it's cured?

Prost!
Brad
 
Re: A bit of sculpting, casting and a little magic...

Just looked in on this thread Wolfgang - and am full of admiration for your expertise and skill at producing "new" figures. :D

Love what you've done with them. Well done. :salute::jb

Hello JB,
thank you very much for your kind words. Happy to see you interested.
Kind Regards
Wolfgang
 
Last edited:
Re: A bit of sculpting, casting and a little magic...

Ah, I think I see. You pour the silicone rubber in, as a solid block, and then cut it into two halves, once it's cured?

Prost!
Brad
Jawoll, you are right on Brad, the following pictures show what you have expected.
Kind Regards
Wolfgang
 
Last edited:
Re: A bit of sculpting, casting and a little magic...

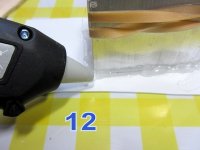
To prevent the mould-frame from floating away it has to be fixed to the plastic sheet which forms the button of the mould.
A hot-glue gun is just the right tool to use.
Haveing done that you can still move the filled mould around. Why I need to move the moulds
is shown on the upcomeing photos,- it's part of the production process.

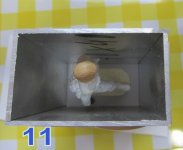
12 (Kopie).JPG11 (Kopie).JPG


Picture 11 is a different view of the mould arrangement. As you can see from this view there is just enough room between the figure and the side walls of the mould. Time to pour the rubber now.
 
Last edited:
I am useing addition cure rubber which is mixed from 50% of each rubber/catalyst.
It has a very short potlife so you have got to be quick.
 

Attachments

  • 15 (Kopie).JPG
    15 (Kopie).JPG
    70.6 KB · Views: 130
  • 16 (Kopie).JPG
    16 (Kopie).JPG
    48.6 KB · Views: 127
  • 17 (Kopie).JPG
    17 (Kopie).JPG
    51.9 KB · Views: 127
  • 18 (Kopie).JPG
    18 (Kopie).JPG
    55.7 KB · Views: 127
The filled mold-box is put inside a COMPACTOR which is conected to an compressor. What it does is to eliminate all air bubbles inside the liquid rubber mix.
It does so by compressing the trapped air inside the liquid under about 80 psi of air pressure. Physically the air bubble is still there but it has shrunken to a size that can only be detacted under a microscope due to the high airpressure in this artificial enviorment. Once the rubber has hardened the trapped micro bubbles can not regain the original size.
Simple but very effective especially with quick cureing resins.
So it is simply a pressure pot as it is called in the USA. Mine is a medical instrument with the advantage of an quick releasable door and it will allow for airpressure as high as 120 psi. It fills in less than 15 seconds and pressure is adjustable but most of all it is safe!!!!
Maximum airpressure is about 4 times as much as you got in each tire of your Ferrari. Fiddling about with such high airpressure is quite the same as playing with dynamite at your kitchen table.
Therefore never ever except any cheap or homemade equipment when dealing with high pressures like that.
You all know what happens when a car tire bursts now multiply that by 4 and put a metal rim around it.
DIY market pressure pots go as high as 50 psi, honestly this is barely enough pressure you got to have 60 psi to really rely on the whished for bubblefree effect.
 
31a (Kopie).JPG


Now the filled moldbox rests inside the pressure vessel. Airpressure is set (see picture) and a built-in timer will activate a release-valve after 30 minutes releaseing the airpressure and thus allowing to open the door of the vessel. The rubber of the mold will be cured by than.
 
Re: A bit of sculpting, casting and a little magic...

Hello JB,
thank you very much for your kind words. Happy to see you interested.
Kind Regards
Wolfgang

Interested - yes - but a bit too tricky for me to play with - I still prefer to let others do the dangerous stuff - so I'll continue to buy my castings from those who KNOW what they are doing - and then modify by the usual old tricks - cutting/filing/filling/sanding etecetera. Full of admiration for what you do - but definitely NOT my thing. :D:salute::jb
 
I've seen guys use vacuum to eliminate the air bubbles- first time I've seen your pressure method. I use a low-viscosity rubber, slow to cure, but the bubbles float out, especially if some vibration is applied. How do you avoid damaging the master when cutting it out of the block mould? Just by being very, very careful?
 
How do you avoid damaging the master when cutting it out of the block mould? Just by being very, very careful?[/QUOTE]


Hi Mike,
yes you guessed right. Cutting along the parting line is the more difficult part which you can only achieve by practise. It is not that difficult at all you just have to work really slow. For my first mould I needed an hour or even longer but by gaining experience you will be able to do those cuts more precise and faster.
rgds
Wolfgang
 
Moulds are cut
 

Attachments

  • 26 (Kopie).JPG
    26 (Kopie).JPG
    69.3 KB · Views: 263
  • 27 (Kopie).JPG
    27 (Kopie).JPG
    64 KB · Views: 259
  • 28 (Kopie).JPG
    28 (Kopie).JPG
    54.5 KB · Views: 254
  • 29 (Kopie).JPG
    29 (Kopie).JPG
    42.8 KB · Views: 248
Now with all moulds cut it is time to do some casting. The rubber I am useing is excellent in many ways but I was a bit dissapointed how quickly it wore out. As if I had sensed it before, I made 7 moulds of the marching soldier an just one of the officer useing a different more durable rubber. You can see the different white rubber for the officers mould. Much more duarable it is but also more difficult to process and much more expensive. For this project I need 40 rifleman and just one officer, for yet another project I need 12 figures of the marching officer. So I used up all my remaining stock of the blue rubber to produce moulds for the marching soldiers. Allways wise to cast a few more copies than actually needed with proof for that yet to come.


Moulds ready to be filled. Three moulds allready inside the pressure vessel cureing at 4,5 BAR
 

Attachments

  • 31 (Kopie).JPG
    31 (Kopie).JPG
    69.6 KB · Views: 238
  • 31a (Kopie).JPG
    31a (Kopie).JPG
    114.7 KB · Views: 224
Now here I got 8 more or less perfect castings but you can see what happened with the soldier down at the button of the picture. I used to much force and a wrong angle when demoulding, so as a result the base broke off.
 

Attachments

  • 34 (Kopie).JPG
    34 (Kopie).JPG
    133.4 KB · Views: 337
Sorry just confused myself with the numbering of my photos. This should have been before the last post.
This is what you get when you are opening the moulds after casting. Still feels good every time ...


33 (Kopie).JPG
 
Not bad, though, with the one casting that went schief. Can you salvage him by glueing the base on?

Prosit!
Brad
 

Users who are viewing this thread

Back
Top