A New Adventure (2 Viewers)

wadepat

Moderator
Joined
Dec 22, 2005
Messages
3,231
Gentle Friends,

Several weeks ago, I posted a series of questions regarding painting figures. Much to my pleasure, several excellent figure painters came to my assistance and answered my questions. Special thanks go to Brad (TheBaron), Scott (Britfarmer), Michael (Kilted Vampire), Simon (Wraith), Jeff (Aujj65), John (NJJA), Russell, Captain, and Ragnar for so generously coming to my aid. Beyond stating that I wanted to increase my knowledge concerning the painting of figures, I was not very specific about what was motivating me to ask my series of questions. In order to achieve full closure on the project I was considering, I think it is time to fully explain myself, so let me share my adventure to you.

Background:

Almost a year ago, I acquired a Marlborough Delhi Durbar set that I much desired and I did so at a reduced cost. Upon receiving the set, I discovered it was damaged in several ways. Some of the damage was caused during shipping and some of the damage existed prior to shipping. In order to repair and repaint the set to a level I would be proud to display, I considered enlisting the aid of someone who had the skills to perform the necessary work. However, if I shipped the set to a painter, paid for the work, and paid for the return shipping, I would have more money invested in the set than the set is actually worth. Further, the set is delicate and fragile and by shipping it again, I could well encounter additional damage. As you have probably already guessed, the most viable solution seemed to be for me to attempt the repair work and the repainting myself. Having never taken such a step before, I was naturally anxious and wanted to maximize my potential for performing decent work. Therefore, I posted the questions that most concerned me.

The Set:

The set I obtained is Marlborough Set #D43, Government Official in Landau Coach. It consists of a Landau Coach, a team of four horses, two riders, the Government Official and his Lady, and two footmen.

The Adventure:

Repairing and repainting this set has been a true adventure for me. If you are interested in following the progress of my adventure, then please read my subsequent posts in this thread. I intend to present a step by step discussion of the challenges I faced with this project and the means by which I attempted to address them. The project had great meaning for me and I hope you enjoy accompanying me on my newest adventure!

Warmest personal regards,

Pat ;)
 
Gentle Friends,

In my previous post, I indicated the set I decided to repair was Marlborough Set #D43, Government Official in Landau Coach. To begin my adventure, let me outline the damages I found on the set.

The Damages:

The team of horses that pull the coach are held in place by two pegs that are attached to the tongue of the coach and by a series of wires that are attached to the outer flanks of the horses. The pegs had become bent in an upward direction thereby not allowing the horses to remain attached to the coach in a level manner. These pegs are reasonably strong and large in size. The strength and size of the pegs present great resistance to casual bending with your fingers.

As the horses had become detached from the set during shipping, they had roughly rubbed against the pegs and wires creating a number of ugly paint chips.

The rear seat on which the footmen rest had been bent forward to such an extreme the figures could not be placed into position.

Four lanterns are attached to the coach. These lanterns, though still attached, had been bent at inappropriate angles.

There were numerous paint chips on the horses, the harness, the coach, the coach tongue, the footmen, the coach frame, the wheels, the axles, and the rear seat.

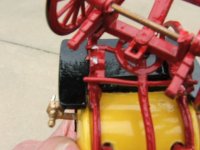
Attached below, you should find a few “before” photos of the coach tongue and the bent lanterns that more clearly illustrate some of the damages contained on the set. I am certain that the issues displayed in the photos may seem rather elementary to most of the accomplished painters on this forum, but, to me, they represented huge challenges.

Warmest personal regards,

Pat
 

Attachments

  • Landau0001.jpg
    Landau0001.jpg
    36 KB · Views: 175
  • Landau0003.jpg
    Landau0003.jpg
    51 KB · Views: 177
  • Landau0004.jpg
    Landau0004.jpg
    47.2 KB · Views: 176
  • Landau0005.jpg
    Landau0005.jpg
    49.8 KB · Views: 171
Gentle Friends,

Below are a few photos displaying the paint chips found on the Landau Coach.

Warmest personal regards,

Pat
 

Attachments

  • Landau0010.jpg
    Landau0010.jpg
    53.4 KB · Views: 155
  • Landau0021.jpg
    Landau0021.jpg
    49.3 KB · Views: 158
  • Landau0022.jpg
    Landau0022.jpg
    49 KB · Views: 153
  • Landau0023.jpg
    Landau0023.jpg
    43.6 KB · Views: 155
Gentle Friends,

Below you should find two photos that allow you to view a few of the paint chips found on the team of horses. The photos do now reveal all the paint chips that existed on the horses, but you should see a few of the larger ones.

In my next post, I will outline the first steps I took as I prepared to address the set damages. I hope you will continue to accompany me on my adventure.

Warmest personal regards,

Pat
 

Attachments

  • Landau0048.jpg
    Landau0048.jpg
    63.5 KB · Views: 150
  • Landau0053.jpg
    Landau0053.jpg
    47.9 KB · Views: 154
Gentle Friends,

My adventure begins:

First Step:

My first step in this adventure was to contact a painter friend of mine, Peter Stephano. Peter is an excellent toy soldier painter who will perform repair and painting services on pre and post war Britains figures. We discussed the problems I had identified with the set and I forwarded to him pictures of the damages.

After a careful review of the problems, Peter encouraged me to address the problems with the set rather than sending it to him for his repair. He generously volunteered to provide consulting services to me as I progressed with my work. His encouragement and advice were essential in helping me develop the confidence required for the task I was undertaking. This project resulted in Peter and I becoming good friends and his friendship is worth more to me than any success I may have experienced with this project.

Second Step:

I contacted Marlborough Military Models and inquired regarding the paints applied to the set. The Marlborough personnel were incredibly helpful. They indicated they only use Humbrol petroleum based enamel paint on all their Delhi Durbar sets (see Brad, I learned something from you! I am no longer using the term “oil based enamels.” :D). They also generously provided me with information concerning the specific colors to use on various portions of the set. As I have never been able to identify a hobby shop in the State of Kansas that stocks Humbrol paints, I ordered the necessary paints via the internet.

Armed with good information and the necessary supplies to accomplish my tasks, I was ready to begin my work.

Soon, I will present a discussion of the third step I took in my adventure. It was one that created much anxiety for me, but I think it turned out rather well. If you continue to be interested in my adventure, watch for my future posts in this thread!

Warmest personal regards,

Pat :)
 
Dear Pat,

I shall be following your adventure with close interest, as I also have some sets that need to be repainted.

Your written presentation is so well organised that it beckons reading.

Also, you have posted some excellent close up photographs of the parts for restoration.

Thanks very much for sharing your adventure.

Good Luck,

Best Regards, Raymond.:)

*
 
Gentle Friends,

If you have been following my thread, you will already know I am tackling a repair and repaint job with a damaged Landau set. As a review, I have accomplished the following: 1.) I assessed the damages to the set; 2.) contacted a good friend who is also an excellent painter and who has agreed to advise me during my work; and 3.) contacted the manufacturer and secured information regarding the paints necessary to complete the repair and repainting of the set. Now, for my next step:

Third Step:

I was extremely anxious regarding the state of the pegs that hold the team of horses in place. Consequently, I established straightening the pegs as my first task. If I failed to accomplish this action or if I broke the pegs from the tongue, I planned to declare the project a disaster and ship the set to my friend, Peter, who possessed the necessary skills to perform all the required repairs.

I thought long and hard about how to straighten the pegs. I knew the metal would soften if I heated it and the softened metal would allow me to more easily straighten the pegs. The issue I felt necessary to address was how best to heat the metal without damaging the existing paint. The manner in which I chose to do this may seem unconventional as I have never known of anyone else who tried or even recommended the method I chose to utilize.

I also knew I would need the assistance of a good pair of pliers in order to apply the necessary leverage to bend the pegs into their proper place. In preparing for my task, I wrapped the jaws of the pliers with electrical tape. By so doing, I hoped to prevent making impressions on the pegs that might be left by the pliers. With terrific anxiety, I took the next step.

I pre-heated the oven on our kitchen stove to 105 degrees. I placed the Landau Coach on a cookie sheet and inserted it into the oven. I set the timer for 10 minutes. I knew if left on a window sill during the summer, the coach could easily be heated to that temperature by the entering sunlight. I crossed my fingers and hoped for the best.

Once the timer alerted me ten minutes had passed, I turned off the oven and carefully removed the cookie sheet on which the coach rested. If you ever attempt this operation, be sure and use pot holders to handle the heated cookie sheet and the heated coach. You must take great care at this stage, or you risk dropping the coach from the cookie sheet or dropping the cookie sheet itself.

Once the coach was removed from the oven, I immediately used the pliers to straighten the pegs on the coach tongue. I was fearful I would break the pegs from the tongue or that I would not bend the pegs to a desirable angle. I told myself throughout this operation that I did not have to bend the pegs to a perfect angle. They only had to be straightened enough to allow easy entry into the holes in the rear flanks of the horses.

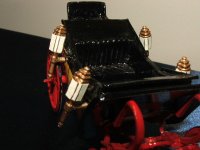
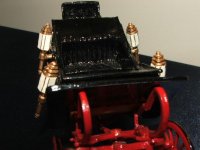
It was also at this time that I chose to straighten the angle of the coach lamps. This task was performed by simply using my fingers to gently and carefully straighten the lamps. Great care had to be taken in order not to break the lamps from the coach.

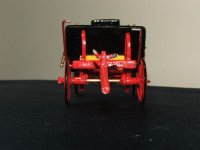
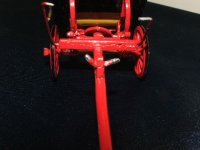
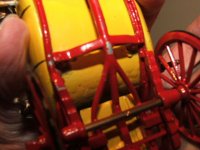
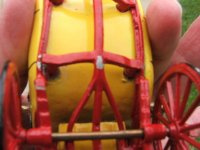
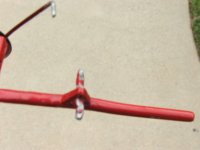
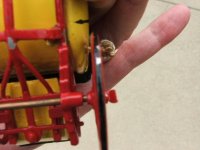
Much to my delight, everything seemed to work in just the manner I hoped and I was able to breathe a great sigh of relief. Below, you should see three photos of the end result of my effort. As you can see, the pegs are not perfectly angled, they are simply straight enough! The pegs fit easily into the holes located on the horses’ rear flanks to allow the horses to stand correctly and these imperfectly angled pegs will not be visible once the horses are reattached to the coach.

You will also note that the pegs and the remainder of the coach are not yet repainted. Repainting the necessary portions of the coach was to be my next step. I will tell you about that step in my next post!

Warmest personal regards,

Pat :)
 

Attachments

  • Landau0012.jpg
    Landau0012.jpg
    53.5 KB · Views: 141
  • Landau0013.jpg
    Landau0013.jpg
    47.9 KB · Views: 142
  • Landau0024.jpg
    Landau0024.jpg
    31.3 KB · Views: 141
Gentle Friends,

In my last post, I described how I straightened the pegs of the coach tongue to allow the proper attachment of the rear pair of horses. The completion of this operation resulted in great excitement as I believed I had successfully accomplished one of the most difficult tasks for the restoration of my Landau Coach set. I was now ready to take the fourth step, which I will describe below:

Fourth Step:

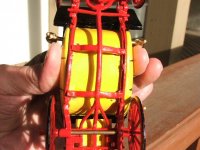
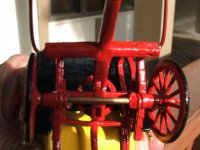
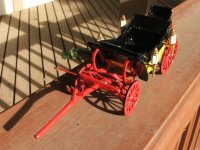
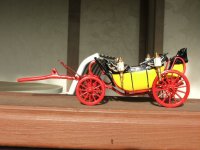
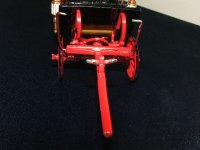
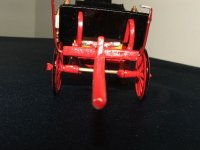
My fourth step was to prepare the Coach for painting. This step required a thorough cleaning of the coach. I prepared a diluted mixture of Simple Green and warm water and sprayed the coach with it. I used a soft bristled tooth brush to gently remove any dust, dirt, paint flakes, and grease. Once the set was thoroughly cleaned and rinsed, I dried the coach with a soft cloth baby diaper. I placed the coach on a soft rag and allowed it to completely dry overnight.

The next day, I examined the coach to make certain all surfaces were completely dry. I carefully examined the areas that required repainting. I was aware that I would need to be able to hold the coach as I repainted various areas, so I determined I should only apply a single color and allow that color to completely dry before attempting to paint another area or series of paint chips that required a different color. I chose to repaint the bright red portions of the coach first (tongue, undercarriage, wheels, etc.).

Next, I dipped a “Q-tip” in a small jar of paint thinner and squeezed the excess thinner from the cotton. I used the Q-tip to apply a thin coat of thinner over the targeted areas and to the paint surrounding the targeted areas. Applying the thinner to the surrounding area softens the existing paint and allows the new paint to more easily blend with the older paint.

As I methodically painted one color per day, it took several days to complete the necessary touch up. I also learned a couple of interesting things during this operation. I learned that Testors Gloss Red and Testors Gloss Black are nearly perfect matches for Humbrol Gloss Red and Humbrol Gloss Black. However, Testors Gloss yellow is not a match with Humbrol Gloss Yellow. Since I find it impossible to obtain Humbrol paints locally, I recorded the information for future reference.

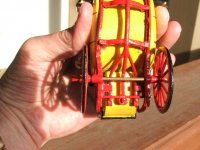
Below, you should find five photos that display my handiwork. I hope you think my work exhibits some improvements over the earlier condition of the coach.

There is more of my adventure to come. Stay tuned for additional steps!

Warmest personal regards,

Pat
 

Attachments

  • Landau0039.jpg
    Landau0039.jpg
    65.5 KB · Views: 121
  • Landau0040.jpg
    Landau0040.jpg
    66.9 KB · Views: 125
  • Landau0041.jpg
    Landau0041.jpg
    55.7 KB · Views: 127
  • Landau0038.jpg
    Landau0038.jpg
    71.3 KB · Views: 123
  • Landau0034.jpg
    Landau0034.jpg
    55 KB · Views: 126
Hi Pat,
that is an interesting project you got going on there and your detailed descriptions of each step are very helpful.
Konrad
 
Pat what a wonderful thread! I am thrilled that you decided to attempt this

repair yourself and ad a new dimention to your hobby experience! May I say

you are doing a wonderful job!

Who would ever dare put a valued collectible in the oven?:eek: That was a

very brave thing to do, and I am glad it worked out so well! I can imagine it

made the bending of delicate parts easier (always a difficult situation).

I am following this thread with great interest, and admire the paint work

you have done so far. Your tip on wiping the areas to be painted with

thinner before hand was excellent!

One suggestion I might make if allowed would be to always use cold

water when cleaning any painted surface. For some reason hot water which

many people think would ad in cleaning will ofter remove all the luster from a

painted surface (along with any applied dry transfers). I would not even use

warm water even though it seemed to work ok for you. Cold will still get the

item cleaned, with no risk to the paint.

Keep up the good work, and I am sending you a PM with my paint restoration

secret (shhhh):)
 
Excellent thread Pat. The repair and painting look good. I picked up a few tips. Thanks for the photos and explanation. You did not need Compton to paint the repairs.:D John
 
Pat, all I can say is that you must be enjoying yourself, easy when you know how isn't it! ;):)

I'm glad to see you are not rushing things, repairing figures is almost as time consuming as painting from scratch and with gloss enamels you have a longer wait for the paint to dry, but imho a better overall finish is achieved.

Looking forward to the next installment.

Nice model btw.

Jeff
 
Way to go Pat. ;) I'm glad you decided to try your hand at your own repairs. Be careful thought as you'll find it can be adictive.
Many times I will buy an item at a very reasonable (cheap) price that is damaged knowing that I can bring it back to like new condition. It was also a smart move to inquire as to what paint was used. I find that a lot of the items made in Gt. Britain use Humbrol enamel paint if the finish is glossy. I have a fair amount of Steadfast items and most of their colors also match Humbrol. One of the exceptions is the grey they use. I have to mix this color and it's rather difficult to match exactly.
I think that you'll also find that the satisfaction from making your own repairs will add an extra dimension to your soldiers collecting. At least it does for me. :p
Next you have to try your hand at doing a complete figure from a kit. Good luck, keep at it, and welcome over to the 'Dark side". (a little Star Wars humor)

Chuck
 
Hi Pat,

Glad you embarked on this type of project and that I was able to help in some small way. I can sense from the thread you have had fun doing this and also have a lot of pride in your work thus far. Quite rightly so, a great job so far and I look forward to the next installment.

PS as you know carriages are a favourite collectible of mine (so keep your eyes on that one :D)
 
Hi, Pat, great thread! And thanks very much for your kind words!

You did an excellent job at repairing the damage to your set, but even more important-isn't it satisfying to have done the work yourself?

Next we'll see you buying some Tradition castings to add to your Durbar!

Can't wait to see the whole piece in its place of honor in your display!

Prost!
Brad
 
Gentle Friends,

If you have been following my progress, you know I have completed the work on the Landau Coach. Having done so, it was time to initiate the next step:

Fifth Step:

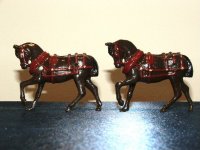
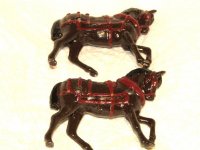
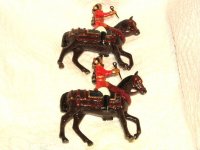
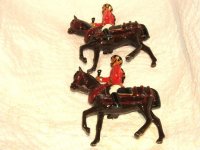
You have seen photos of the team of horses that pull the coach. Paint chips existed on the underside of the horses, on their legs, on their harnesses, in their manes, and on their heads. Two of the horses included riders who also needed some touching up. The riders required some attention to their turbans and to the riding crops in their hands. I began to address these needs in the same manner as I had addressed the problems with the coach. I first cleaned the figures with a diluted mixture of Simple Green and water and let them dry. I slowly and carefully straightened the riding corps with my fingers. I studied the location and severity of each chip and developed a plan whereby I could hold each horse as I applied a single color to it each day.

Once again, I dipped a “Q-tip” in thinner and squeezed the excess liquid from the cotton. I dabbed each chip I intended to paint and made certain I also dabbed the existing paint surrounding the chip. Finally, I applied a single color to each horse and allowed that color to dry overnight before applying a second color the next day. Slowly, but surely, I painted each horse, each mane, and each harness. I worked diligently to blend and/or feather the new paint with the old. After the painting of the horses was completed, I touched up the turbans of the riders. I began to smile at the result. Perhaps you will smile with me.

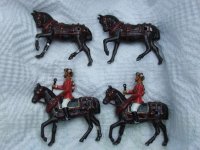
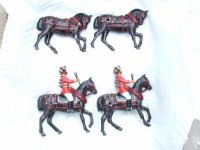
Below, I have attached four photos of the four completed horses, two of which included riders. I hope you enjoy viewing them.

More discussion will follow in my next post.

Warmest personal regards,

Pat
 

Attachments

  • Landau0058.jpg
    Landau0058.jpg
    59.7 KB · Views: 66
  • Landau0064.jpg
    Landau0064.jpg
    52.2 KB · Views: 60
  • Landau0068.jpg
    Landau0068.jpg
    52.4 KB · Views: 96
  • Landau0069.jpg
    Landau0069.jpg
    59.6 KB · Views: 62
Dear Pat,

I shall be following your adventure with close interest, as I also have some sets that need to be repainted.

Your written presentation is so well organised that it beckons reading.

Also, you have posted some excellent close up photographs of the parts for restoration.

Thanks very much for sharing your adventure.

Good Luck,

Best Regards, Raymond.:)


*


Hi Raymond,

Thank you for your interest and for your kind words concerning the organization of my presentation. I hope you will continue to follow my adventure. There are a few more steps to discuss before I reach the end of my story.


Hi Pat,
that is an interesting project you got going on there and your detailed descriptions of each step are very helpful.
Konrad


Hi Konrad,

Yes, I think this is an interesting project too. Believe me when I say it took a great act of courage for me to initiate this endeavor. I hope you will continue to follow my progress


Pat what a wonderful thread! I am thrilled that you decided to attempt this

repair yourself and ad a new dimention to your hobby experience! May I say

you are doing a wonderful job!

Who would ever dare put a valued collectible in the oven?:eek: That was a

very brave thing to do, and I am glad it worked out so well! I can imagine it

made the bending of delicate parts easier (always a difficult situation).

I am following this thread with great interest, and admire the paint work

you have done so far. Your tip on wiping the areas to be painted with

thinner before hand was excellent!

One suggestion I might make if allowed would be to always use cold

water when cleaning any painted surface. For some reason hot water which

many people think would ad in cleaning will ofter remove all the luster from a

painted surface (along with any applied dry transfers). I would not even use

warm water even though it seemed to work ok for you. Cold will still get the

item cleaned, with no risk to the paint.

Keep up the good work, and I am sending you a PM with my paint restoration

secret (shhhh):)


Hi John,

I have received your secret paint restoration process and I will definitely utilize it in the near future. Also, I will only use cold water for cleaning my figures in the future. Thanks for the tips!

In the next couple of days, I will respond to your wonderful pm. Thanks for so kindly sharing your wisdom and your knowledge with me!

Warmest personal regards to all,

Pat :)
 
Excellent thread Pat. The repair and painting look good. I picked up a few tips. Thanks for the photos and explanation. You did not need Compton to paint the repairs.:D John

Hi John,

:D:D:D Don't think I did not consider contacting Compton every step of the way!

Warmest personal regards,

Pat ;)
 
Pat, all I can say is that you must be enjoying yourself, easy when you know how isn't it! ;):)

I'm glad to see you are not rushing things, repairing figures is almost as time consuming as painting from scratch and with gloss enamels you have a longer wait for the paint to dry, but imho a better overall finish is achieved.

Looking forward to the next installment.

Nice model btw.

Jeff


Hi Jeff,

Yes, I am enjoying myself very much. Yes, I am sure you are correct that the work is easy when you know how. Unfortunately, when I initiated this project, I did not know how! :D

Thanks for all your encouragement. You have been a great help!


Hi Pat,

Glad you embarked on this type of project and that I was able to help in some small way. I can sense from the thread you have had fun doing this and also have a lot of pride in your work thus far. Quite rightly so, a great job so far and I look forward to the next installment.

PS as you know carriages are a favourite collectible of mine (so keep your eyes on that one :D)

Hi Scott,

Yes, I am having great fun and I am taking lots of pride in my work. Don't worry about me keeping my eyes on this coach. I have looked at nothing else for several weeks! It now resides in a locked curio cabinet!


Hi, Pat, great thread! And thanks very much for your kind words!

You did an excellent job at repairing the damage to your set, but even more important-isn't it satisfying to have done the work yourself?

Next we'll see you buying some Tradition castings to add to your Durbar!

Can't wait to see the whole piece in its place of honor in your display!

Prost!
Brad

Hi Brad,

Yes, the restoration work is highly satisfying. I did not know how satisfying this project would be until I launched myself into it and discovered I could do some acceptable work.

It might interest you to know I have considered purchasing some castings and giving them my all. However, before I do that, I will need to ask many more questions, so get ready for them! :D

Warmest personal regards,

Pat :)
 

Users who are viewing this thread

Back
Top