British Brown Bess Fire Power: Taking Aim (3 Viewers)

mestell

Colonel
Joined
Feb 12, 2008
Messages
8,261
Ever since the new British 43rd Regiment of Foot figures were previewed I have been drawn to those wonderful looking red coats. To go a long with these figures, Ken Osen recently announced a 43rd Collectors Club figure for 2025 entitled "Locking In".

IMG_5065.jpeg

I decided that this was a "must have" figure for my collection and therefore renewed my membership in the club. That was when I decided to make a small diorama of a British detachment "Taking Aim" with their Long Land Pattern (Brown Bess) muskets. The actual command was "Present" (take aim).

I am using a Belmont picture frame by Studio Decor for the base. I get these at Michael's Craft Store.

17408478806394920791023125644893.jpg
To prepare the frame, I first discard the glass, white mat, and backing. I then inserted a 1/4" thick piece of plywood planking, which has been cut to size and painted with two coats of primer, into the frame.

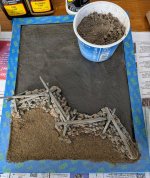
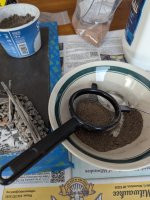
Next, is the CelluClay (another product obtained at Michael's Craft Store) application.

1740848163660836916063483338722.jpg

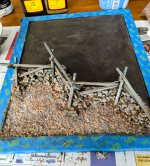
This product is used to cover the exposed plywood and to fill the interior of the frame, sculpting any contours desired. I also decided to anchor a section of Hudson & Allen HA2012, "Stone and Wood Split Rail Zig Zag Fence" into the wet CelluClay to add some visual interest. This was a spare scenic piece I've had for years. It's been long out of production and no longer available.

Please note that the frame has been protected by painter's tape.

PXL_20250301_170431348~2.jpg

At this point the base was set aside to allow the CelluClay to dry. This usually takes three to four days depending how wet the paper meche material was made and how thick it was applied.

. . . to be continued

Mike
 
Looking forward to watching this project progress. Sounds like you really have to have some patience with that CelluClay dry time.
 
Looking forward to watching this project progress. Sounds like you really have to have some patience with that CelluClay dry time.

It does take some time to dry. But your patience will be rewarded. Once completely dry it can be painted with a earthtone base coat in preparation for the ground work and foliage accents.

Mike
 
I am really looking forward to seeing the finished diorama Mike!

You and me both Ken. But you do realize it won't be finished until the 2025 Club Figure "Locking In" is available . . . I need 5 😉

Mike
 
Great looking diorama Mike. Are you going to add the colours too?

Brendan
 
Nothing like having a project to plan out and think about. After that, the satisfaction of seeing it completed and a job well done. This is one of those Mike. Robin.
 
Great looking diorama Mike. Are you going to add the colours too?

Brendan

THX Brendan. You bet I'm going to add the colours. I understand from Ken that the anticipated release is April.

Nothing like having a project to plan out and think about. After that, the satisfaction of seeing it completed and a job well done. This is one of those Mike. Robin.

Thanks Robin. The nice thing about this project is that I can take my time with it since the last 5 figures I will want won't be released until later this year. In the meantime I can just sit back and enjoy it's progress.

Mike
 
Thanks Mike, your step by step display really helps guys like me who want to learn the “process behind the great scenes”.
 
Thanks Mike, your step by step display really helps guys like me who want to learn the “process behind the great scenes”.

Thank you for the nice compliment Mike. However, after viewing so many of your own beautifully done displays, I hesitate to think you need help from me. Truth be told, I could learn a lot of creative techniques from you.

Mike
 
Oh yeah Mike.....this is shaping up very nice!!! I appreciate the step by step instructions. I have recently joined those who are using these frames to create some small dio's. Although, I have not used the Celluclay but have used Styrofoam insulation board with mine so far. I may try the Celluclay though having seen how you use it.

These figures of the 43rd are great. I was going to get them at first but opted instead for the Deux Pont range. Hoping to put together some kind of small dio of those figures similar to what you're doing with the 43rd.
 
I just finished painting the exposed CelluClay with a coat of brown latex paint which I had left over from trimming out the exterior windows and door frames and other accents of my house. I mention this because any brown/earth tone paint will suffice. Any "earthy colored" paint on hand will do. The purpose is to cover the CelluClay so that the grey doesn't show through when applying the ground cover. For easy clean up I recommend using an acrylic or latex water based paint.

When dry I will start adding the ground cover/dirt/soil and ground debris that I want to use.

. . . to be continued

Mike

PXL_20250303_173250170~2.jpg
 
Oh yeah Mike.....this is shaping up very nice!!! I appreciate the step by step instructions. I have recently joined those who are using these frames to create some small dio's. Although, I have not used the Celluclay but have used Styrofoam insulation board with mine so far. I may try the Celluclay though having seen how you use it.

These figures of the 43rd are great. I was going to get them at first but opted instead for the Deux Pont range. Hoping to put together some kind of small dio of those figures similar to what you're doing with the 43rd.

Thank you very much Mark. Since I started using these inexpensive Belmont style picture frames (due to being down to a very limited amount of display space) I have actually had more fun and enjoyment making the smaller displays vs the really large displays I have made in the past. It's a great way to showcase a few of your favorite figures but yet visually tell a bigger story

Mike
 
Now that the base color is dry, the base is ready to have the soil/dirt/earth and ground debris detail applied. I used Woodland Scenics Fine Turf Soil blend and Earth blend as well as some Woodland Scenics Fine Brown Ballast. This was all mixed together with actual garden dirt from my yard.

PXL_20250303_203429560~2.jpg

Using slightly diluted PVA white glue, I liberally "painted" the area to be covered with the dirt mixture.

PXL_20250303_204118681.jpg

Then, placing the dirt mixture in a fine mesh sieve/strainer, I generously sifted the mixture over the area until the glue was covered.

PXL_20250303_204146874.jpg

PXL_20250303_204521917~2.jpg

A very dilute solution of PVA glue was then
applied to insure complete adhesion. I used a teaspoon to do this with but an eye dropper or a fine spray bottle would work too. Once the dirt mixture was saturated with the glue wash, I generously sprinkled the area with Hudson & Allen Forest Debris. All of this was gently pressed in with my finger tips.

PXL_20250303_205624783~2.jpg

Once done, the base was set aside to dry overnight.

. . . to be continued
 

Attachments

  • PXL_20250303_204521917~2.jpg
    PXL_20250303_204521917~2.jpg
    268.1 KB · Views: 6
  • PXL_20250303_204146874.jpg
    PXL_20250303_204146874.jpg
    148.9 KB · Views: 6
  • PXL_20250303_205624783~2.jpg
    PXL_20250303_205624783~2.jpg
    280.3 KB · Views: 5
Quick question Mike, Did you seal the plywood base before spreading on the CelluClay? I've read of people doing that, but wonder if it's necessary.
 

Users who are viewing this thread

Back
Top