Building an authentic looking Wigwam for under $5.00 (1 Viewer)

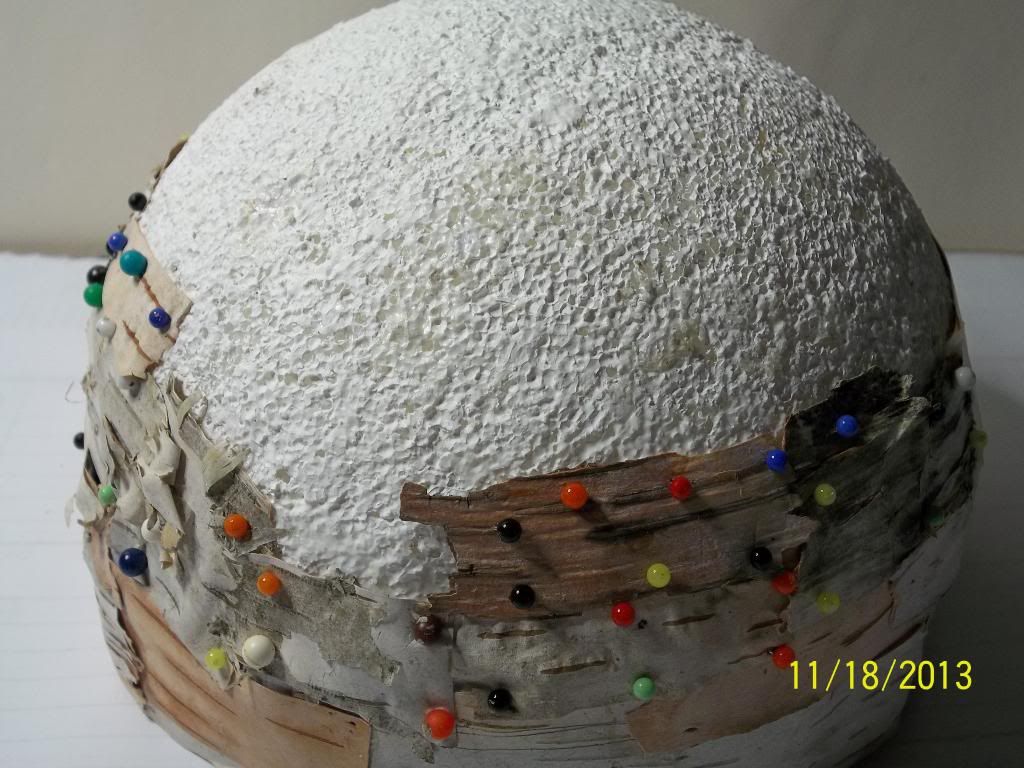
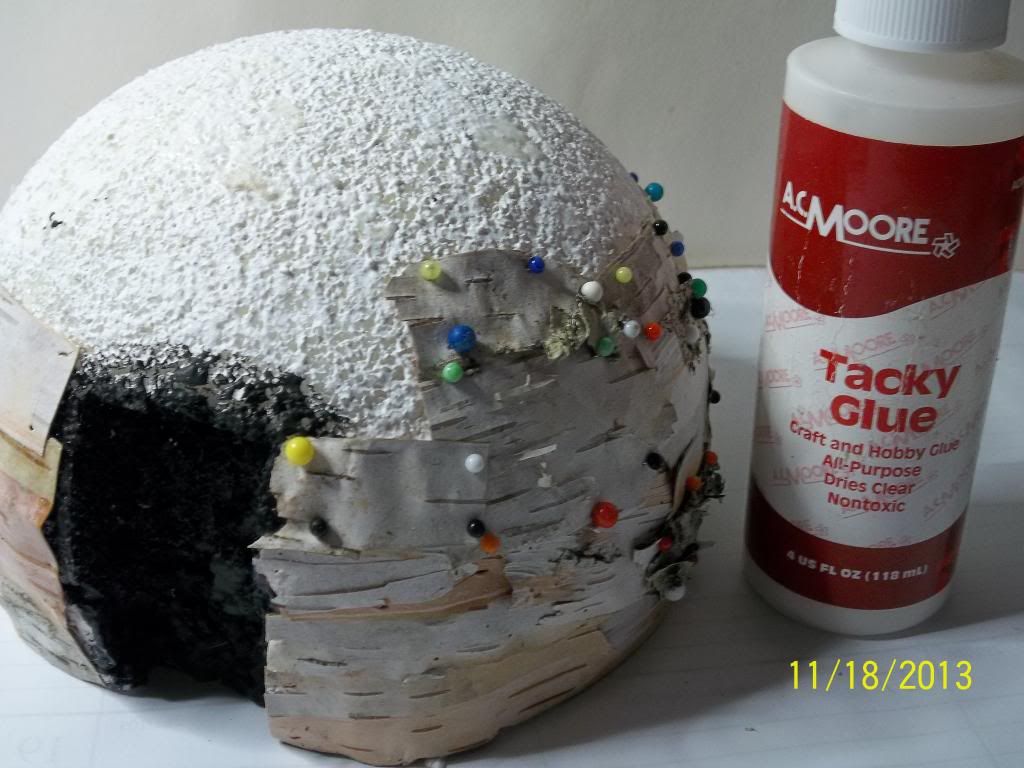
***** Continue to add large and small pieces from the bottom up, overlapping as you would with real shingles.


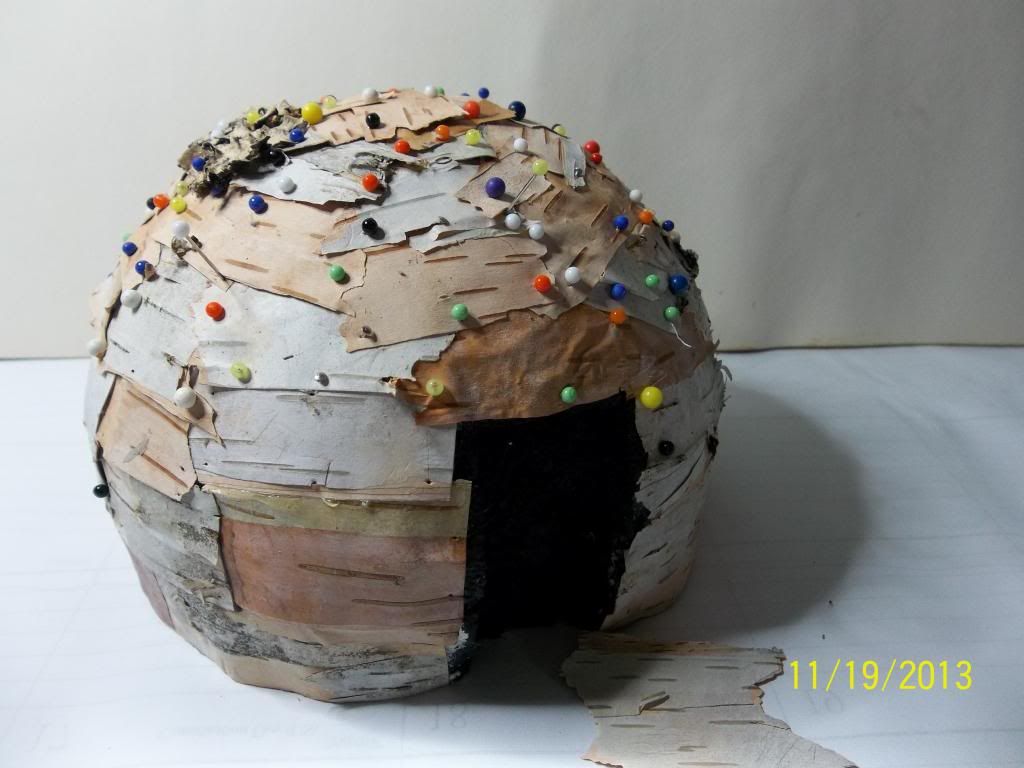
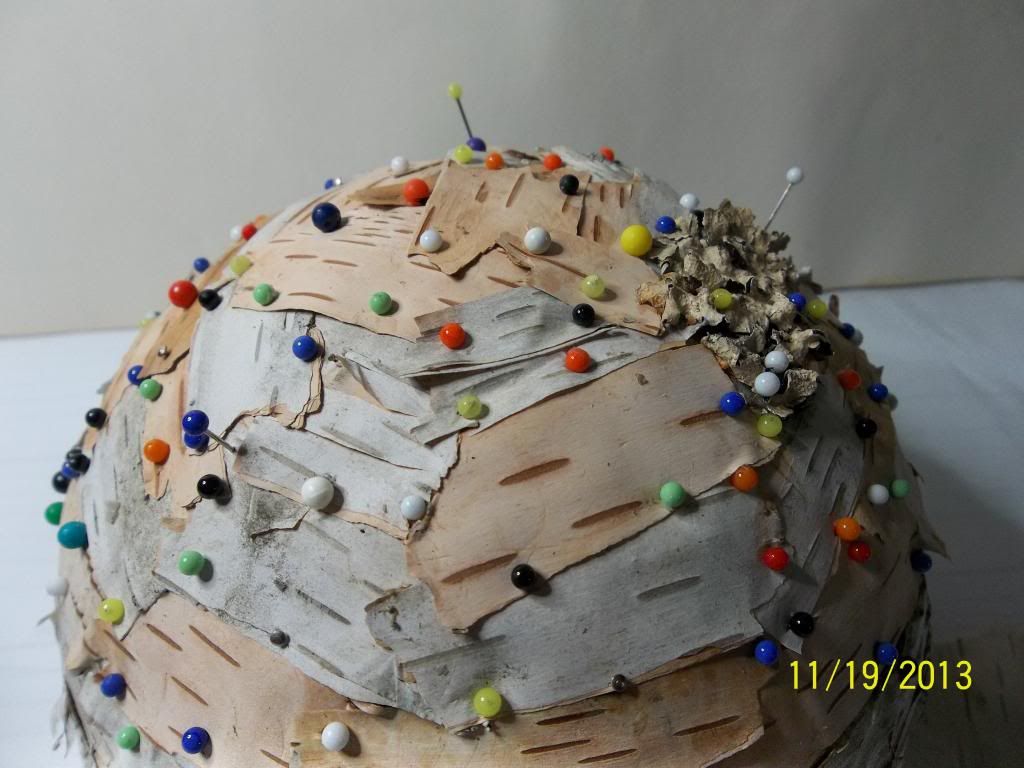
After all the birch is applied, you can cut a small (semi-square) opening in the top if you wish to have a smoke hole with depth. If not then you can simply apply a piece of wood or something to show it closed.

***** The next steps will be as before, cutting and applying the outside frame.
See ya' in a while.

--- Larry
 
***** We are going to continue as before with the Wigwam #2 by making some external framing members. As shown in the photo below start off with a couple and start to add the framing members where they look good. Pay special attention to the door opening.

TIP: Generally, start at the bottom and work your way around and up to the top.


Here is the Wigwam getting close to finished. Yours should look "something like this" but everyone is different.


For example this:


OR THIS:


OR Possibly this mixed type:


OR Heaven Forbid ..this attempt! ...... {sm2} {eek3} :confused:


--- Larry
 
**** DON'T over do the frame, since I initially found I didn't know where to stop.
My first attempt looked more like a spider web than a Wigwam


Maybe something like these?

Here notice I also added some weathering, mostly very watered down brown and grey paint. But do so VERY sparingly as Birch Wigwams don't change much with weather.

Also in these you can clearly see where I cut out the smoke hole and painted it BLACK inside ... {Soot!}

REMEMBER to seal the knots that you tied for the framing members. I used a "tacky glue" or "white glue" ... the Indians used Cedar Sap. Be sure to weather these a bit also .... mostly a little more grey perhaps???


FINALLY you can build a cover for the smoke hole any way you want. Here is one of my examples. See the other Wigwams for different styles ... or look on the web. Adding a bit more soot around the hole is a good idea.


AND to finish ... make a door covering of anything you wish. Here is a simple blue cloth with a bit of stitching.

NOTICE the small detail that I added to OPEN <> CLOSE the smoke cover?

I have a lot more detail items coming up when I start to post my Indian Village Diorama so watch for that


Well that should finish off the Birch Bark Wigwam.

One more to go ... the Cedar Bark. That is a bit more difficult but still VERY doable. {sm2}


I hope to hear from you if you have any questions or have any additional ideas or pictures you want me to show.
 
****** Good Evening Treefroggers!

Tonight (here in Maine at least) I will start the 5th ... and maybe the most challenging .... of the Wigwams that you can build....{sm2}

This one is the Cedar Bark Wigwam.
The only thing different is the preparation and application of the Cedar strips.
They can be a bit difficult to maintain in one piece during the construction.
However, in my opinion only, I like this the best as it is really close to the actual home that the Indians used.

Here is what we will be building ....


***** So at this point you should know the beginning steps.

* Carefully mark cut the Styrofoam sphere in half
* Seal it
* Cut and seal a raised base if required (optional)
* Cut a door opening an paint Black inside
* Cut a smoke hole opening and paint Black inside (optional)
* Paint the sphere white of Brown as desired ... Or what ever color works with the surface you are applying
* Get a supply of sticks and PRE-BEND for a few days to make life easier for yourself.


**** Lets pick up from there.

As in the others first we need to get our supply of the covering, in this case the Cedar Bark. Once again, I am blessed with a hundred trees on my property so my supply is virtually unlimited but if you really want some and can't get any let me know.


***** If we try to apply the bark as-is that we picked up off the ground, it will be WAY to thick to bend. It will also not stick very well. Generally the thickness of the pieces on the ground are sometimes 1/2" up to 1" thick ... See above photo to see what I mean.

So we need to "THIN" it down by removing the backing off and keeping just the surface layer. The surface layer comes out about the thickness of a heavy weight paper or maybe construction paper.

Here is what you will pickup and the quantity that you will probably use ... there is a lot of waste of the junk pieces.


TIP: As before NEVER strip the bark off of a live tree. It will kill of harm the tree so please respect Mother Nature.


**** Below is the stuff that we will either toss away ... or I ground it up and use it for ground covering. We want the outside Green/Brown/Gray pieces as show above.


***** Get your readied sphere and a handful of rubber bands (RB). Starting at the door opening apply as long a strip as you can find and secure with a RB.

TIP: Since it is now thin material you will find that the RB might tear and shread the Cedar strip ... SO ... be very, very gentle when securing the strip with the RB.

TIP: Don't spare the white glue here .... I found it makes life easier if you really coat the back of the strip well.


***** Continue to go around the Wigwam applying strips. Don't worry about the gaps and holes as this is ONLY the first pass. The mission here is to try to get as much on the sphere in this first pass as possible since we will seal and set aside for a while to dry. Here is a photo of a few strips applied.


**** End of pass ONE
Before you proceed with pass two .. and three ... scroll down to see my SECRET!!!!!


****** After the glue has dried and you **** VERY - VERY - VERY ***** carefully removed the rubber bands, then make a second pass white slightly smaller pieces going over the holes and spaces that were left after the first pass.


Here are some pictures after my second pass .....


***** AND my "THIRD" pass with ever small and smaller pieces .... as you can observe.


HERE IS the secret .... I used a Fixative between the passes to help secure and preserve the thin Cedar Bark.....


Coming up .... adding the frame and building the door ......

--- Larry
 
***** Back again to finish the Cedar Bark Wigwam.

When you are satisfied with the look of the covering after your third or last pass .... and the fixative has had time to dry, it is time to start the frame.

There is no difference here than what we have done before. This time I just used a more soaring exterior frame and a different type of smoke hole opening. I saw that these were more typical than the tight frames. We will add the close in members at the end, this time.

See the web for examples.


Get your pre-bent strips and roughly measure where you want the first piece. Find some rubber bands.

I always start at the front and work towards the back ... but that is just the way I do it. I used a small BRAD to hold the first piece in place. If you do, be sure to pre-drill a small hole with a pin vise or you will always split the wood. Later you can remove the brad or simply cover it with another stick, Raffia or paint.


See the photo below.


**** Remember to apply a small amount of glue to the Raffia (or string) knots to hold them tight and prevent any unraveling.

Continue to add structure members until you are satisfied. Below you can see that after I applied the soaring frame I went back and applied the frame members that were closer to the covering. That is simply easier than the opposite way and a lot less gluing. Also note that I only applied a small amount of weathering to the Wigwam. Mostly the knots were darkened and a "soot" layer was applied to the smoke hole area.

Look it over and add any members that you feel you need.


When you are finished ... before you stand back to admire your work you should do a couple like sprays of a MATT finish to dull the glossy sheen left by the Fixative. But suit to taste!.


--- Larry
 
**** THE LAST item is the door.

It takes a bit of nimble fingers and/or patience.

I made this one by measuring the opening and making a frame a tiny bit smaller than the opening. Then I cut and glued small sticks with a little space in between each stick. Get a "LONG" piece of Raffia (string really won't look good) or a blade of straw or grass and weave it between the sticks ...... AS SHOWN.

Glue off the ends. When dry apply a few light coats of wash or weathering to suit to your taste.

And to end ... touch up and area that needs a bit of "character" and YOU ARE DONE ......
..{sm4} {sm3} ^&grin

... Larry


Well fellow Toy Soldier collectors it has been a real pleasure for me to provide this tutorial to you.


Every day I marvel at the incredible masterpieces that you guys create and share and it was my goal to try, in a small way to contribute to the excellence of the Forum

I hope that it was of some value when you are thinking about making an Indian Diorama for FIW up to 1812. I am in the beginning stages of .... "HOW TO BUILD A INDIAN LONGHOUSE" using the same frugal methods, inexpensive supplies and simple techniques. I have a couple of road blocks that I am working through but hopefully I can get through those.

If there is a desire I can do a similar tutorial on these in the future ... so let me know.

THANK YOU for all the very nice comments and encouragement along the way. As always let me know if there are any questions or how I can help.

I hope to start an "INDIAN Diorama thread" that we can all contribute our pictures of Indians villages and mini-dioramas.

GOOD BUILDING and COLLECTING
--- Larry
 
Thank you, very much, Larry, for this excellent step-by-step! It has been instructive, following along, and I look forward to seeing a diorama now of an Indian village. Are you going to build a longhouse, too? That'll be cool!

Prost!
Brad
 
Hello Larry,

this is a fantastic thread. I admire those step-by-step guides knowing that they are difficult to assemble.
The subject is also most interesting and I am sure that a lot of us will benefit from your fine guidance on this. Talking from experience I got to praise the fine quality of the pictures you have taken showing your work. Difficult to sum it all up, - Thank you very much for this wonderful thread!
kind regards
Wolfgang
:salute::
 
Larry...this is the absolute most comprehensive tutorial thread I have ever read...it was a pleasure following you and watching you create these extremely realistic wigwam pieces...I'm sure all the FIW collectors could manage to re-create structures similar to the ones you showed us how to make by following your simple laid out directions....I know it was a time consuming thread for you and I appreciate all the pictures and step by step directions...one day...if I get caught up...I would like to make a few of these...I'm sure yours will look great in your diorama photos!
 
Thank you, very much, Larry, for this excellent step-by-step! It has been instructive, following along, and I look forward to seeing a diorama now of an Indian village. Are you going to build a longhouse, too? That'll be cool!

Prost!
Brad

Thank you, Brad, for the kind words. Yep, the Indian Village is under design study and layout. I am also building many Indian village accessories like fire pits, animal skin drying racks, watch towers, walls and the such ... and I am documenting the building so I can show how I did it ... although most are really straight forward.

Hello Larry,

this is a fantastic thread. I admire those step-by-step guides knowing that they are difficult to assemble.
The subject is also most interesting and I am sure that a lot of us will benefit from your fine guidance on this. Talking from experience I got to praise the fine quality of the pictures you have taken showing your work. Difficult to sum it all up, - Thank you very much for this wonderful thread! kind regards
Wolfgan
:salute::

Many thanks Wolfgan it was a bit of work but really enjoyable .... well for the most part. There was a lot of trial-and error trying to figure out the easiest way to build them so a lot of those attempts got deleted as wood flew across the room, pieces fell off or the result looked just wrong. My photography is improving so when I get to the Diorama it should be even better.


Larry...this is the absolute most comprehensive tutorial thread I have ever read...it was a pleasure following you and watching you create these extremely realistic wigwam pieces...I'm sure all the FIW collectors could manage to re-create structures similar to the ones you showed us how to make by following your simple laid out directions....I know it was a time consuming thread for you and I appreciate all the pictures and step by step directions...one day...if I get caught up...I would like to make a few of these...I'm sure yours will look great in your diorama photos!

Hey Mike .... appreciate the thoughts ...especially coming from a Master Diorama maker. I actually learned a bit about building a tutorial so my next ones will be a bit clearer and smoother.... I hope. I am starting to work on -- "How to build an Indian Longhouse." I haven't got to the actual building yet but expect that in a while. I would be VERY interesting to see all the different variations of Wigwams, Longhouses and other items that people build ...:rolleyes:
 
OH Yes ... I almost forgot....:eek:

If someone has a JJD Longhouse .... Short and/or Long .... can you please provide me the Width X Length X Height of that building.

I do not want to copy it ... but it would be interesting to see the approximate dimensions.

Much appreciated.

--- Larry
 

Users who are viewing this thread

Back
Top