Cherry Pickers Mounted Band (1 Viewer)

Your illustration looks a lot like this one that I found - but yours is a bit larger - and therefore - clearer. Yes - I can see now how I was fooled into thinking that they did carry swords - as on closer inspection - my version is strikingly similar - and it's the Escort with the sword - and not the musicians. Love the Greys mixed in with the band, once again.

Interesting that my version has the name of Harry Payne - bottom left.
Cheers chum - jb

hp3520band20of2011th20hussars20tucks20115.jpg
 
Update on progress below. The front five will be musicians except for the central figure who will be one of four escorting hussars carrying carbines. This one is close to completion - but I have to make a Sabretache for him yet. There are two more Greys in this five (Trombone and Cornet) whilst the left hand figure will have a Euphonium - and the far right - a Bassoon when they are ready to receive them. I'm trying for a very dark brown horse for the Bassonist - almost black.

You may notice my first attempts at the VR cypher on some of the shabraques of the figures approaching completion in the second row. This was done with the "Shaved Brush" - as described in a tip from Trooper earlier. I had wanted to try for a "Squirlier" VR - but as these are Toy Soldiers and not Model Figures and my fine brush has seen better days, that will do for me! The small dash above - will be the base for the crown. At least - I have it on now. The Trumpeter on the dapple grey in this row is not a musician, by the way, (though he also wears the pale grey busby - as do the band), but accompanies the Officers as their signaller - and will eventually be part of the Escort group.
huss23.jpg
 
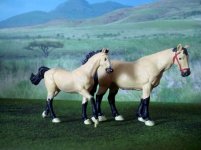
Hi John - thanks for the encouragement - as I'm beginning to flag a bit at the moment!:p Mine are not to the same standard as some of your beauties that I've been admiring recently, but jolly enough Toy Soldiers to be very satisfying for me. That's why I like making up a biggish band - there are so many - that the eye gets deceived - and doesn't linger TOO long or look too closely at each individual piece! I'm having fun just shuffling them around at the moment - and also trying to paint a "Bay Dun" horse - for one of the band - something like this:

DunHorse.jpg


I too am looking forward to the end of the project - when there will be 21 on Parade, as they stand. I'm currently even thinking of expanding them later on to a total of 35 (will fill one of my shelves nicely then), by adding more instruments to the band - and having some standing dismounted with their horses at the rear of the formation - but that's for the future yet.

See - there is some method in my particular form of this madness!^&grin

Cheers for now................jb
 
You mean like this JB ^&grin^&grin^&grin

I just used cheap old acrylics for these.
 

Attachments

  • DSC02168.jpg
    DSC02168.jpg
    96 KB · Views: 96
Yes Scott - that's the general idea.^&grin How much per gallon was the paint?:D

I had the idea of trying to make my band just a little different from the standard way most early Britains band figures were painted ( i.e brown or black - with maybe a splash of white around a hoof or two). Also, to try for a bit of shading from one colour into another - a wee bit. Don't want them to look as if they're wearing wellies now - do I? :) The little picture that started me off on this project of the band crossing a bridge, reinforced this idea - as it shows greys mixed in with the other horses - Troopers recent picture shows that too.

So - I started looking at images of horses (marvelous thing - this Internet!) - and my latest pic. below shows (I hope), that I am trying to take this on board. The front three are my attempts at a grey, a dun - and a very dark brown horse, (early stages for two of these at the moment - more coats and washes to go on yet). I'm avoiding pure black - for the simple reason that each band horse has a black sheepskin and the rider has black boots - otherwise I would have one or two pure black ones too. I can't go too far with colours though - as most British Cavalry units of this period DID use predominantly black/brown horses - so I couldn't have a Palamino or a pure white, for example.

PS Scott, - Only joking bach!:wink2:

huss24.jpg
 
More great progress, John!

I like that you're trying to do more specific detail for the horse colors, too. I think it adds to displays like ours.

My general formula for grays is gull grey for the lighter areas, and dark gray for the muzzle, rump and socks, and mane and tail. Then I do some dappling on the rump with the gull gray.

Prost!
Brad
 
Hi Brad - lottsa visitors today. Just had a look in my Humbrol Colour chart and found Gull Grey (129) - a Satin colour. Yes, I like the look of that. I'll put it on my list. Or I could ask Scott if he has half-a-gallon knocking about in his shed I s'pose:D

My base starter colour for Greys, is usually the Matt 64 Light Grey - which I then add touches of other shades to. I also frequently prime a grey - and did so this time. A touch of black obviously darkens - and Ivory lightens it - but I sometimes use some of the odd blue hues too. I sometimes underpaint with spots of this blue-ish-grey, and then go over it with a wash of light grey later. When it dries out, the dappling shows faintly through. Just a touch of colours we are talking about, mind you. I'm also trying to have a go at washes - as we discussed a while back - especially for the lower legs of the horse, which are frequently verging on black in a brown horse.

My basic brown is a mixture too. I start with a splosh of Matt Red-Brown (100) and mix in pure black (vary sparingly). It gives a really nice deep redish-dark brown. By working this mix up or down the leg - it shades in nicely.

All good fun - and learning as I go along. Glad most folks seem to like them, so far. jb
 
Latest pic.on progress is shown below. I'm particularly pleased with front right Hussar escort with carbine in hand - and immediately behind - the bassoon player on his dark horse. Next comes my "bay Dun" which is still developing nicely and the Grey. Most of the others are subsatantially complete - just a few small details to go. More tomorrow. Thanks for the interesting comments today chaps.................jb
huss25.jpg
 
Just put a coat of varnish on my "Bay Dun" horse and an extra coat on the Dark Brown one (ignore the riders who aren't quite finished yet) - and am so pleased with how they have turned out - I thought you might like to see them. I have been working on developing the shading light to dark - especially on the legs, but shows up well on the lighter horse body too - using light washes of the darker colours - which build up to give the effects shown. Just a few tweaks to the riders - and I should finish these two to be ready for another pic later. jb

huss26.jpg
 
Fresh outta grey Guvvna, I have half a gallon of Parisian pink and a quart of Norwegian Blue and that is your lot! You can have em both for a tanner.

You've "dun" a nice job on that horse though and the rest are looking mighty fine too.
 
Hi Scott - good job you can put up with a gentle leg pull:) But not much you can do on a nag with Parisian Pink thanks!:eek:

They are coming along, slowly though, I think - and pleased you're liking them. I really meant to have both of those finished today - but real life intervened once again - so they will have to wait until tomorrow.^&grin
 
Last pic for tonight shows where I have managed to get to, today. Just behind my front three (Bay Dun needs the head and shoulders finishing off - still wet) you can see a pair of Greys - also nearing completion, though with arms/instruments to go on yet (cornet & trombone). Will hopefully complete all twelve shown by tomorrow evening - and will start off some more musicians by putting bases on some. Over half-way with my project now - with just nine more to not begun yet. jb
huss27.jpg
 
I have just finished touching in details of lots of bits and pieces - and put the arms/instruments on my two musicians riding Greys - when I noticed that it has turned into a beautiful afternoon, and the sun is streaming in through the window of my Studio (Ha! ex-bedroom - but Studio sounds SO much nicer!).

Any excuse - here's how they look in the sunshine!

huss28-1.jpg


huss29.jpg
 
In between giving my two Greys bits and pieces of paint jobs, I based up another three Musicians (Tuba, Sax and Tenor Horn). These horses are now ready for priming - and then will start the painting process for these three once again. I should have the two Greys completed tomorrow to give me 12 completed figures from the 21 I will have at the end of this part of my project. (though, of course, I still have most of the bases to paint too).
huss30-1.jpg
 
In this pic, I am showing how I begin painting these three figures of musicians. Each has a pencilled mark on the base to identify which arms/instrument are his - as these have been individually dry fitted and tailored to each casting. Then I usually give a coat of flesh to each face, and in this case - a coat of primer to the horse (large surface - little detail to obliterate with the coat). I normally don't give a coat of primer to the soldier figure - as it CAN tend to hide detail. Instead, I prefer to give a couple of coats of the colour I am using . I have been told this is "unusual" - but just the way I work.

Now - if you are already a painter - ignore the next bits, and don't get upset - I'm not trying to teach Granny! - these are intended for anyone contemplating joining the "Do It Yourself Brigade" for the first time.

Next comes the raised detail of most of the yellow parts. This includes the hat cord, collar,frogging on the front of the piece, base and back of the jacket and trouser stripes. Note that I have given two fairly liberal coats of yellow paint ( its not a very strong colour ), in order to cover well. I haven't tried to stay online - as the stronger colour coats of blue for the jacket and red for trousers will be covering any extra paint that has gone over the edges. THESE are the colours that will need care in applying - and for which a fine brush is needed.

Note that the collar(for example) is just painted solid yellow - as a blue middle section will be carefully painted in - to leave a top and bottom edge of "piping". I don't attempt to paint the collar blue - and add a top aand bottom edge of piping.

Same for the two yellow trouser stripes. Instead of painting the trousers red and attempting to overpaint two yellow stripes - just paint the two stripes as one in solid yellow. Then, when dry of course, paint the thin red line in the centre groove, thoughtfully provided by the sculptor - and then paint the trousers red around what you have done already.

Remember, painting up to a raised edge, is nearly always easier than trying to stay within an imaginary line.

I will try and show these two items with more pics later
huss31.jpg
 
Below see the three compadres now. Note that I have gone around the collar with blue, leaving a cord of yellow at top and bottom. I will be going over the face with another coat of flesh later, when I will be careful to "cut in" to leave a thin line of yellow at the neck. If you look across at the other two, you can see that I have begun the blue of the jacket - and have left the lower cord of yellow at the neck also.

Now, the trousers. Note that I would normally have completed each jacket with blue - before doing this - but wanted to show the principle involved. First left - the thin red strip has been painted in down the centre of the yellow strip. Next across - the front of the trouser leg has been painted. Put plenty on and overlap the edge where the black sheepskin will be - as you can overpaint later with black - which will cover any overlapping - just take care at the yellow edge. Then - the last figure shows the rear of the leg completed. It's the edge to the yellow stripe that needs care here. But don't worry if there are any inconsistencies with the width of the stripe (as in my last figure), remember this is fabric on the leg of a moving rider on a moving horse - and some inconsistency is normal. If it's too bad - wait until it's dry once again, and carefully touch in with a dash of yellow - or red - as appropriate, as I will be doing on that last rider.

Here endeth the beginners guide! Seriously though - hope that helps any aspiring painters or beginners. Do have a go - it's really very satisfying to paint your own - as well as enabling you to own far more toy soldiers for your bucks! johnnybach
huss32.jpg
 
Thanks for the step-by-step description on your method, John! Even though I've done my own painting and have my own methods, I enjoy seeing how others do things and get to the results that they do. I'm filing this all away, along with things I see in John Firth's posts, to keep in mind as I go forward.

This is going to be an impressive display when you've finished!

Prost!
Brad
 

Users who are viewing this thread

Back
Top