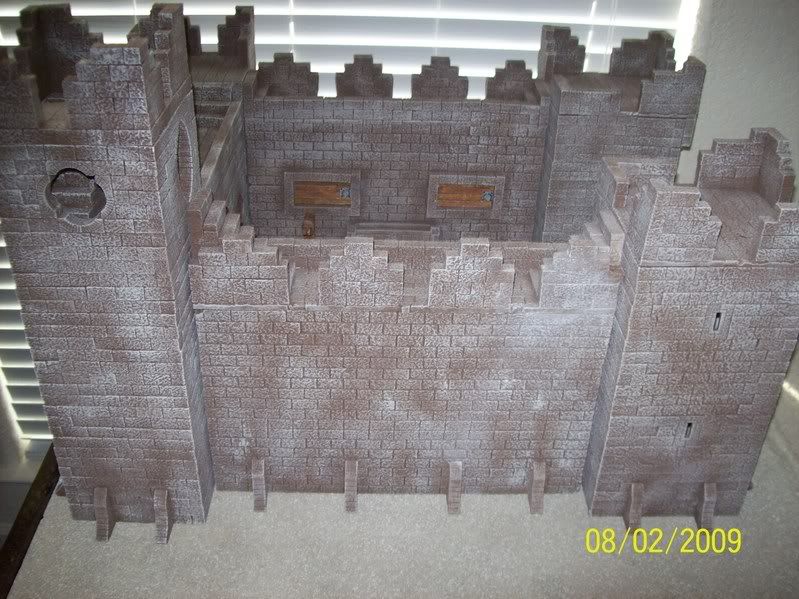
Indian Wall for Durbar background. (5 Viewers)

Mardasson

Sergeant
Joined
Sep 14, 2008
Messages
644
Hi All,
Some months ago I've started to sculpt foam background for my durbar display. That was a lot of fun at the beginning when I was trying to find how to best sculpt wall, tower, gate... but it became a bit repetitive and boring.

I first research how to make a mould to inject polyurethane foam but without success.
I then discovered Hirst Arts moulds on this forum and that give me the idea to design my own silicone moulds in order to produce easily multiple pieces.

It took some time and (a lot of) retries: I first sculpted the initial blocks, made silicone moulds to replicate them, make some changes to the copies so all the blocks don't look similar, solder some blocks together and make some new moulds...until having the 3 master moulds that formed that wall section.
Here are pictures of the first result :
muraille01.jpg

muraille02.jpg


The section is 12'' length and about 7'' high.
It is made of dental plaster. My wife thought I was mad (not the first time she did:D) when I started receiving 20kg packets of dental plaster (had to try several type before finding the good one, I'm sure you cannot guess how many different type of dental plaster exist).

My concern is that it is quite heavy (about 1,3kg for this piece) and should it fall on the figures they would be crushed..:eek:
So if you have any idea on how I could prevent that it would be welcome !

The next building (a tower) is on its way but even with the use of the already made basic blocks it will take some some more weeks..

Cheers,

Michel
 
Hey Michel, that looks brilliant mate! It's really come out well. Now to justify all the time you have spent producing an excellent mold, you'll have to convince the wife that a 70 foot wall surrounding your living room would look really cool! :D

Re the potential issue of the walls falling over, if memory serves me correctly, you are positioning the walls next to your 'real' wall. If that's the case, you could sand the base of the plaster walls at a slight angle, so that they angle backwards towards the wall very slightly, reducing the chance of a crushed Durbar (sounds painful! :eek:).

Or possibly some Hobby tac stuff behind the walls to keep them semi-permanently 'tacked' against the 'real' wall?

Cheers for the update on the progress,

Simon
 
Hi there Michel,

Thats a great looking wall section. How many hours do you have invested in the project? Also what sort of display area do you have?

Looking forward to seeing some more photos for this project.

All the best

Dave
 
How about some self adhesive velcro? One piece to the wall one piece to the dio piece wich is really nice BTW.
 
Hey Michel, that looks brilliant mate! It's really come out well. Now to justify all the time you have spent producing an excellent mold, you'll have to convince the wife that a 70 foot wall surrounding your living room would look really cool! :D

Re the potential issue of the walls falling over, if memory serves me correctly, you are positioning the walls next to your 'real' wall. If that's the case, you could sand the base of the plaster walls at a slight angle, so that they angle backwards towards the wall very slightly, reducing the chance of a crushed Durbar (sounds painful! :eek:).

Or possibly some Hobby tac stuff behind the walls to keep them semi-permanently 'tacked' against the 'real' wall?

Cheers for the update on the progress,

Simon
Simon,
Thanks for the comment and the tips. Will see how it can work.

Regarding the 70 foot wall in the living room, that's a nice idea....but maybe a 'bridge too far' !
Cheers,
Michel
 
Hi there Michel,

Thats a great looking wall section. How many hours do you have invested in the project? Also what sort of display area do you have?

Looking forward to seeing some more photos for this project.

All the best

Dave


Hi Dave,
Thanks for the comment.
I can tell precisely how many hours : a lot :D
But they are good relaxing time after work.
The display area is originally a 10 feet long shelf but I'm afraid that there will be no room enough for all the figures so another shelf will be necessary.
Cheers
Michel
 
How about some self adhesive velcro? One piece to the wall one piece to the dio piece wich is really nice BTW.

Hi KV,
I would have never thought of velcro.
Even if I cannot use it against the wall maybe I can solder all the pieces together so they will be mre stable (or will fall all together as one)
Michel
 
Nice job on the walls, Michel, an excellent effort!

Another thought occurred to me about stabilizing them, and that was to try adding buttresses to the front face, or perhaps making a section that represents a small watchtower that projects from the face of the wall. Of course, that would mean making another master and mold. But it would also provide a little more visual interest to the face of your backdrop.

Were the 20kg wrapped in 1-kilo bags? Must have looked awful suspicious...

Prost!
Brad

Hi Brad,
Thanks for the comment.
Buttresses is a nice idea :cool:. I will see how I can try it ( maybe also with boulders at the foot of the wall so it won't be too regular).

I already thought about a small tower (or rather outflanking wall) where two wall sections are connected together. It would be slightly covering the edges of the wall to prevent them to fall. That would also have the advantage of avoiding 2 wall sections being put next to the other : the effect is not that nice as you can see the joint instead of interlacing stones.
I already had in mind a half-circular tower all that is needed now is to make the moulds...

Regarding the suspicious look of the powder... well as I only paid about 60 EUR for 20 kg that would have been quite a deal ... and would have allowed me to work 22 hours a day on the project :D

Cheers,

Michel
 
This really great Michel. I can't wait to see photos of the walls and towers all in place. I may have to try this soon as I will be receiving new figures from the WB matte Durbar.
 
Great job Michel,

Really nice detail on the wall.

Glad to see you're hanging in there with Hirst.

I had a lot of fun with mine.

To steady "my" walls, even though they were 4"s thick, I added some mini butress's around the base.

100_0472-2.jpg


Just an idea.

Your wall looks really cool.:cool:
 
Hi All,
Here is a picture of possible butress or boulders I could glue at the front of the wall to prevent them to fall. The idea is to add one or two of them for each wall section.
I still need to sculpt the details on these pieces.
Which ones do you think are the most interesting ?
I'm also working on the connecting towers... more pictures soon.
Kind regards,
Michel

Butresses.jpg
 
Michel,

The dental plasters are easy to sand to almost any shape you want.

I used a grinder.

Have you tried standing a full brick against the wall and sanding it at an angle for a larger buttress?

Maybe just play around with sanding any of your bricks to add for some more support.

You are doing a great job with them.:cool:
 
Very nice, Michel, I hadn't thought of boulders/rocks, either, that's a good idea, too.

I think if I were building the wall, and added a buttress to it, though, I'd probably make it a little larger, perhaps as wide as the length of one of the dressed stones in the wall, with a height of about 2/3 the total height of the wall, and maybe a depth at the base of about half the length of one of the dressed stones, tapering a little towards the top. In my mind, I'm picturing a fortress wall somewhere in the UK, whether in England or perhaps in Wales. I think it was featured in a show on the History Channel or the Discovery Channel, about the trebuchet and other medieval siege machines. But I remember a wall with a buttress along a face between two corner towers.

If you make towers, might you even consider a gate piece of some kind?

You know, I should some plaster and molds myself....
 
Nice wall Michael. Making a silicone mold sounds difficult:eek: certainly beyond my talent and patience.

I look forward to seeing a more complete diorama with some of your figures.

Cheers
 
Brad, Michael,

Thanks for the nice ideas.
I will let them wander into my mind as I'm working on the tower and it will probably end up with something...Of course I'll let you know.

Yes, I'm thinking about gates but that's some long term planning :mad:

I will at least try to make in plaster the buildings I already built using foam (some pictures are in my albums).

Regards,

Michel
 
Nice wall Michael. Making a silicone mold sounds difficult:eek: certainly beyond my talent and patience.

I look forward to seeing a more complete diorama with some of your figures.

Cheers

Thanks Russel,
Making the mold is actually the easy part.
But you first need to have the master to replicate....
I wouldn't say it's difficult (as I manage to do it) but it takes time ! But that's destressing time so the more the better...
Cheers,
Michel
 
Hi All,
I've finished the master for the small half-round connecting tower.

tower01-1.jpg


Tonight I'll make a mould of it together with the larger rectangular tower I had made earlier and will be able to cast elements tomorrow evening.

tower02-1.jpg


Michel
 
Hi All,

I've finished my first towers castings (the small semi-circular ones) and thought I would post some pictures of them.

They are still at the assembled castings stage so no colours yet (the extra wall sections have only been primed with a very dark brown).

As you can see I've used the idea of the butress to avoid the wall falling forward and crushing the Durbar (surely a diplomatic incident).
Each small tower has a soldered buttress on each side that will prevent any accident (I hope so).

More pictures when they are painted.

Michel

Tour_01.jpg


Tour_02.jpg


Tour_03.jpg


Tour_04.jpg
 
Those look really great Michel. I can't wait to see them all painted and behind your Durbar collection.
 

Users who are viewing this thread

Back
Top