Prussian Hussar (1 Viewer)

fishead19690

Command Sergeant Major
Joined
Nov 3, 2005
Messages
2,555
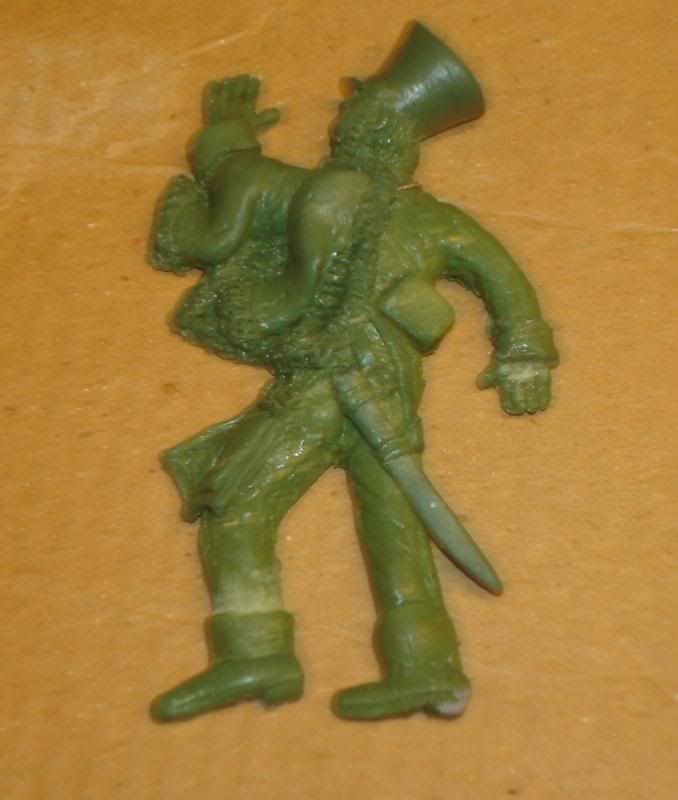
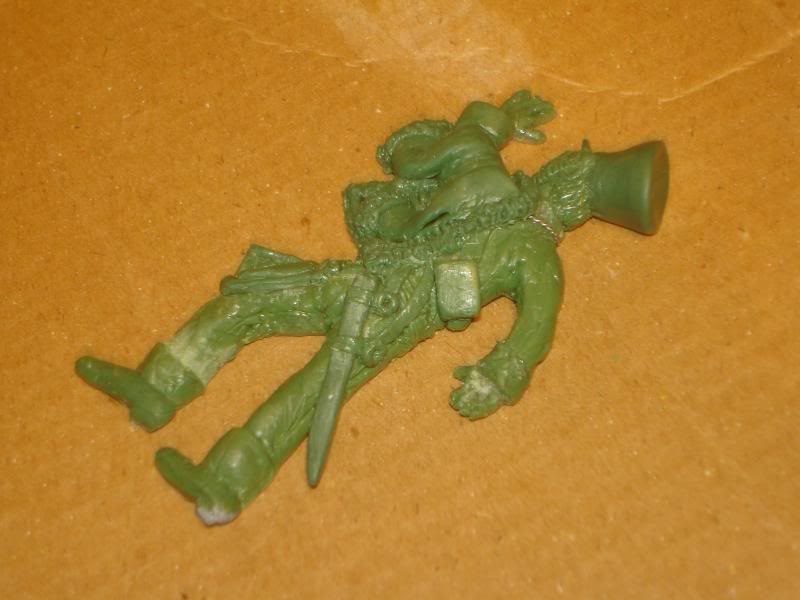
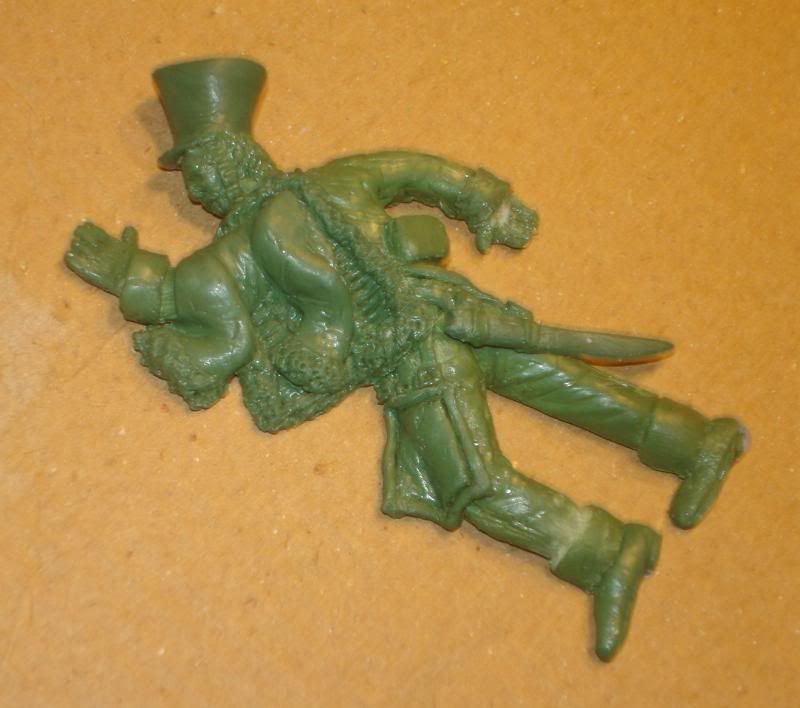
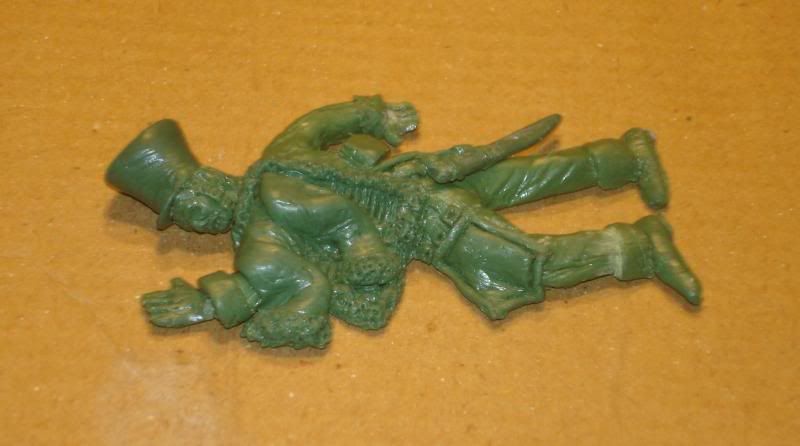
I was messing around with some green stuff and scratch built this dead Prussian hussar. The scale is somewhere between 54mm and 60mm? About the size of a Britians figure. It was fun to make, I might try a few more?
I,m no sculptor but with more practice they might get better????? I don,t have enough patience to let the putty fully dry before moving onto the next section and I ruined a lot of the detail I had better the first time around.:mad:
I had the hands and feet better before I destroyed them and had to glue one of the hands back on.
Hopefully the next try will go better?
019-3.jpg

021-2.jpg

023-5.jpg

028-2.jpg
 
Yes Fish, great work. More practice and they will get better at every new step.
You're better at it than most of us.
Try working on numerous pieces at the same sitting. You can work on 6-8 different pieces at a sit down, that way you do a little to each over a sit down, come back for your next work period and they'll all be dried and you can do a little more to each.
I should talk. I haven't touched any figures in a year.
By the way, when you get a bunch of your dead and wounded, parts , whatever done, I'll make molds for you.
FUb
 
Hi Tim,

I'd say you're a sculptor. I really think you need to try the desk lamp to cure the putty faster as well as working on a few figures at a time. That way when you get the detail the way you like for a given section you are working on, you slide it under the lamp and let it cure. I think 15 minutes is about all a 60 watt bulb needs to cure the putty. You can test the time needed by making just a few small "snakes" that you do some detail, does not matter what, and then put them under the light to see how they are after 10 minutes or so, then lengthen the time under the light until you are sure. I would then recommend you try doing 3 dead guys at once - rotating them in and out as you work.

The lamp head with the bulb must be close to your work surface so the heat stays next to your figure that you are curing. Don't leave it in for more than 20 minutes, and leave about 3 inches or a bit less to allow you to slip the figures in and out. They will be hot so be careful. Let them cool as you mix the next amount of putty.

I think you will find that your productivity increases as does your patience while working on the figures.

One little point to make note of here. the putties change their properties as they set. If you need to wait for the putty to set for a few minutes before you sculpt detail, please don't rush that by using the light bulb. The light bulb is for making the putty cure very fast, instead of waiting 6 hours or so. The work life of mixed putty changes depending on ratio you mix and temp of the area you are working in.

Keep at it. You're doing really well. Epoxy putties are not an easy thing for anyone to get use to quickly. And I am in the same boat as Fubar. I have not touched a sculpture in about a year. I have only now just found time to start again. Work and the family life tend to get in the way at the moment.

I look forward to your next post of the next batch of sculptures.

Matthew
 
I'm probably the one guy who doesn't like Green Stuff. I think your sculpt is very impressive...you will be amazed how you will improve, and already you are doing great.
 
I don't like greestuff either. I find it to be too sticky and it has too good of a memory that it takes a lot more effort to push the putty around and have it stay where you want.

I prefer ProCreate and Magic Sculpt. For me, these products are easier to work with.

Matthew
 
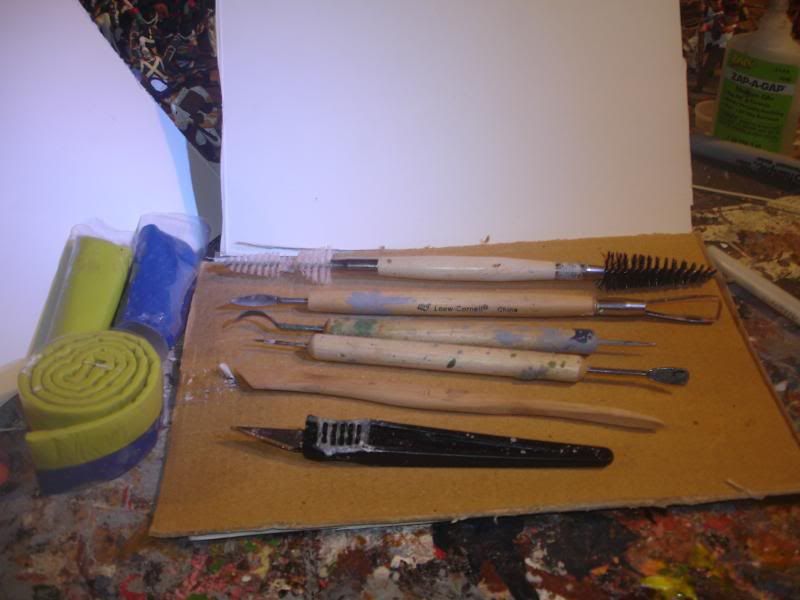
Nicely done! Did you use an armature, or just sculpt/work the mass of putty? What sort of tools did you use?

Prost!
Brad
 
As I look some more, I want to say that I really like the texture you achieved on the fur trim and braiding on the Pelz.

Many good tips, from the rest of you, too!

I've used Sculpey, which I found easy enough to work with, but it has to be baked to cure, which can be a little touchy (too much heat, and the cured putted turned black. Not burned, per se, just black in color). I'm using Aves 2-part now, and I'm also using up an old batch of Miliput, for small items that don't require a lot of shaping or an armature (loaves of bread, sacks of flour or sandbags, eg).

I use dental tools, as well as pins and toothpicks, and pieces of fine tubing, and I started using floral wire to make armatures.

Prost!
Brad
 
Yes Fish, great work. More practice and they will get better at every new step.
You're better at it than most of us.
Try working on numerous pieces at the same sitting. You can work on 6-8 different pieces at a sit down, that way you do a little to each over a sit down, come back for your next work period and they'll all be dried and you can do a little more to each.
I should talk. I haven't touched any figures in a year.
By the way, when you get a bunch of your dead and wounded, parts , whatever done, I'll make molds for you.
FUb

Thanks Harold! I just might hit you up on that offer to make a mold! I don,t know if anyone would be interested in buying any in these being rough amateur attempts but You could sell them if you wish? And have some for your own collection also.
Just give me a couple of castings for the effort, cast in metal and I,ll be happy.^&cool Then in the future if I want more you,ll have the molds and I,ll just have you make me more. I,ll just send you a few bucks for time and material.

I have tried doing my own molds but the stuff I used is not good for casting metal and I don,t seam to be very good at casting metal other then making lead sinkers for fishing that is.:rolleyes2:

I made a mold of the dead horse I converted and cast a few in 2 part plastic and it came out alright so I,m going to give this figure a shot in plastic and then if your interested I,ll send it over to you to make a mold for metal if your interested???

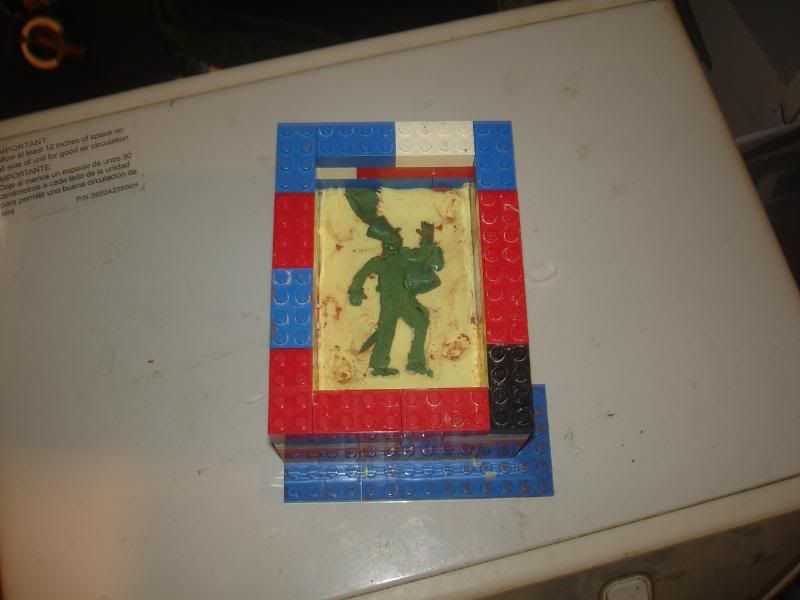
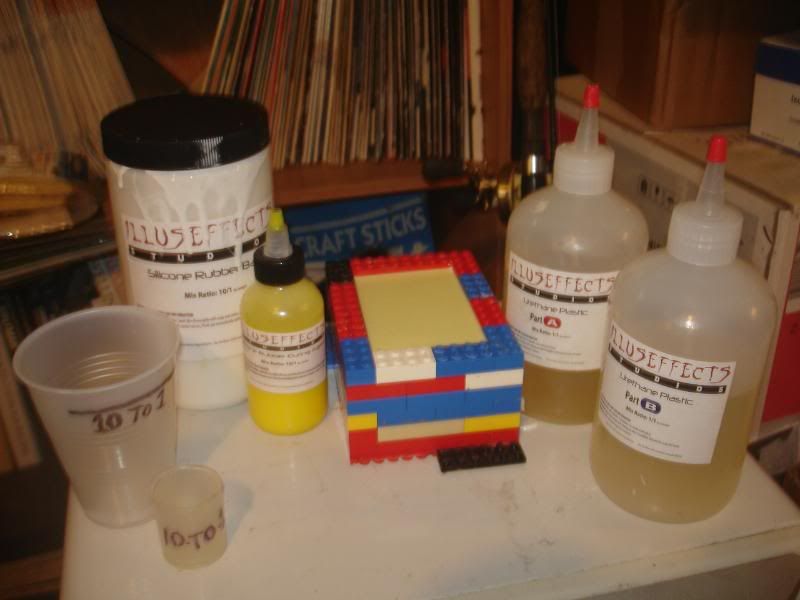
Here is a picture of the stuff I,m using to mold and cast. I used Leggos to make the mold box and used clay that stays wet till baked to embed the figure into. I pushed the figure into the clay where the mold parts would join and poured the silicone into the mold, then pulled it out, took off the clay and poured the other half after the first half had dried.

Its a 10 to 1 mix on the silicone and a 1 to 1 mix on the casting plastic.
The second half of husar mold is drying as I post this. here are a few pics!
001-1.jpg

005-1.jpg

012-3.jpg

059-1.jpg
 
Hi Tim,

I'd say you're a sculptor. I really think you need to try the desk lamp to cure the putty faster as well as working on a few figures at a time. That way when you get the detail the way you like for a given section you are working on, you slide it under the lamp and let it cure. I think 15 minutes is about all a 60 watt bulb needs to cure the putty. You can test the time needed by making just a few small "snakes" that you do some detail, does not matter what, and then put them under the light to see how they are after 10 minutes or so, then lengthen the time under the light until you are sure. I would then recommend you try doing 3 dead guys at once - rotating them in and out as you work.

The lamp head with the bulb must be close to your work surface so the heat stays next to your figure that you are curing. Don't leave it in for more than 20 minutes, and leave about 3 inches or a bit less to allow you to slip the figures in and out. They will be hot so be careful. Let them cool as you mix the next amount of putty.

I think you will find that your productivity increases as does your patience while working on the figures.

One little point to make note of here. the putties change their properties as they set. If you need to wait for the putty to set for a few minutes before you sculpt detail, please don't rush that by using the light bulb. The light bulb is for making the putty cure very fast, instead of waiting 6 hours or so. The work life of mixed putty changes depending on ratio you mix and temp of the area you are working in.

Keep at it. You're doing really well. Epoxy putties are not an easy thing for anyone to get use to quickly. And I am in the same boat as Fubar. I have not touched a sculpture in about a year. I have only now just found time to start again. Work and the family life tend to get in the way at the moment.

I look forward to your next post of the next batch of sculptures.

Matthew

Thanks for tips and encouragement, I,ll have to get a lamp or heat bulb down on my work bench! Its been getting real cold down there and thats not helping me any either. The 2 part mold I had curing down there that should have cured in 2-4 hours took about 8 hours to cure!{eek3} So I guess looking into a heat bulb would be a good idea.
 
I'm probably the one guy who doesn't like Green Stuff. I think your sculpt is very impressive...you will be amazed how you will improve, and already you are doing great.

I have tried a few different putties and they all seam to work a bit different from each other and some are better for certain things then others. Its best to try as many as possible and see what works best for you!
Working times vary a lot from putty to putty as does stickyness and some are better at finer detail. A stiffer putty is better at smaller fragile parts for me because I find I break and destroy small fragile parts with fine putties.

Fine putties work good with water for getting smooth fine detail. I have even mixed different putties on the same piece in the past and it worked for me but this was all with doing conversion work but I,m sure I,ll mix different putties in the future if i continue to explore scratch building.

Thanks again! Keep sculpting!^&cool
 
I don't like greestuff either. I find it to be too sticky and it has too good of a memory that it takes a lot more effort to push the putty around and have it stay where you want.

I prefer ProCreate and Magic Sculpt. For me, these products are easier to work with.

Matthew

You want to talk about sticky try working with Millput, then add a little water and that stuffs all over you.
I have never tried either of those brands, are they 2 part putties or air/bake dry???
 
Nicely done! Did you use an armature, or just sculpt/work the mass of putty? What sort of tools did you use?

Prost!
Brad

Thanks Brad!
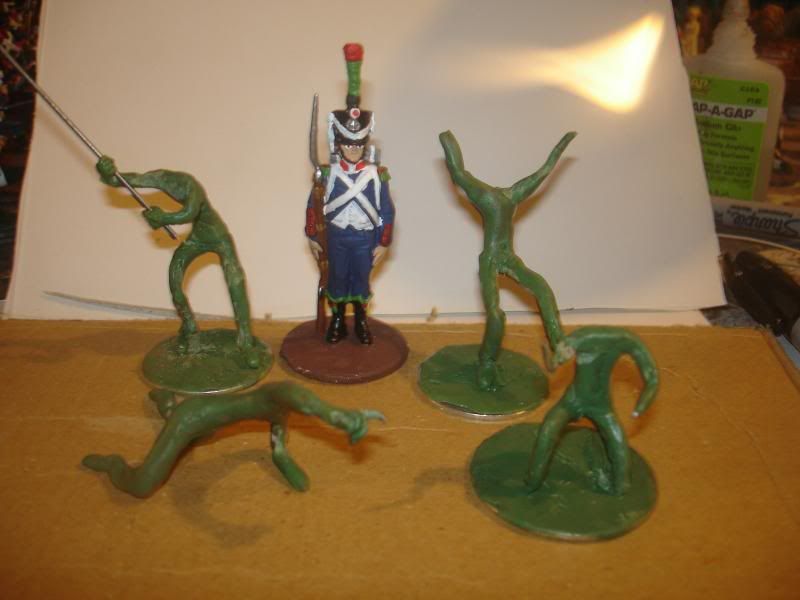
No I didn,t use an armature I just kinda went for it but, I just started work on a few more and on these I,m trying the armature method. These guys are not laying dead so I think the armature will be a big help.
i,m not even really sure what these guys are going to be yet as far as what type of troops but they,ll be an artillery crew fighting off a cavalry attack and that is all I know at the moment????

I was thinking maybe Prussians? but then again maybe Austrians??? But I started on a basic shape of a cavalry figure and it was going to be either a Cossack or a Prussian so maybe french artillery????

I,ll have to keep eyeing them out and see???
Here are a few pics!
Oh! And you asked about tools??? Anything that looks like it,ll work but here are a few of the manythings I have been using. The texture of the fur on the coat was done with the wire brush in the photo. i love that thing. It also makes great grass texture for bases also.

044.jpg

047.jpg

064-1.jpg

052-1.jpg

022-1.jpg

047.jpg
 
Thanks for the look at your bench! You've got quite a bit in progress.

I've heard others mention using a wire brush, too. I'll try that, when I get to the Pelz, too.

Prost!
Brad
 
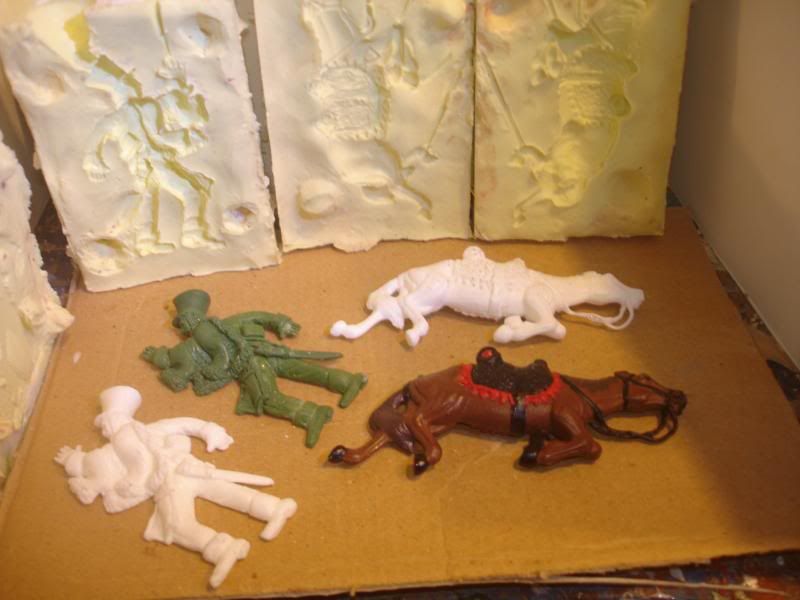
The mold is complete and after a few bad casts and a little bit of vent cutting its pouring a complete figure.^&cool The hand and head had a few issues as you can see from the first few miss casts.
I also converted an old dead Marx horse into a Napoleonic style dragon tooth sheep skin hussar style saddle with some 2 part putty and made a mold of that also. now he has a dead mount to go with him.
The scale is off though. The horse is 1/32 and I made the hussar about 1/30 as can be seen from the Del Prado figure on side of him.
077.jpg

083-1.jpg
 
Great job Tim, You are an inspiration!
I can't seem to get the 2 part plastic stuf to work very good for me, but I have little patience. I did manage a few Civil war Union guys but not enough success and , I lost patience.
I have 4 different ACW casualties that need a little tlc and they'll be ready for a mold, plus some Prussians that are plastic conversions.Maybe in the Spring.
Looks like you are having fun being creative.Good for you!
Anything you want turned into metal and lots of duplicates, you just lmk.I think they're splendid!
FUB
 
Hi Tim,

Really nice stuff there. To answer the question about Magic Sculpt and ProCreate. ProCreate is the same type of clay as Green Stuff, just less sticky and easier to mix and push around. Also less expensive. Magic Sculpt is a two part resin and hardener. You mix equal parts by volume and then mix. It is like working with pottery clay. Waster makes it very smooth and blends seams well. The cured product is hard like concrete. I use it instead of armature wire and for weapons and equipment.

I noticed that you used some green stuff to make the pour spout on the mold. Is this something you use over again, or do you make it new every time? We always made the vents out of the plastic / wax type clays like what you used as the bottom of your mold.

I'll try to post later today when to get the putties I am talking about, but you probably can google them and find where they are sold near you.

Again, thanks for the great photos.

Matthew
 
Can ceramic powder be used in making these??! I don't know how easy or hard they are to work with.. but was just wondering!
 
Thanks Harold! I just might hit you up on that offer to make a mold! I don,t know if anyone would be interested in buying any in these being rough amateur attempts but You could sell them if you wish? And have some for your own collection also.
Just give me a couple of castings for the effort, cast in metal and I,ll be happy.^&cool Then in the future if I want more you,ll have the molds and I,ll just have you make me more. I,ll just send you a few bucks for time and material.

I have tried doing my own molds but the stuff I used is not good for casting metal and I don,t seam to be very good at casting metal other then making lead sinkers for fishing that is.:rolleyes2:

I made a mold of the dead horse I converted and cast a few in 2 part plastic and it came out alright so I,m going to give this figure a shot in plastic and then if your interested I,ll send it over to you to make a mold for metal if your interested???

Here is a picture of the stuff I,m using to mold and cast. I used Leggos to make the mold box and used clay that stays wet till baked to embed the figure into. I pushed the figure into the clay where the mold parts would join and poured the silicone into the mold, then pulled it out, took off the clay and poured the other half after the first half had dried.

Its a 10 to 1 mix on the silicone and a 1 to 1 mix on the casting plastic.
The second half of husar mold is drying as I post this. here are a few pics!
001-1.jpg

005-1.jpg

012-3.jpg

059-1.jpg

Tim, you are talking toy soldiers which boasts an unlimited of sculpt styles and figure types. Your figure is well done and would make for a super TS offering all painted up. I would be proud to have it in my collection, which already hosts a large number of homecast and homemade soldiers. Michael
 
Nice job. Once you start making rubber molds the pose possibilities are almost limitless, plus you can just cut the vent out of the rubber instead of casting it. Two part plastics are unpredictable. I have a mold for a two piece set and I poured the plastic in both cavities. One turned out perfectly, the other was a gooey mess that never cured and it took forever to get the gunk out of my mold.
 

Users who are viewing this thread

Back
Top