You are using an out of date browser. It may not display this or other websites correctly.
You should upgrade or use an alternative browser.
You should upgrade or use an alternative browser.
Purchasing "job-Lots" (1 Viewer)
- Thread starter johnnybach
- Start date
johnnybach
Major General
- Joined
- Nov 24, 2010
- Messages
- 13,663
You will have post some process pics for the arm repairs. I have a trooper I am working on and would be interested in seeing some more of your process pictures. Especially on how you deal with holes in the horses bodies.
Dave
I've shown lots of process pics before of this process - so I don't want to bore people with the same old thing every time.
BUT....Okay Dave - next time I do some - I will show a bit more detail.
I'm, beginning repairs on a couple of hunting dogs at the moment - both of which are very small - and have lost a leg - I'll take a few pics as I go along with those. It's really the same principle each time - drill into something solid left on the figure - and insert and glue in a pin. Think of this as the "bone in the leg" . Once set, either replace the missing part - by cutting it to fit - and drilling into that too - and fit it to the pin. OR, use epoxy putty to form "the flesh on the bone" instead.
I'll take a few pics shortly of my dogs - as I go along to show how this goes. jb
theBaron
Major
- Joined
- Mar 27, 2008
- Messages
- 10,526
I'll chime in, too. I'll pack a little 2-part epoxy putty into a cavity, and then stick my pin (ie, wire) into the putty. When the putty sets up, it's a firm base for the pin and the limb. I've also done the same thing but with 2-part epoxy glue. It depends on how easy it is to get something into the cavity, how much material is left, if the figure is hollowcast or solid, and so on.
Prost!
Brad
Prost!
Brad
johnnybach
Major General
- Joined
- Nov 24, 2010
- Messages
- 13,663
I'll chime in, too. I'll pack a little 2-part epoxy putty into a cavity, and then stick my pin (ie, wire) into the putty. When the putty sets up, it's a firm base for the pin and the limb. I've also done the same thing but with 2-part epoxy glue. It depends on how easy it is to get something into the cavity, how much material is left, if the figure is hollowcast or solid, and so on.
Prost!
Brad
Good methodology Brad.
But I do agree - it all depends on the state of the figure that you're repairing. The more variables there are - the more difficult/easy it is. jb
johnnybach
Major General
- Joined
- Nov 24, 2010
- Messages
- 13,663
Here goes with repairing dogs legs.
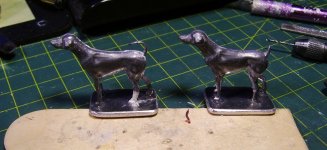
Above are a couple of Britains hollowcast hunt dogs - both having a missing lower left leg when found. I have already drilled into the leg - and fitted a pin, cut from a peper clip. Note that the pin is deliberately slightly longer than the remaining legs - as it goes through a hole drilled into a tailor-made stand (base) which I made for each dog. ( You can see the pin on the right side dog). This is my "bone" for the leg.
The left dog has had the leg remodeled by using an epoxy putty to form around the pin - just as flesh would around a bone.
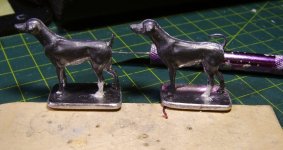
Here's the other dog - whose leg has been remade in a similar fashion.
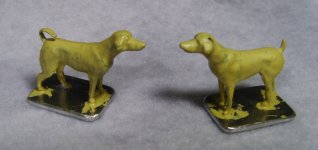
When the epoxy putty has cured - I give each dog a justification coat of matte paint - which will help show up any minor flaws - which can be modified, by sanding or filing to remove material - or adding more if necessary.
Here's where I am with these two - not too bad - but maybe a bit of sanding back required in a day or two - once everything has solidified. Also note that I deliberately left one dog with a short tail ( snapped off from the original curled one) , as it reminded me of my favourite dog Angus ( now sadly, gone), who had a tail very much like it. Guess what I will call them when they are done??
Curly and Angus, of course!
Hope that helps a bit.
When I next get a horse with a hole in it - I'll do another show and tell. But for now .................... here's a tell version.
Cut a piece of tissue paper about two or three sizes bigger than the hole - and crumple it up into a rough ball. Push it into the hole with something ( a straightened paper clip will do. When it's inside it will un-crumple a bit. If you lose it - do it again with another piece. When you can see it inside and preferably touching the inside of the horse - run a little super-glue (the runny kind) into the hole. It will quickly set off - and be stuck inside the horse. You can add smaller pieces of tissue paper now - if you want to save the putty - and keep the layer thin.
When you are satisfied that the hole is now shallow enough (aim for a couple of millimetres) - you can begin putting in small pieces of epoxy-putty into the hole to build up to the surface of the horse. I usually put in a touch more super-glue for the putty to quickly stick to. Build up the putty to slightly proud of the surface - and leave it to set off HARD. This may take a day or two - depending on how deep the putty is, (that's why it pays to use the paper first - so you have a thinner layer of putty to solidify.
Once dry - you can file/sand it down until you are satisfied with the surface - when you can put on a justification coat of paint - which will help show up any faults or irregularities - just as I have done above with my two dogs.
Hope that helps too Dave - jb

Above are a couple of Britains hollowcast hunt dogs - both having a missing lower left leg when found. I have already drilled into the leg - and fitted a pin, cut from a peper clip. Note that the pin is deliberately slightly longer than the remaining legs - as it goes through a hole drilled into a tailor-made stand (base) which I made for each dog. ( You can see the pin on the right side dog). This is my "bone" for the leg.
The left dog has had the leg remodeled by using an epoxy putty to form around the pin - just as flesh would around a bone.

Here's the other dog - whose leg has been remade in a similar fashion.
When the epoxy putty has cured - I give each dog a justification coat of matte paint - which will help show up any minor flaws - which can be modified, by sanding or filing to remove material - or adding more if necessary.
Here's where I am with these two - not too bad - but maybe a bit of sanding back required in a day or two - once everything has solidified. Also note that I deliberately left one dog with a short tail ( snapped off from the original curled one) , as it reminded me of my favourite dog Angus ( now sadly, gone), who had a tail very much like it. Guess what I will call them when they are done??
Curly and Angus, of course!

Hope that helps a bit.
When I next get a horse with a hole in it - I'll do another show and tell. But for now .................... here's a tell version.
Cut a piece of tissue paper about two or three sizes bigger than the hole - and crumple it up into a rough ball. Push it into the hole with something ( a straightened paper clip will do. When it's inside it will un-crumple a bit. If you lose it - do it again with another piece. When you can see it inside and preferably touching the inside of the horse - run a little super-glue (the runny kind) into the hole. It will quickly set off - and be stuck inside the horse. You can add smaller pieces of tissue paper now - if you want to save the putty - and keep the layer thin.
When you are satisfied that the hole is now shallow enough (aim for a couple of millimetres) - you can begin putting in small pieces of epoxy-putty into the hole to build up to the surface of the horse. I usually put in a touch more super-glue for the putty to quickly stick to. Build up the putty to slightly proud of the surface - and leave it to set off HARD. This may take a day or two - depending on how deep the putty is, (that's why it pays to use the paper first - so you have a thinner layer of putty to solidify.
Once dry - you can file/sand it down until you are satisfied with the surface - when you can put on a justification coat of paint - which will help show up any faults or irregularities - just as I have done above with my two dogs.
Hope that helps too Dave - jb
johnnybach
Major General
- Joined
- Nov 24, 2010
- Messages
- 13,663
Your repairs on the ladies look great, too, John! Are you working towards a complete hunt?
Prost!
Brad
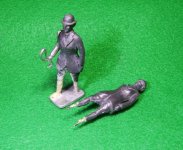
I hope so ......................but it all depends on what turns up and when - and if I win them!!!! I have a couple more Hunt Ladies that I have been working on - with rather more difficult problems. One was missing both lower legs - and the other had no feet.
See below the latest state of repair to both gals. I've begun remodeling the one with missing legs - by setting her onto a new stand with pins - and begun modelling the leg/boot on the "bone" of the pin. The other lass, has shorter pins - to go through a new stand - which will then require new feet to be made from putty again. Also note the missing "loose" arm with whip. You can see the new arm on one ( not yet glued in place) - which again, is a Dorset spare part. jb
johnnybach
Major General
- Joined
- Nov 24, 2010
- Messages
- 13,663
The tissue paper idea is exactly the kind of advice I was looking for! I will use that on the horse I am fixing. Thanks Johnny
Dave
Happy to help Dave - let us know how you get on. jb
Instead of using tissue, I use wire cloth (window screening). Prior to sticking into the cavity, i attach a bit of thread or wire looped through the screening so that I can pull it tight when appling super glue. When the glue is dry, I pull out the wire/thread and apply putty. This makes a really strong patch.
Bosun Al
Bosun Al
johnnybach
Major General
- Joined
- Nov 24, 2010
- Messages
- 13,663
Instead of using tissue, I use wire cloth (window screening). Prior to sticking into the cavity, i attach a bit of thread or wire looped through the screening so that I can pull it tight when appling super glue. When the glue is dry, I pull out the wire/thread and apply putty. This makes a really strong patch.
Bosun Al
I think if it were a really large hole - I would prefer your method Al. But for minor holes - I think the tissue route is an easier and quicker method. It's simple, cheap and virtually foolproof.
Wire cloth is just another variation - but the super-glue (I think some call it Crazy Glue) and attaching the "patch" inside the hole which is the important bit. I suppose you could even use fabric as a patch??
jb
bromhead
Sergeant Major
- Joined
- Aug 7, 2008
- Messages
- 1,712
You will have post some process pics for the arm repairs. I have a trooper I am working on and would be interested in seeing some more of your process pictures. Especially on how you deal with holes in the horses bodies.
Dave
I have used filler putty,,bondo LOL etc w backing depending on the size of the damage,,prime then paint after sanding,,
johnnybach
Major General
- Joined
- Nov 24, 2010
- Messages
- 13,663
Thanks for sharing the different ideas for repairing holes guys - I'm sure it's all food for thought for future repairs - and it's good to have different options.
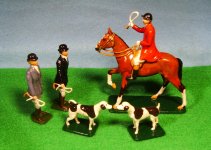
But...............back to my dawgs again. Repairs on the rear left leg of both hounds have now been completed. Here's a pic below - with the other completed members of the hunt, so far.
I must admit that I'm very pleased with both little hunting dogs - and think they are quite cute. You may notice that I have put them onto a tiny stand each, for their future years. The legs are very fine indeed - and therein maybe lies a clue to how they became broken in the first place. Anyhow, Doc JB has fixed 'em up for the forseeable future.

johnnybach
Major General
- Joined
- Nov 24, 2010
- Messages
- 13,663
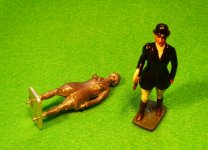
Thought that you might like an update on my two hunting ladies - who originally had problems standing up!
NO! - not a bit too much "Stirrup Cup" before the hunt took off. They were both found minus their original stand - one having no feet - and the other no bottom half of legs either.
Here's how they look now. The one almost completed - is the one who originally had no legs/boots. The other - shows how pins have been inserted into her boot legs - and taken through a newly fabricated stand and cem,ented in; (alloy sheet metal stand - cut and drilled to accept the new pins). Both figures were repaired in the same manner - except that the one with no boots/lower legs had longer pins. The boots were made from sculpted epoxy putty around the pins (I use Milliput).
The feet of the other one - will be sculpted on to her boot legs/base in a similar manner jb

johnnybach
Major General
- Joined
- Nov 24, 2010
- Messages
- 13,663
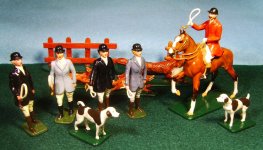
For those following my "Hunt" figures - my last two "Whipper Ins" (as I've learned they are called), have now been completed. These last two ( pic below) were the most damaged of the four - with the one on the far left (black jacket) being most damaged - having no legs below the knee. The lady next right (pale blue jacket) had no feet - and rather obviously, neither had a stand (base) left, when found.
After the magic of Milliput and glue was put to work - you would be hard pressed to notice the difference between them and the other two who DID have legs and feet when found. As usual, all free moving arms with whip were missing - but thanks to Dorset model Soldiers copious "Spares Department", that was soon sorted out.
Here's how they all look now. "Look out - they're behind you"
[N.B. My three foxes are all repaired from previous finds. The one with goose in mouth (JoHillco) is most sought after - and is slightly larger in scale than the Britains Hunter figures - which are all 54mm scale - which includes the two dogs.]

Ivanhoe
Sergeant First Class
- Joined
- Jun 24, 2015
- Messages
- 1,185
For those following my "Hunt" figures - my last two "Whipper Ins" (as I've learned they are called), have now been completed. These last two ( pic below) were the most damaged of the four - with the one on the far left (black jacket) being most damaged - having no legs below the knee. The lady next right (pale blue jacket) had no feet - and rather obviously, neither had a stand (base) left, when found.
After the magic of Milliput and glue was put to work - you would be hard pressed to notice the difference between them and the other two who DID have legs and feet when found. As usual, all free moving arms with whip were missing - but thanks to Dorset model Soldiers copious "Spares Department", that was soon sorted out.
Here's how they all look now. "Look out - they're behind you"
[N.B. My three foxes are all repaired from previous finds. The one with goose in mouth (JoHillco) is most sought after - and is slightly larger in scale than the Britains Hunter figures - which are all 54mm scale - which includes the two dogs.]
Great work, as usual jb !
I had to look up "Whisper Ins"...always learn something from you.
Thank you.
johnnybach
Major General
- Joined
- Nov 24, 2010
- Messages
- 13,663
Great work, as usual jb !
I had to look up "Whisper Ins"...always learn something from you.
Thank you.
Glad you like 'em chum - jb
johnnybach
Major General
- Joined
- Nov 24, 2010
- Messages
- 13,663
Excellent repairs and restorations, John! They all look like they're ready for a little tot after the chase, too.
Prost!
Brad
Thanks Baron Brad - D'you know - I think I might join 'em! ( in a tot, that is - I don't like chasing foxes ).
Users who are viewing this thread
Total: 2 (members: 0, guests: 2)


