Refurb of old hollowcast Mounted Indian Cavalry (2 Viewers)

johnnybach

Major General
Joined
Nov 24, 2010
Messages
13,663
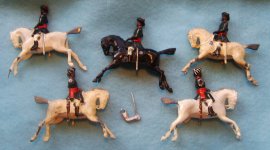
I found these old Hollowcast Indian Cavalry om e-bay - must heve been 18 months ago - and not being quite sure what I wanted to do with them - put them in a drawer. They looked like the old 11th Bengal lancers to me - from what was left of the old paintwork - all had lost the "moveable arm" - and one horse had lost a hoof. Here's a pic., of them as found
PIC_5161.JPG


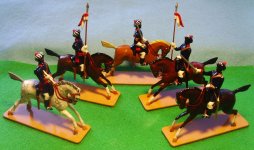
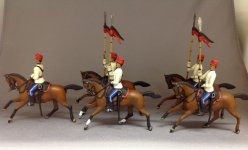
I have now dug them out - and decided to go with the original paintwork - and so a new look of 11th Bengal Lancers was given to my old castings.. By the addition of different arms, I have made an Officer with outstreched sword arm - two Lancers with lances in right hand - and a Havildar (Sergeant) with sword at the low carry. This last figure, Britains never made - but I have used a spare arm from the household cavalry to create him - for a bit of fun - however, he's turned out to be quite a nice looking figure this way.

I'll leave youto decide which hoof was remade around a pin - as darned if I can remember which one it was. Pics below.
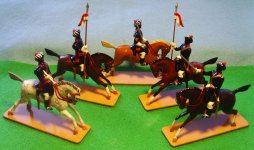
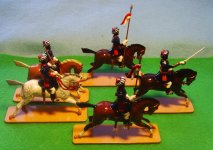
PIC_5200.JPGPIC_5201.JPG
 
I found these old Hollowcast Indian Cavalry om e-bay - must heve been 18 months ago - and not being quite sure what I wanted to do with them - put them in a drawer. They looked like the old 11th Bengal lancers to me - from what was left of the old paintwork - all had lost the "moveable arm" - and one horse had lost a hoof. Here's a pic., of them as found

View attachment 251239


I have now dug them out - and decided to go with the original paintwork - and so a new look of 11th Bengal Lancers was given to my old castings.. By the addition of different arms, I have made an Officer with outstreched sword arm - two Lancers with lances in right hand - and a Havildar (Sergeant) with sword at the low carry. This last figure, Britains never made - but I have used a spare arm from the household cavalry to create him - for a bit of fun - however, he's turned out to be quite a nice looking figure this way.

I'll leave youto decide which hoof was remade around a pin - as darned if I can remember which one it was. Pics below.

View attachment 251240View attachment 251241
What is your dapple grey painting technique- if you don't mind sharing?
 
What is your dapple grey painting technique- if you don't mind sharing?

Sure. I first clean of all old paint. Then I use Humbrol Matt 103 to give the horse an undercoat. When dry, I paint horse Gloss41, Ivory.
I then mix Ivory with Black to get a light grey colour - and apply this to parts that I want dappled. For example I like that look on the rear end of the horse- sometimes down to the knee. I usually feather this in with the previous coat of Ivory. Front flanks and neck of horse can also be done this way. Note that knees are often greyish to black sometimes too.

Then I apply various spots of Ivory or light grey over the grey panels I created - being sure to go over any hard edges of paint. I sometimes re-visit these sites and reapply more spots of paint - until I'm happy. But use sparingly - you don't want lumps of paint.

I lastly varnish the horse - to create a flat surface - as the addition of this extra paint can make them look a bit lumpy - if you overdo it!

Same as any skill, the more you do it - the better you get at it.

Good luck - jb


PIC_5200.JPG
 
Spectacular and if you ever get tired of them I have a perfect spot in my Durbar parade for them!

Thanks for sharing

Dave
 
Spectacular and if you ever get tired of them I have a perfect spot in my Durbar parade for them!

Thanks for sharing

Dave

Okay Dave - I will remember that. From the pics I have seen of your Durbar - these old restored Britains figures, which have a bit more sympathetic painting than the originals - look like they would fit right in. jb
 
I really enjoy your reclamation projects. I have a small collection of hollowcast Britains that are well played with, so I like seeing these pristine repaints. I also like the bases you put the cavalry on, adding stability that can't be overcome by mear floor vibration, as in the case of my older figures. I'm constantly having to reset my figures because they fall over so easily. My collection consists of some of my fathers original figures from the late 20's/early 30's and figures he bought for me in the early 60's. Had a ball playing with them as a kid, but they show it, unfortunately. At any rate, keep on showing us your fabulous work. -- Al
 
Inspiring work, jb -as expected from you! The Havildar is a great example of how a simple arm change can result in a very attractive figure. One small detail about the painting is that the 11th (Probyn's Horse) had red over blue lance pennants.

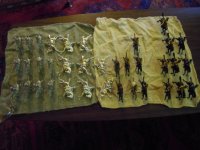
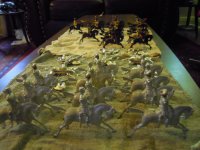
Here are a couple of pictures of my own recasts of the Indian cavalry figure. I couldn't bear cutting up one of the few I have, so I used an American Civil War trooper as the master. New Indian heads are London Bridge castings. I added a sword hilt to the master; that empty scabbard always looked odd, a legacy of the original sword-carrying issue of the figure. Also improved the horse ears.

Indian Cavalry vintage and castings a.jpgIndian Cavalry vintage and castings b.jpg
 
...I'm constantly having to reset my figures because they fall over so easily...

Al, have you tried putting a small piece of poster tack putty under the bases? A ball the size of a BB, flattened out, should help keep them from pitching over. I use it for figures I have in display cases, whose shelves are glass. It keeps them from rutsching around, too, as vibrations pass through the ground to the walls. There are different brands, but they all work the same. I use 3M's putty, myself.

Prost!
Brad
 
Inspiring work, jb -as expected from you! The Havildar is a great example of how a simple arm change can result in a very attractive figure. One small detail about the painting is that the 11th (Probyn's Horse) had red over blue lance pennants.

Here are a couple of pictures of my own recasts of the Indian cavalry figure. I couldn't bear cutting up one of the few I have, so I used an American Civil War trooper as the master. New Indian heads are London Bridge castings. I added a sword hilt to the master; that empty scabbard always looked odd, a legacy of the original sword-carrying issue of the figure. Also improved the horse ears.

View attachment 251712View attachment 251713


Thanks for the pics Mike - very interesting. I don't go near re-casting - as Heat and I don't mix well.

My own research indicated that it was 10th Bengal Lancers Sowars (later, Hodson's Horse) that had the blue over red pennants.

Mine were intended as 1st Bombay Lancers (later 13th Duke of Connaught's own Lancers - [Britains set 66]), which had the more conventional red over white. That's what I intended when I painted them that way. I think maybe I made an error in one of my earlier posts with the title.

As to the empty scabbard - I hate them too - and have used cut off examples to fill them before now. Unfortunately - I have run out of stock parts to do this - and have been unable to obtain any more. I have asked a friend to help out - but am still awaiting any parts. Until then.............they will have to stay empty...............we shall have to see what may turn up. jb
 
I really enjoy your reclamation projects. I have a small collection of hollowcast Britains that are well played with, so I like seeing these pristine repaints. I also like the bases you put the cavalry on, adding stability that can't be overcome by mear floor vibration, as in the case of my older figures. I'm constantly having to reset my figures because they fall over so easily. My collection consists of some of my fathers original figures from the late 20's/early 30's and figures he bought for me in the early 60's. Had a ball playing with them as a kid, but they show it, unfortunately. At any rate, keep on showing us your fabulous work. -- Al

Thanks Al, glad you like them.

Given the prices of modern examples of mounted figures - it is hardly surprising that most always provide the extra security of a sound base (stand) these days.

I like to do this for older figures (such as Britains ), just because of the falling over and damage effects caused by that ( as you describe). Such older figures can often approach or exceed 100 years old - and a few hundred little falls won't take long to mount up.

I used to have a house that was close to a road - and the glass shelves in my cabinet used to vibrate gently when large trucks went by. Since my normal practice of basing up all mounted figures however, I can report no falls or damage whatsoever in my converted figures.

I also think they look better that way - but - whatever floats your boat - I guess. jb
 
Al, have you tried putting a small piece of poster tack putty under the bases? A ball the size of a BB, flattened out, should help keep them from pitching over. I use it for figures I have in display cases, whose shelves are glass. It keeps them from rutsching around, too, as vibrations pass through the ground to the walls. There are different brands, but they all work the same. I use 3M's putty, myself.

Prost!
Brad
Brad, thanks for the tip. I have never tried any sort of adhesives for the hooves. My usual remedy is to crowd the figures in tight together with one end of the line against the side of the case and the other end braced by a wagon or caisson or cannon so that there is no room to go all domino. It works for the large part until vibrations eventually loosen up the formation and then I repack them all again. Might give the putty a go if I can get enough space for a decent, more spread out display. -- Al
 
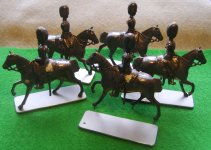
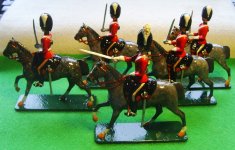
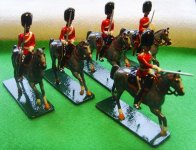
Here's my latest set receiving newly fabricated bases. They are Scots Greys - and are standing on three legs - so a prime candidate for a more stable existance in future with a solid base to each.

I buy my alloy plate in nowadays - but when cut and shaped to fit - each stand will have cost pennies - and a bit of pleasant time. I then pin each standing foot by drilling and glueing - then fix the same way to each stand. I light filing of the cut off pins under each base makes them smooth and flat - and each figure now will withstand quite a knock or shaking before it will ever fall over. Domino effects are also gone forever.

Note the front figure is not fixed to the stand yet - just to illustrate my method better. Note also pins in hooves (cut pieces of paper clips).

jb

PIC_5208.JPG
 
JB: it is really great to see old beat up figures brought back to life, looking better than the originals.its a shame that Britains never put their cavalry on metal bases.

You work is very inspirational.

Jim
 
Another vote for the use of poster putty to keep figures from toppling over. Like Brad, I place a tiny ball of putty under each hoof and it would take an earthquake to topple the figures over. I also,use the putty to seat riding figures to their horses. Also, an even smaller bit of putty can be placed under the arm to keep a sword arm or Lance arm in the upright positions .

Jim
 
JB: it is really great to see old beat up figures brought back to life, looking better than the originals.its a shame that Britains never put their cavalry on metal bases.

You work is very inspirational.

Jim

Thank you Jim - very kind of you to say so. In the early days of TS making - there were quite a few Firms competing on price - so things like stands for horses weren't considered essential. Nowadays it's very different, and the price of a piece of metal for a stand is no barrier. Quality has also improved - but what I hope I've shown, is that it is possible to make a very decent figure up from what are usually very good castings, when what's left of the paint comes off.

I also do what I do because it is fun - and I show them - to encourage those with perhaps more limited funds to have a go themselves. jb
 
FullSizeRender.jpg

I've been repainting some Britains Egyptian Lancers for the Sudan Campaign. My glossy enamels are in storage so I used acrylics with the intention of spraying gloss finish on the figures. However, I kind of like the matte finish so I think that I will keep them in matte.
 
Thank you Jim - very kind of you to say so. In the early days of TS making - there were quite a few Firms competing on price - so things like stands for horses weren't considered essential. Nowadays it's very different, and the price of a piece of metal for a stand is no barrier. Quality has also improved - but what I hope I've shown, is that it is possible to make a very decent figure up from what are usually very good castings, when what's left of the paint comes off.

I also do what I do because it is fun - and I show them - to encourage those with perhaps more limited funds to have a go themselves. jb

How did you split the master horse to get a two piece casting? Both halves look like they fit seamlessly. Asking for a friend that just procured some B-scale cavalry.
 
How did you split the master horse to get a two piece casting? Both halves look like they fit seamlessly. Asking for a friend that just procured some B-scale cavalry.

I just buy these in from the manufacturer in two halves- fettle them if required and fill in any gaps using a epoxy resin filler. I use Milliput - but there are several different fillers on the market.

In my case - this is Andrew, at Replica Metal Soldiers (UK).

I have seen people do it using ann old hollowcast ( or parts from several of them) and cut them apart using small circular model saws - but haven't done that myself

Whatever method used - you arrive at a hollowed centre for the main part of the figure - which sort-of replicates the original old idea of reducing metal and unwanted weight. jb
 

Users who are viewing this thread

Back
Top