Starlux Makover (1 Viewer)

Hi Martyn - I have been using it okay for the last few days in the New format. It suddenly stopped letting me upload yesterday - So......I clicked on the change back to old format - and ................nothing. It wouldn't do that either!!

So...............I'm snookered! jb
 
Hi Martyn - I have been using it okay for the last few days in the New format. It suddenly stopped letting me upload yesterday - So......I clicked on the change back to old format - and ................nothing. It wouldn't do that either!!

So...............I'm snookered! jb

Hi jb

I just clicked on the new page, nothing, but now I can't get back to the old page either, I think it must be a Photobucket malfunction{eek3}

Looks like we are both behind the Eight ball

Cheers

Martyn:)
 
Well - I won't say that I'm glad that you're in the same pickle - but it is rather comforting to know - It's not just me!{sm2}

So.............sorry I can't show any more of my Starlux/Atlas figures at the mo................I'll just get on with some more painting until Photobucket gets its act together again.

Whatever happened to "If it ain't broke - don't fix it"? jb
 
This is a test to see if I can attach a pic directly from my computer - (cross fingers)

PIC_2018.JPG

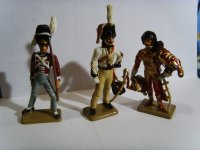
From the left. Fusilier of The Royal Welch Fusiliers; Commandante Mahnes, Aide-de-camp to marshall Murat: Marshall Joachim Murat - resplendant in his red and gold tunic - holding the biggest fur hat I ever saw.

Oh - and Goodbye Photobucket! johnnybach
 
Last edited:
WOW!!!!

Well done to Martyn (GICOP) who talked me through it by PM!

The trick was to LEFT DOUBLE CLICK on the "Manage Attachments" box. I was just clicking on it (just once) as the instructions didn't say DOUBLE LEFT CLICK ( you have to be VERY specific with me - as I am new to computers).

Anyhow - it works - and Im off to do a few more pics now - as I have some more to show you.

Thanks again Martyn - much appreciated. Can someone at Treefrog please update the FAQ's items on putting pics on - as the instructions don't match what's in the boxes now. jb
 
Uh-oh! Back to the drawing board.

Can anyone help advise me what's happening here. When I click/double click on "Manage Attachments" box - a small white hand overlaid with a yellow star shaped box appears. This symbol has an exclamation mark inside it in red (also a thin red edge to the yellow symbol) and the sequence of posting stops there - as no further pages appear.

Any advice appreciated - it did work once - see below! jb
 
As photobucket is still up the spout - and I can no longer get my pics from my computer onto the Forum via the "Manage Attachments" box when trying to reply to the thread - Martyn (GICOP) has very kindly agreed to post my latest picture for me - so I have e-mailed it to him.

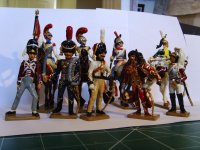
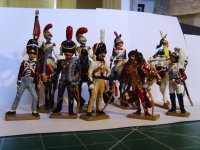
It will show a pic of Five foot figures - and the four mounted figures that you have already seen behind them.

The five foot figures will show repaired and repainted figures. From left to right are: RWF Fusilier - which is a straight repaint of a worn figure.

Next is a Hussar. This figure has a restored plume to his cap - and a new sword blade. Both items were made from a steel pins, (curved for the sword) drilled into and embedded with epoxy glue - then built up with milliput - then painted when dry.

Centre in white jacket is Commandante (Colonel) Manhes - who was aide-de-camp to Marshall Joachim Murat - who he is in conversation with to his right. He has a restored plume to his cap - made the same way as the above - and a complete re-paint.

Murat is wearing his sumptious red and gold outfit - trimmed with brown fur - as is his fur cap which he is holding. His sword was repaired to look like a picture of the original - as part of it was missing. He was also re-painted.

Last figure is a Trumpeter - no repairs required - so just a re-paint.

I have several more well underway - so hope to be able to show how they come along later. Hope I'm continuing to show just how nicely these Starlux figures can be brought back to form a very colourful collection. jb
 
Testing input directly via "Manage Attachments"

PIC_2023.JPG

Wierd - now it works again????

By the way - forgot to mention that the plume on the side of the RWF figure's (first on left) cap was also originally broken off. This was drilled and a wire pin inserted - then built up with milliput. The reason for putting in the pin - is to strengthen the core of the plume. They often get broken off when a figure is knocked over. This is a much stronger fixing than the original cast in soft metal. jb
 
Testing input directly via "Manage Attachments"

View attachment 110385

Wierd - now it works again????

By the way - forgot to mention that the plume on the side of the RWF figure's (first on left) cap was also originally broken off. This was drilled and a wire pin inserted - then built up with milliput. The reason for putting in the pin - is to strengthen the core of the plume. They often get broken off when a figure is knocked over. This is a much stronger fixing than the original cast in soft metal. jb

Perfect {bravo}}

Cheers

Martyn:)
 
Photobucket's back online - might give 'em one last chance! Lesson is - if it breaks down over the weekend - forget it until Monday!!!!!

The good news is - I have discovered another way of getting pics online (sometimes!) using the Treefrog method. Thanks Martyn (GICOP).
 
My next batch of four foot figures have now been repainted - and have joined the growing Army.

Front left is a French dragoon drummer. A nice pose - but rather unstable. When he was a plastic figure, the base was fine - but now he is in metal, the overhanging drum and the figure's lean in that direction - make him very heavy to one side and most unstable and liable to fall onto those drumsticks. I may have to adapt the base, to continue underneath the drum.

Next right (and partially obscured by a sword blade) is a French hussar. I'll try for a better pic of him next time.

The two figures front right - are both Prussians. An Officer flourishing a drawn sword - and a Soldier with his musket. The tip of the musket was repaired before painting, as it was missing - but otherwise that was the only repair with this batch.

PIC_2025.jpg


Lots more at various stages of repair and repaint coming along. I have noticed some distinct differences in sculpt with these Starlux metal figures - doubtless reflecting the random choices made by the Atlas sponsor - when they selected various items from the huge Starlux plastic range of figures. I am trying to make them a more unified bunch - by painting all of the bases in the same colour. jb
 
John, regarding the dragoon drummer, could you try hollowing out the drum, to lighten it?

I like how your Prussians came out, especially.

They're all rather elegant figures, in your finish.

Prost!
Brad
 
John, regarding the dragoon drummer, could you try hollowing out the drum, to lighten it?

I like how your Prussians came out, especially.

They're all rather elegant figures, in your finish.

Prost!
Brad

Hi Brad - yes that's another option - I'll have to give it some more thought. Glad you liked the Prussians!!! - and the Glossy finish.

I thought that those who haven't seen one before - might like a peek at how a damaged figure is begun to be "fixed". Below, see a french Hussar with a sword problem! Note how I have cut a piece of Mk.1 paper clip (heavy duty) - to size by measuring it against the scabbard. Then I use a pin vise (that's the hand-drill thingy) and file etc to make it fit a hole I drilled into his hand (very slowly and carefully - as the metal could be old and fragile).


PIC_2026.jpg


Next pic shows the cut pin inserted into the hole (about 3mm deep) and glued in place. I used a fast acting cycroanalate (super-glue) - as the piece is not load bearing. He now looks like this - note how I put a slight bend in the "sword" to match the scabbard again. Leave to dry thoroughly for a few hours.
PIC_2027.jpg


Next, I used a thin roll of milliput (epoxy resin two-part paste), to roll on to the "core" of the sword and just like using plastecine - I flatten it out to make a blade around the pin core. I will leave it like this, slightly over-size, for a few days to harden naturally. When dry it can be filed and sanded to its final shape. keep an eye out for him later - to see how he eventually turns out when painted.
PIC_2028.jpg


last pic is of one of my horses - which I am re-doing as a grey. He will have another Hussar aboard - so I have raised his saddle to fit the figure - and made up a blanket roll to fit behind the rider - and re-done his old paintwork and shabraque to suit, (the colours are complementary to the rider). Both horse and rider were very shabby before - but are coming along nicely now, I think. I have fixed the rider with a spare sword from my spares box - so he may be finished tomorrow, if the paint dries quickly enough. jb

PIC_2031.jpg
 
I have completed three more figures - the first of which is another mounted figure. He is a French 12th Hussar - and is mounted on a horse that I repainted as a grey. I don't think he was the original mount for this figure - as he was a poor fit initially. I made him a new saddle to fit on top of the original shabraque, (from milliput), and made up a saddle roll to go behind him. I made the saddle to fit his rather long legs securely to - and pinned him in place (after completely repainting him).

Note that I always photograph what is left of the old paintwork - so that I can reproduce the colours that were there originally. The shabraque was completely the wrong colours for the rider originally - so I repainted that in complementary colours to the rider's uniform.

Once both parts (horse/rider) had been completed and paint was dry - he was pinned and glued in place on his new horse - any visible bare patches of milliput were touched in later. This is him below - sorry about the lighting - I'll try for some better shots in daylight - with the rest of the gang! Three shots of Hussar below - followed by a fourth pic - which is of all three figures.

PIC_2032.jpg


Front view:
PIC_2033.jpg


Rear view:
PIC_2036.jpg


This pic shows a French Drummer - and a most unusual subject - a valet - or what we used to call a Batman in the British Army - which was basically a servant to senior Officers. I don't think they have them any more (???). The valet is dressed in a green tunic - and is busily cleaning a jack-boot with a brush. Rather unusual - but he is definitely growing on me. Also very easy to paint - as he is mostly clad in green! At the rear is the Hussar again.
PIC_2038.jpg
 
I finished off just one more Soldier late last night ( nice and peaceful after midnight^&grin. He's the Hussar on the left). I'm now up to seventeen completed - though there is also a riderless white horse awaiting yet another Hussar at the back of the picture. I hope to be collecting a suitable arm/weapon for him next week - when I visit Dorset and have a good rummage through Giles' stock of arms!! I'll show how I get on with him once I have all of the parts to complete the figure.

I hope you can see once again from this picture, just how nicely these second-hand Starlux/Atlas toy soldiers can turn out with just a little TLC and a re-paint. Some are very toy-like, but all have a certain charm - and - as John (Obee) found when starting this thread - very satisfying to restore.

By the way John - if you are looking in - I have a spare from this lot to send you - as I already have three of the figure (you know the one). Just PM me your adress - and I'll put him in the post - with my compliments. :D Johnnybach

PIC_2040.jpg
 
I've found out from looking through a listing of Starlux figures (given to me by Obee) - that the Valet figure below - is actually a known personality figure. He is in fact Louis Constant Wairy - the Head Valet to Napoleon Bonepart. He is therefore, probably polishing one of the boots of his master.

He also famously published his memoirs of his time with the Emperor, under the title "Memoirs of Constant, first valet de Chambre of the Emperor", in which he gave a fascinating insight into the private lives of Napoleon, his family and court. How interesting. jb

PIC_2038.jpg
 
I had a very good "find" online today - which will help me enormously with re-painting my Starlux Atlas figures. previously, I only had some rather small excerpts from some of the booklets which were originally produced to accompany the figures and/or stimulate sales. The pictures I had were also slightly out of focus, so details were often hard to see - but today - I found a site with larger illustrations - which I could see far more clearly. The front cover of the first booklet is show below.

From this I can now see that my figure of Marshall Murat SHOULD have had a white feather plume issuing from the top of his fur cap. (top right below). My repainted figure was without one - and I mistakenly assumed that was how the cap should have been. My figure has now had the white feather plume added - ( with a bit of careful micro-surgery), and is currently drying out prior to a coat of varnish. Should be ready to show you the finished article later tonight - or first thing tomorrow! :D

I now have copies of ALL pages in all 5 booklets - so have an illustration of every figure produced in this range- which is enormously helpful for the rest of my figures.{sm4} jb

STARLUX-01-01.jpg
 
Below are my latest recruits with a few repairs and a fresh coat of paint - and Marshall Joachim Murat (central figure in red and gold) - re-done with his feather plume restored to his plush cap, which he is holding in his right gloved hand. A simple matter of drilling into the old stump - inserting a steel pin and building up some milliput around it and then texturing to make the feather plume. This needed some care - as I didn't want to spoil his new paint-job. I wrapped the figure in tissue paper whilst working on him.

Thanks to my new illustrations - I can see all uniform details far better - and also read the captions (in French, of course) - and identify them all better as well - as a bonus.

There are three newly re-painted recruits also in the front rank. First left is a kneeling/firing East Prussian Chasseur - who was an intact figure - so just required stripping and repainting. Next right - in his gorgeous red trousers is a Trumpeter of the 2nd Regiment of the Guard of Honour. His sword sabretache equipment had been badly replaced with glue at some time in his past - so needed removing, remodelling and replacing correctly - then a complete repaint, as someone had done a very messy retuching of him before he came to me. Lastly, next to the right of Murat - is an Officer of the Carabinier in his "Tenue de Societe" - which loosely translates to what we would call "Walking out Dress". Also intact - just a re-paint required - a simple, yet elegant figure.

I am now up to twenty completed figures - so still 17 to go. Some of these are going to be tricky to complete - as I will be needing some tools and materials I don't have with me at the moment - so will probably complete some of these later on - when I get back to my proper work-bench. I should be able to fix up around another dozen or so though.


PIC_2042.jpg
 

Users who are viewing this thread

Back
Top