mikemiller1955
Lieutenant General
- Joined
- Aug 3, 2008
- Messages
- 17,841
I just finished a Whaleboat Diorama with Magic Water.
I'm getting ready to post some photos now, after a quick coffee break.
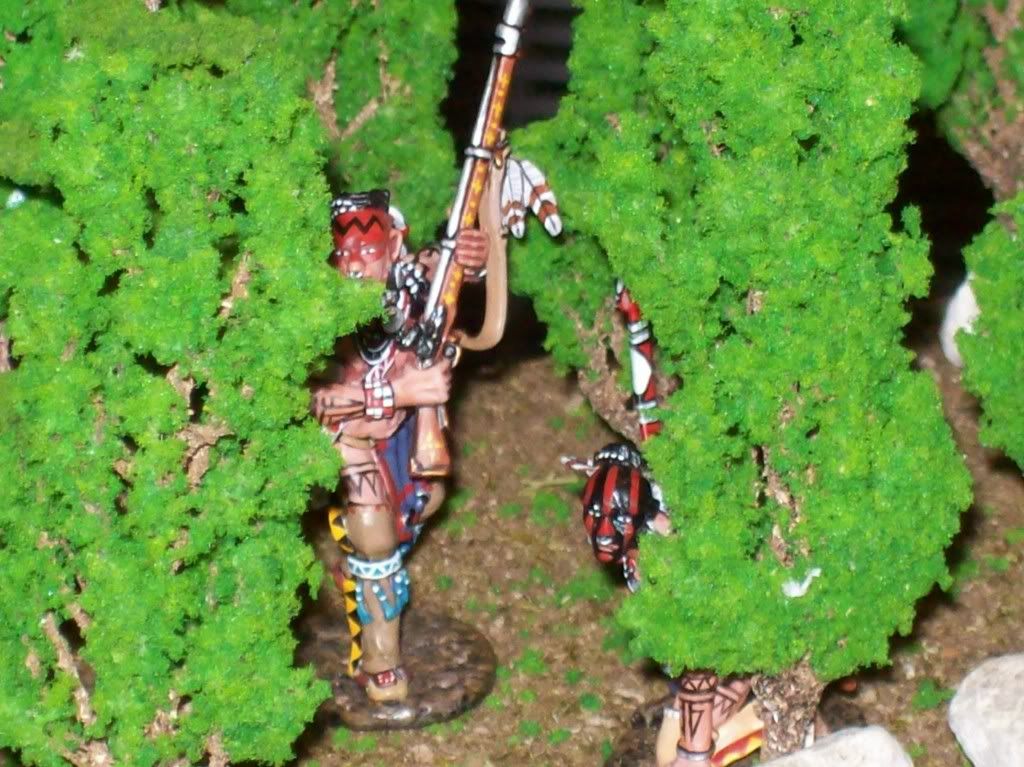
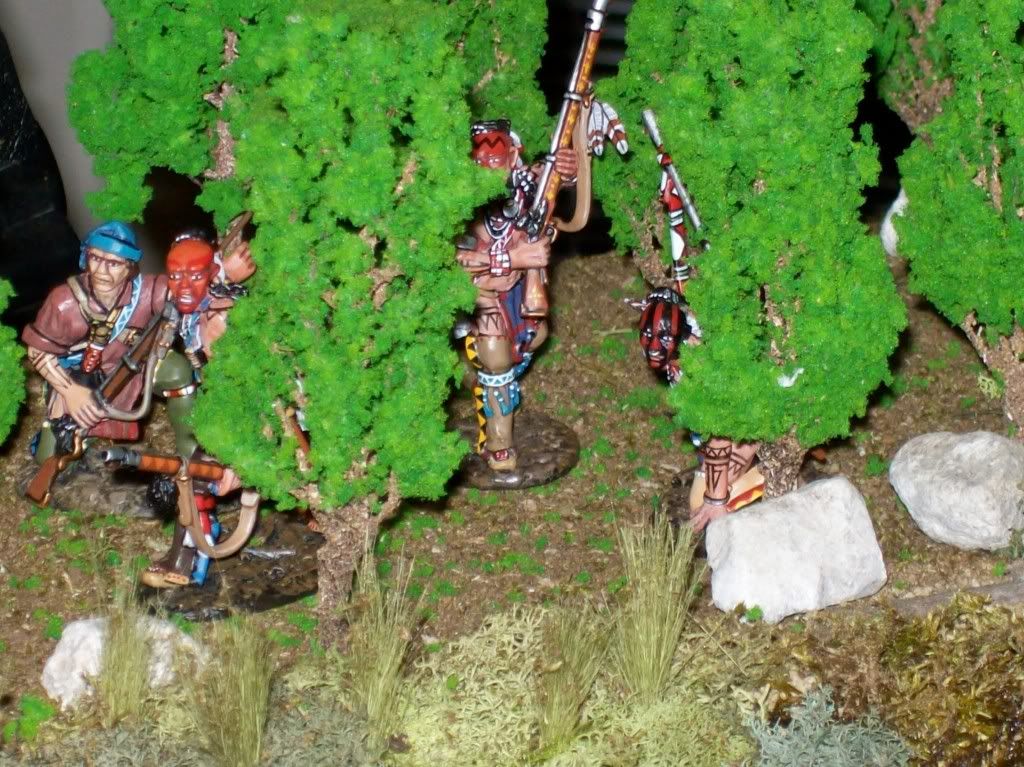
It has John Jenkin's Design WHRR01 and WHRR02 as the main pieces, with some Ranger's sets and some French and Indians lurking in the trees.
The Ranger's hut, log cabin and all figures are John Jenkins.
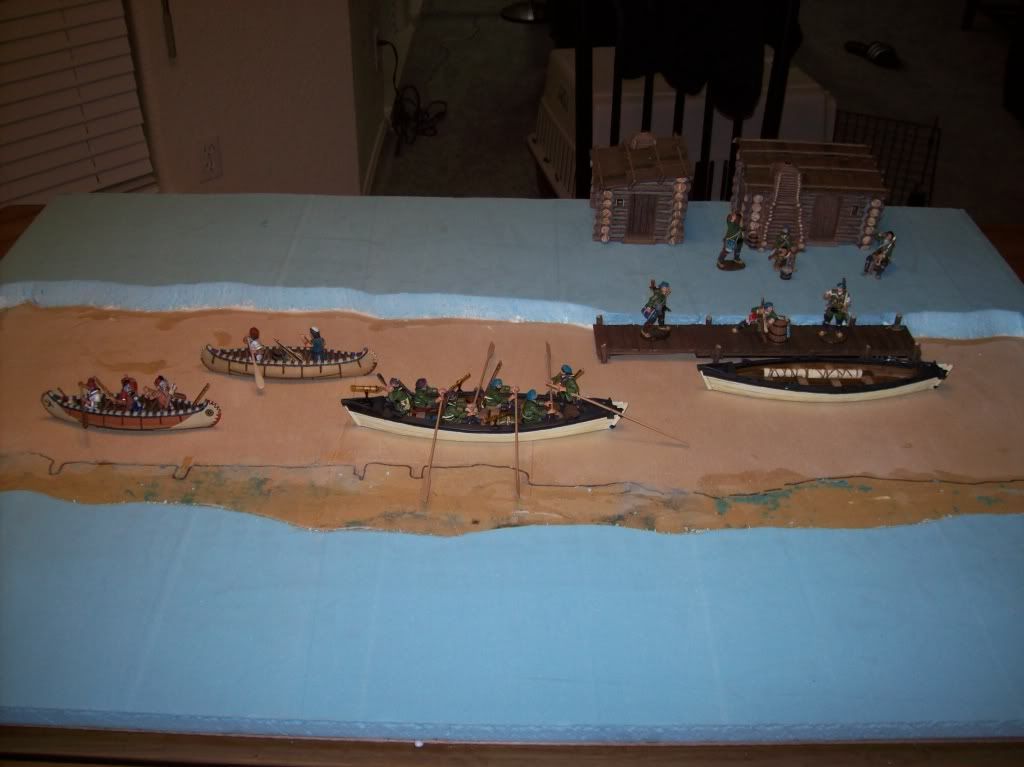
I also have the JJ's canoe sets, CAN01, CAN02 and CAN03, that I will do a small diorama of using this river.
Anyway, the trees are HO railroad scale bought on Ebay from "everydaygoodz", they range from 7 1/2"s tall to 4 1/2"s tall. They have the "realistic" bark and shapeable limbs. They are pretty nice for the money.
I bought 109 trees for about $108.00. They are all on the table, count them if you must, lol.
The terrain cover, is Woodland's Scenic, which I ran through the coffee bean grinder and adhered with spray adhesive.
The landscaping reeds are Woodland's Scenic.
The moss is Dollar Store.
The rocks are found in a driveway, not mine, lol, I stole them.
Broken trees in the water are from real trees (small branches) in my back yard, (my scraps, not stolen).
The water is Magic Water, by Unreal Details, owned by Dave Williams, which by the way was a pleasure to use.
www.unrealdetails.com
Magic Water, comes in two seperate bottles. Two parts to one part, mix and pour. Very simple and a very nice product.
Dave was so helpful on tips and advice. A pleasure to work with. He even sent me photos of his work, which is way better than mine, that I posted on here last week.
The base is 1/4" birch and the foam board is polystyrene ("blue board").
The table finished off at 4 foot long and 3 foot wide.
The river runs the length of the table and is about 14"s wide, at it's widest point.
I did not "dam" the river at the ends when I poured. Instead, I left a small strip of foam board to hold the Magic Water instead.
After I finished, I painted on some Magic Water over the edges and shrubbed it.
Overall and from a distance, it really looks like a lake, but I can't imagine I would ever take a photo from so far away that it would show the damed edges.
Since all the shots I take will be closeups, this seemed like the easiest and smartest way for me.
Here is a photo of the plywood and foam board.
Cut to fit the plywood, with the river cavity cut out and sloped, then white glued down to the plywood. It set up overnight for the glue to dry.

Next it was painted with a cheap white latex to protect the foam board, any color paint will do.
Dave Williams gave me a great tip on sealing the cavity of the river to avoid leaking (Durham's Water Putty) while the Magic Water hardens, which by the way, took about 3 days to harden.
The reason it took so long to harden was because I had spots in the river that were deeper than others, and had to mix 3 batches of Magic Water to get the depth I wanted. My mistake, which wont happen again. I just didn't realize how big this river was.
Now each layer hardened quickly (16-24 hours) no problem, but I just didn't pour enough the first time and had to layer it two extra times.
Durham's Water Putty.

Durham's Water Putty is a powder, you mix with water to the consistency of cake frosting mix.
Applied to the river cavity and banks with a plastic spatula, it dries in 15 minutes and seals the river to hold the Magic water from seeping out any pin holes.
I'm sorry, I can't show this process, the photo was accidently erased, sorry.
If you can imagine a big flat frosted cake, that's what it looked like.
I then put on a couple of coats of the same white latex.

One nice thing about the Durham's Water Putty was that in the bottom of the river bed, you can get a rippled effect on the bottom with the spatula, like a current has left small sand bars.
I painted the river forest green, and then ran a strip of flat black down the middle to simulate depth.
I wish I had made a wider strip of black, to make the entire river look deeper, but, my mistake, which won't happen again
Another nice thing about the Durham's, is that it dries hard, real hard.
Anyway, those are the products and that's how I did it.
I'll post some photos now.
I'm getting ready to post some photos now, after a quick coffee break.
It has John Jenkin's Design WHRR01 and WHRR02 as the main pieces, with some Ranger's sets and some French and Indians lurking in the trees.
The Ranger's hut, log cabin and all figures are John Jenkins.
I also have the JJ's canoe sets, CAN01, CAN02 and CAN03, that I will do a small diorama of using this river.
Anyway, the trees are HO railroad scale bought on Ebay from "everydaygoodz", they range from 7 1/2"s tall to 4 1/2"s tall. They have the "realistic" bark and shapeable limbs. They are pretty nice for the money.
I bought 109 trees for about $108.00. They are all on the table, count them if you must, lol.
The terrain cover, is Woodland's Scenic, which I ran through the coffee bean grinder and adhered with spray adhesive.
The landscaping reeds are Woodland's Scenic.
The moss is Dollar Store.
The rocks are found in a driveway, not mine, lol, I stole them.
Broken trees in the water are from real trees (small branches) in my back yard, (my scraps, not stolen)
.The water is Magic Water, by Unreal Details, owned by Dave Williams, which by the way was a pleasure to use.
www.unrealdetails.com
Magic Water, comes in two seperate bottles. Two parts to one part, mix and pour. Very simple and a very nice product.
Dave was so helpful on tips and advice. A pleasure to work with. He even sent me photos of his work, which is way better than mine, that I posted on here last week.
The base is 1/4" birch and the foam board is polystyrene ("blue board").
The table finished off at 4 foot long and 3 foot wide.
The river runs the length of the table and is about 14"s wide, at it's widest point.
I did not "dam" the river at the ends when I poured. Instead, I left a small strip of foam board to hold the Magic Water instead.
After I finished, I painted on some Magic Water over the edges and shrubbed it.
Overall and from a distance, it really looks like a lake, but I can't imagine I would ever take a photo from so far away that it would show the damed edges.
Since all the shots I take will be closeups, this seemed like the easiest and smartest way for me.
Here is a photo of the plywood and foam board.
Cut to fit the plywood, with the river cavity cut out and sloped, then white glued down to the plywood. It set up overnight for the glue to dry.
Next it was painted with a cheap white latex to protect the foam board, any color paint will do.
Dave Williams gave me a great tip on sealing the cavity of the river to avoid leaking (Durham's Water Putty) while the Magic Water hardens, which by the way, took about 3 days to harden.
The reason it took so long to harden was because I had spots in the river that were deeper than others, and had to mix 3 batches of Magic Water to get the depth I wanted. My mistake, which wont happen again. I just didn't realize how big this river was.
Now each layer hardened quickly (16-24 hours) no problem, but I just didn't pour enough the first time and had to layer it two extra times.
Durham's Water Putty.
Durham's Water Putty is a powder, you mix with water to the consistency of cake frosting mix.
Applied to the river cavity and banks with a plastic spatula, it dries in 15 minutes and seals the river to hold the Magic water from seeping out any pin holes.
I'm sorry, I can't show this process, the photo was accidently erased, sorry.
If you can imagine a big flat frosted cake, that's what it looked like.
I then put on a couple of coats of the same white latex.
One nice thing about the Durham's Water Putty was that in the bottom of the river bed, you can get a rippled effect on the bottom with the spatula, like a current has left small sand bars.
I painted the river forest green, and then ran a strip of flat black down the middle to simulate depth.
I wish I had made a wider strip of black, to make the entire river look deeper, but, my mistake, which won't happen again
Another nice thing about the Durham's, is that it dries hard, real hard.
Anyway, those are the products and that's how I did it.
I'll post some photos now.