1st Canadian Mounted Rifles, Pipe & Drum Band. (2 Viewers)

Thanks, John! I've heard of Araldite, but I'm not sure it's available here in the State. I'll second that, about epoxy versus CA glue. For assembly like this, I prefer epoxy, too. I use CA for attaching smaller bits, generally speaking.

Prost!
Brad
 
Well - I must admit that I have been using superglue (cycroanalate) for years - and nothing has broken up yet - but did hear this was better - so use it now for major bits and bobs. Like you though, I still use superglue for attaching small pieces ( like swords) - but usually pin as well if there isn't a deep enough socket (as Prince August parts are very shallow - I pin these as well as glue). Nice castings these - so I'm being just that bit more careful with them.^&grin
 
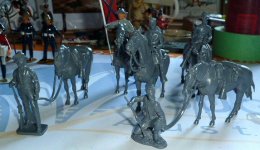
Progress with my castings proceeds - interupted by my need to get my tomato, peppers, chillies, courgettes etc., seeds planted in the greenhouse. Below see "the herd" as it grows. This is how my Band will eventually be formed up - in ranks of four - 12 pipers in front, then four side-drummers, one Bass Drummer and three tenor drummers bringing up the rear.

yeoman05.jpg


This pic shows the Bass Drum Horse with Drum just temporarily mounted to show how it fits on.

yeoman06.jpg


Lastly, this pic shows the last two unopened packages received from Yeomanary Miniatures - and an opened one displaying the bits of the kit that are being fitted together. My objective in assembling the twenty Band horses first, is to reduce the number of parts to more manageable proportions. Note how the combination of four differing horse body poses - and nine differing head positions, means that there are potentially 36 different looking horse options available. If you look closely, and also add in the different tails - the options get even bigger. As I will have 20 figures in my band (around the number that actually took part in a parade which took place in Europe for this Regiment in the closing phases of WW1), it means that no two horses will look the same. Note the horse parts of head, tail and reins in one package - and the mounted figure and instrument (side-drum in this case) in the other package. Again, very professionally and neatly done by Yeomanary Miniatures. Makes the preparatory assembly job so much easier.

yeoman07.jpg


Note that when we get to the assembly of riders/instruments, I will also show how these are assembled too. jb
 
Here's a pic of the two horse halves shown in my last pic, now joined together with the epoxy adhesive referred to earlier (Just for Brad - this one). Mix the two together and apply to the joint face sparingly. I wait for about an hour for a strong bond - and then fit head and tail. Any oozes are removed with a mark one finger and smoothed into the joint (perhaps that's why I'm always glueing myself to something!). Craft knife and files are useful fo removing any nibs on the joint face before gluing. Note the two pegs on the two legs of the horse, which fit into the pre-drilled holes in the base. I also glue and pin a third leg, as a modification - for absolute stability. Probably unecessary - but I'm a belt and braces man! (Not that I WEAR them - but you know what I mean!). Note also that the holes on the bases are sometimes a bit small for the pegs to fit into. It is the work of seconds to enlarge them using an inserted craft knife and a twirling motion - when they can be made to fit beautifully, for cementing the horse in place. I usually fit the head and tail bfore doing this.
yeoman08.jpg
 
Here's a pic of the extra pin that I have glued into the rear leg by about 3mm. Note the corresponding hole drilled to accept it in the base. Note also my new hi-tech equipment on display here - just got this new corless re-chargeable mini-drill, with variable speed function. Wot a beauty! For those with more traditional tastes in drills - see the selection of pin-vices below - which can also do the job far more slowly and carefully with more delicate jobs. I usually use hand tools for drilling up into hooves/ and thin legs - and the electric tools for holes in bases where delicacy is not required. All horses have had this extra pin added by me.

The electrics are not essential - but just "nice toys for boys". This one's a beauty!
yeoman09.jpg
 
And here is the horse fitted onto its base. One tip here for all of those casting bits and bobs and filings. I keep them in a small box - and embed any figures waiting for glue to dry in it. It gently holds figures in whatever position you like for a short time - until the glue is dry. I will cut and file off any projecting pieces when the glue is dry (twenty mins or so) and finally file perfectly flat. Note the extra small steel pin - which (to repeat) is my modification, and was cut from a heavy-duty paperclip. No expense spared here folks!;)
yeoman10.jpg
 
Hi Johnny, these are wonderfull castings and I hope you don't mind me asking, but are you going to undercoat these? I always use a grey primer as it brings out the detail etc.

Looking forward to more photos as you progress.

Jeff
 
Hi Jeff - as usual - no primer required by me. Tried it - and I don't like using it. Several light coats of Humbrol paint will be used.

I try for different mixes of shades of brown and black for Cavalry horses usually. Looking at the three newspaper photos I have either dug up - or had sent to me by friends when I was researching the project - looks like mostly the usual darker shades of horse predominate. These could easily be model quality - but I like the Glossy Toy Soldier look - so that's how I want to paint them.

Here's the pic that started it all - with a bit of info attached too. I will give one of the pipers the four inverted cuff chevrons of a pipe-major - as he is specifically mentioned. Good shot of the drums too - with no badges or emblems to be seen. Below that some more pics;
CMR_pipe_band.jpg


This one's a bit more grainy - but can make them out formed up in fours - and just a peep of a drum in the rear rank
1stCanadianmountedriflespipeband1915.jpg


This one was just labled 4 mounted sergeants (not musicians these) - and show the three stripes on the first rider and a good view of the uniform - plus the darkish horses again.
4mountedsergeants.jpg


And lastly, the only coloured illustrative picture that I have ever managed to find, which shows two pipers (Clan Shaw Tartan) and a drummer, (again, no badges on the drum). A most useful find, as these are how I intend to paint them - circa 1917.

CanadianMountedRifleRegiment.gif


As a P.S. If anyone has any other relevant pics than these - I would be most grateful for a peek. Many thanks - johnnybach
 
Phew! - That was a bit of a marathon preparatory session - but at least gives you an idea of how they will look when I have finished - as this is how they will be displayed. Twelve Piper horses in front, four side drums, Bass drum, and three tenor drums at the rear. I think I'll open a tinlet or two - and dip a brush, see you later............jb
yeoman11.jpg
 
Hi JB

Now thats a band, looking forward to seeing your progress on these excellent quality castings.


Regards John
 
Cheers John, they are beauties - these. And any helpful advice or tips you may have for me, along the way, will be much appreciated too.

Hope the hip is improving - and the odd grape hasn't too many pips!:D jb
 
Phew! - That was a bit of a marathon preparatory session - but at least gives you an idea of how they will look when I have finished

JB,

Sure is a labour of love assembling that many horse in one go.

Last week I assembled and undercoated 5 of Brian's horses to go with some I/R and Shenadoah Confederates I'm making, and seemed to take all day, what with the gluing, puttying and filing down, but like yours, they look very nice.

Maybe I'll show off my work soon,

John

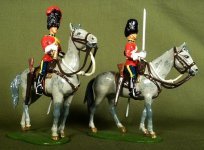
By the way I have one of these troopers in my collection, given to me by a Candian collector some years back, a mst unusual piece being a bagpiper on a horse!
 
Hi John - I cheated a bit - and only fully prepped the first two - the rest of "the herd" were just assembled and given a modest clean up. I figured on painting them one - maybe two at a time, so will fully clean 'em up in pairs - as I go.

Interesting that you have a trooper with pipes - do you have a pic. you could post?

Below, you can see my "first pass" at Dobbin-01. I used Matt 186 brown and matte black as my basic colours, and overpainted the leather bits with Gloss10. I decided to use Sea Grey as the horse-blanket colour. Seemed to work out okay - so far. I intend to apply varnish to make him Glossy when I'm happy with him. Sure is a powerful looking horse.

yeoman13.jpg


yeoman12.jpg
 
I thought that you might like to see the piper figure that will sit on the horse.
yeoman14.jpg


The top figure shows him as he comes - with seperate parts and head. The bottom two figures have had the neck drilled and heads glued in place. Note that as these figures will sit forever more astride their horses, I have done "the sunshine" modification, by drilling and inserting a pin where the sun don't shine. This will slot onto another hole drilled in the appropriate place through the saddle and into the horse (he won't feel a thing!) - he's hollow - as you have seen! A dab of epoxy resin glue - and he's there forever. As usual, I like to paint him before final assembly - which is why I would be interested to see John's (Obees) version. The thin strips are reins, by the way.
 
I like to check that everything is fitting together nicely before going further - so here's a pre-view of how he is going to look. Note his left arm with pipes-bag, chanters separate and left arm - to be fitted yet. All looks fine - and he's seated well with his "sunshine-pin" in place ^&grin(not glued yet, of course). Reins are gently bent little by little into a pleasing shape and fall, before glueing. Small parts - so I use superglue for these. I may very well paint the rest of the reins before fitting with future mounts - depends how easily these are painted.
yeoman15.jpg
 
The reins WERE tricky to paint when fitted - so I will mould to shape - and then paint before fitting the next ones. I am still finding my way around these castings - and working out the best way for me to tackle them - so I think I will revert to an old tactic of mine - and paint the first model all the way through - to learn the way to paint them. I can still do a bit of prep work and fitting of rider to steed etc., with some others - as paint is drying - as you can see with the other two figures. Khaki of the rider will need two coats - and probably better to paint the bandolier first, I've found. No major problems though - just learning my way around them.

yeoman16.jpg
 
Hi johnnybach
I'm back following u all the way with these canadians
Now ur into my Maple Leaf territory
That will look awsome when finished
even considering ordering some
Keep posting i keep following
Maple Leaf
 
Aha! - I wondered where you've been? Awesome! see you later then, chum^&grin - jb
 
The reins WERE tricky to paint when fitted - so I will mould to shape - and then paint before fitting the next ones.

JB,

I have to differ with you when assembling and painting Yeomany horses.

I bend the reins as part of assembly, then fit and glue into position before undercoating prior to painting.
I think this gives a much more secure ashedsion, being metal on metal, and then the undercoat and top coat means even more hold for the rein.

You can see that here with these 5 horses, some with dismounted Confederate troopers. (Shenandoah & Imrie Risley)

cav1.JPG

Then its easy to paint around like these Scots Dragoons,

yeo_sc_grey.JPG

All Yeomany Miniatures horses & dragoons,

John
 
Yes - I can see where you are coming from with that approach John. When the reins aren't cast in - I just like the reins to slightly stand off the horse a bit - which I think emphasises the three dimensional effect of them a little. It's then quite difficult to get in to paint the side of the reins close to the horse - so giving them a quick lick behind first, does the job. I always scrape back to metal to metal, before glueing in place - then touch in afterwards.

But agreed - adhesion to the horse is much improved with your method. I'm about here with the first horse.

yeoman17.jpg
 

Users who are viewing this thread

Back
Top