A New Adventure (1 Viewer)

Hi Pat

Sorry to hear about your mishap:mad:, but reading this thread and how you restored the piece, I'm sure you will be able to revive it back to its former glory.:D:D

Regards John
 
Gentle Friends,

Yes, I stumbled. As if in slow motion, I watched my precious set roll off my arm and began its descent to the stair steps. It was with great agony that I witnessed the set bounce off one step and rapidly plummet down three more steps. As the set plunged, I watched the team of horses slowly detach from the coach. I saw figures fly in every direction. With what seemed a deafening roar, I heard metal hitting the steps. The coach itself managed to hit each of the four steps before finally coming to rest. Needless to say, I was temporarily paralyzed with shock! In all of my adult collecting life, I had never dropped a figure! As my paralysis began to wear off, I heard someone shouting curses known only to the most elite intellectuals and to the most drunken sailors! This most unfortunate state of affairs unexpectedly resulted in the……….

Seventh Step:

Sadly, I gathered up the debris that had been my Landau Coach set and I carried it, piece by piece, to my work station. While doing so, I experienced anger at my clumsiness, embarrassment, regret, depression, sadness, and a host of other uncomfortable emotions. My prized set and my beautiful work simply lay in a twisted heap on my table. And, there it was to remain for the next three weeks as I tried to productively process my trauma.

During this three week period, I could not bring myself to look at the set. I considered throwing the set away. I considered boxing it and placing it in storage never to be seen again. I certainly seriously considered never telling anyone of my stupidity and clumsiness. However, I found myself being daily haunted by something my friend, Peter, had shared with me. He had said if a figure is restorable and you make a mistake, you can correct your mistake. It was this haunting statement that lead to my……

Eighth step:

After the three week period had passed, I decided I must examine the twice damaged set to determine if it could be repaired. The pegs on the tongue of the coach were, once again, bent. The wheels on the left side of the coach were bent at angles almost approximating ninety degrees. The rear seat on which the coachmen rest was detached from the coach. Horses’ legs were severely bent. And, there were multiple large paint chips on the coach and the horses.

On a more positive note, somehow the coach lanterns were still attached to the coach. The human figures were intact. The wheels including some spokes were bent but not broken. I studied the damage every evening for several days. I wondered, “Could I possibly repair this set?” Could I make it look as good as it did before the fall?” I was very uncertain regarding the answers to these questions. Not knowing if I had the skills, I concluded I must attempt the repairs.

TO BE CONTINUED.

Warmest personal regards,

Pat

Pat,

Sorry that it was that bad :( I know it must be gutting but most things can be repaired and I assume that you have been successful in this? :cool:

Jeff
 
Gentle Friends,

As my resolve began to strengthen, I decided I must take my…….

Ninth Step:

When I originally decided to attempt the first group of repairs to the set, I chose the coach as my first target. I determined that I should repeat the process and begin work on the coach again. This time, the challenges were much greater and I concluded that if I could not repair the coach, there was little need to spend time repairing the horses. Also, since I was totally uncertain regarding any success I might achieve with this project, I did not take any documenting photographs of my work. I now regret that decision.

At this point, I did not know what the outcome of my work might be. Therefore, I attacked the project with much greater aggression than during my previous restoration attempts. Without taking time to heat the metal, I grabbed my pliers and bent the pegs on the tongue into place. Much to my surprise, the pegs straightened beautifully. Even though the pegs were now straight, I remained intimidated by the state of the coach wheels. I wondered how I could ever restore the wheels to their former appearance. While I could bend the wheels with my fingers, I could not bend the spokes back into place. Further, the jaws of my pair of needle nosed pliers were too large to insert the jaws between the spokes. While I was considering the issue of the spokes, I slowly bent the wheels back into a semblance of their original state. I bent the wheels ever so slowly, applying pressure and counter pressure all the while. And, amazingly, the wheels began to look almost appropriately round. Even with this degree of success with my project, the issue of the bent spokes remained.

As I considered the challenge of the spokes, I recalled seeing a tool at Michaels that I thought might be of service to me. Since there is not a Michaels in my town, all work on the coach ceased until I could make a trip to Michaels in a nearby city. Once having arrived at Michaels, I purchased a small set of Chain Nose Pliers. The jaws of these pliers are semi-circular and they meet along a flat edge. Because of the flattened edges of the jaws, there are no ridges, no grooves or teeth, to leave indentations on the surface of the metal on which you are working. These pliers are typically used for beadwork and the creation of jewelry.

Utilizing these pliers, I was able to slowly return the spokes to a much straighter position. The pliers were also extremely useful in bending the wheels into their final shape. From my perspective, these pliers are worth much more to the toy soldier collector than their purchase price.

After several evenings of doing nothing but straightening the wheels and spokes, I declared the coach to be as repaired as I could make it. I was now ready for the next step, which I will outline in my next post.

TO BE CONTINUED:

Warmest personal regards,

Pat
 
Pat......I sense a different tone in your repair mode!:eek: When I read that

you "Attacked the project with much greater aggression" I was shocked!:eek:

I can only assume you are still upset with the fall!

Take a few moments to step back, you opened a new door with your repair,

and you will find that you can do an even better job next time with your new

found skills. Just remain patient, and don't let a tiny slip up set you back.

Many times I have found myself pushing a project instead of enjoying it.:D

You repaired it once, and you can do it again just as nice!:)
 
Hi, Pat, I'm relieved to find that you're thread isn't a real-time SBS, and that there was no serious bodily injury ;)

I have a tip on straightening things like spoked wheels bent out of shape-if you have a flat surface, you can place the wheel on that surface and press the rim and spokes back into their plane. A piece of metal plate works, or an old baking sheet laid over a board, or, if you have a vise, the flat anvil face on the back of most bench vises works, too.

Following along with eager anticipation...
 
Gentle Friends,

Tenth Step:

Having decided I had repaired the coach to the best of my ability, the time had come to paint it once again. I followed the steps I previously described. I cleaned the coach. I dobbed paint thinner on the existing paint surrounding the areas to be painted. And, once again, I applied one color per day. First I painted the red surfaces, then the yellow ones. Finally, I painted the black surfaces followed by the gold surfaces. I allowed the paint to dry between the applications of each color. The process took a total of four evenings.

Eleventh Step:

The coach was set aside as I began to examine the team of horses more closely. The horses had large paint chips and numerous scratches from cascading down the stairs. While I felt capable of repainting the damaged surfaces, I was uncertain about repairing the bent legs. I knew my chain nose pliers would not be of much help to me and I knew that many times legs can be straightened by gently bending them back into place. I determined that manually bending the legs was my only option.

Taking each horse one at a time, I gently applied pressure and counter pressure to the legs. My goals were twofold. I wanted to make certain all the appropriate hooves of each horse could be planted firmly on a flat surface and I wanted the legs of each horse to be positioned in such a manner as it would appear all four horses resulted from the same mold. While this process seemed fairly straightforward and simple, it required much patience and considerable time to meet my established goals. Finally, my tasks with the horses were completed and I was ready for the next step.

TO BE CONTINUED:

Warmest personal regards,

Pat
 
Gentle Friends,

As you can see, I am approaching the conclusion of my adventure. If you have accompanied me this far, I assume you are beginning to become interested in seeing the final outcome of my labors. Therefore, from this point forward, I will be brief so you can soon judge the effectiveness of my efforts.

Twelfth Step:

This step consisted of the repainting of the horses. Once again, I followed the procedures outline earlier in this thread. I cleaned the horses. I dobbed paint thinner on the appropriate areas. I painted each color, one at a time, and allowed the paint to dry overnight between applications.

Thirteenth Step:

Having made the corrections I could with whatever marginal and underdeveloped skill or talent I might possess, the time to reassemble the entire set had arrived. Methodically, I brought all the pieces together and attached the team of horses to the coach. Finally, I placed the figures in their appropriate places. I stood back and examined my work. The questions remaining to be answered were:

1.) Was the repaired set good enough for me to include it in one of my Durbar displays?

2.) Given the fact that I had stumbled and caused an increasing amount of damage to the set, would I want to share my experience and my work with members of this forum?

3.) Was my work of sufficient quality to expose it on the forum?

4.) Could I risk receiving the criticisms and the reactions of my fellow Treefroggers as they examined my work?

I did not know the answers to the above questions. I only knew I must move forward and achieve closure with this adventure. In my next post, I will share with you a couple pictures of my Landau Coach set as it presently appears.

TO BE CONTINUED:

Warmest personal regards,

Pat
 
Pat,

I applaud your perseverance and look forward to photos of your endeavours. It is most satisfying to repair damaged figures to their former glory. :)

Jeff
 
Pat, I am very confident that it will find a prominent place within your Durbar display and it will be most appreciated since it has quite a story to go with it when showing your collection to any visitor.
Konrad
 
Gentle Friends,

At long last, I have arrived at my final step in this adventure. Thank you for accompanying me to this stage.

Fourteenth Step:

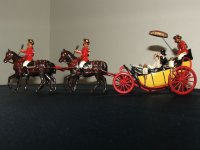
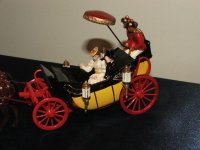
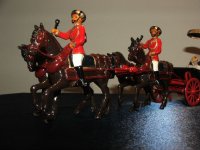
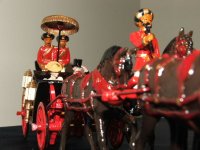
The fourteenth step simply consists of my drawing a deep breath, taking a few photographs of my Landau Coach set, and posting them on this thread for examination. After all, I could not conclude my adventure with the 13th step!

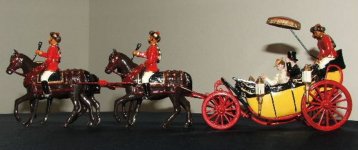
Below, you should find four photographs of the set as it now appears. I invite your comments, reactions, criticisms, suggestions, and feedback.

This project has provided me with a huge learning experience and, before I conclude this discussion, I will compose a list of lessons learned from my adventure. When I provide my list, I hope the more experienced collectors and artists on this forum will add to it for the benefit of all.

Also, several of you have asked to see photographs of my Landau set being presented in my curio cabinet. Soon, I will attempt to take some photographs of it in order to allow you to view the manner in which it is presently displayed in the cabinet.

For now, enjoy my photos and let me know what you think of my work. I look forward to hearing/reading your comments.

Warmest personal regards,

Pat
 

Attachments

  • Landau0106.jpg
    Landau0106.jpg
    47.4 KB · Views: 77
  • Landau0109.jpg
    Landau0109.jpg
    53.2 KB · Views: 76
  • Landau0112.jpg
    Landau0112.jpg
    59 KB · Views: 79
  • Landau0117.jpg
    Landau0117.jpg
    59.4 KB · Views: 74
Well Pat it looks like you did an excellent job!

You now have a great set for your collection!

And you have developed the confidence and skill to repair any issues

that may come up in the future!

All in all I think you have done an excellent job!
 
Pat,

I've been following your 'advebture' for some time, and the final outcome is a 'joy to behold' !! Well Done.

You have show us all what can be done with some patinence, time and a 'lick of paint' and I'd love to see others doing this sort of posts just to see what else is around,

regards,

John
 
Excellent job Pat. I'm glad you didn't let the 'mishap' get the better of you, and that you turned out a fantastic set. Well done. I hope this leads to more adventures (of the fixing and painting variety, not the 'bouncing' variety :eek:)

Simon
 
Gentle Friends,

At long last, I have arrived at my final step in this adventure. Thank you for accompanying me to this stage.

Fourteenth Step:

The fourteenth step simply consists of my drawing a deep breath, taking a few photographs of my Landau Coach set, and posting them on this thread for examination. After all, I could not conclude my adventure with the 13th step!

Below, you should find four photographs of the set as it now appears. I invite your comments, reactions, criticisms, suggestions, and feedback.

This project has provided me with a huge learning experience and, before I conclude this discussion, I will compose a list of lessons learned from my adventure. When I provide my list, I hope the more experienced collectors and artists on this forum will add to it for the benefit of all.

Also, several of you have asked to see photographs of my Landau set being presented in my curio cabinet. Soon, I will attempt to take some photographs of it in order to allow you to view the manner in which it is presently displayed in the cabinet.

For now, enjoy my photos and let me know what you think of my work. I look forward to hearing/reading your comments.
Warmest personal regards,

Pat

Pat,

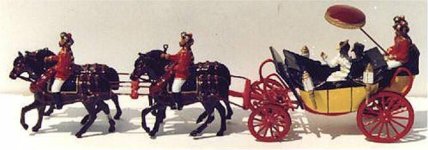
After all you hard work I really didn't want to be the one to point this out :eek: But the carriage seems to be rather bowed and I wondered if the frame could be gently persuaded into a straighter attitude? This is a photo of the set I found on the web……..Sorry :eek:

Jeff
 

Attachments

  • Landau0106.jpg
    Landau0106.jpg
    38.6 KB · Views: 68
  • d043.jpg
    d043.jpg
    38.1 KB · Views: 72
What an excellent thread Pat and thank you for sharing your journey with us. I can certainly sympatize with dropping a precious figure. I do also have to agree with Jeff on the carriage being bowed (although in the initial photos perhap it met it's accdent it was also bowed).

Looking forward to your future projects Pat and I hope this has given you the courage to try more :)
 
Pat,

After all you hard work I really didn't want to be the one to point this out :eek: But the carriage seems to be rather bowed and I wondered if the frame could be gently persuaded into a straighter attitude? This is a photo of the set I found on the web……..Sorry :eek:

Jeff

I thought it was a Victorian dragster, myself.
 
Well, Pat,
although all of your work was very well executed and the paint is like as new, unfortunately the front suspension of the Landau has collapsed.
This will need another try of a lot of careful bending attempts to bring it up again which also might require a bit more touch up where the paint didn't stand the necessary bending.
Or you leave it like that but then you will have to come up with some rushing servants and a shocked look on the Lady's face :)
Konrad
 

Users who are viewing this thread

Back
Top