Castle Facade Wall... (1 Viewer)

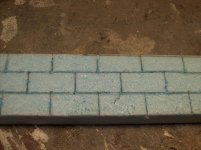
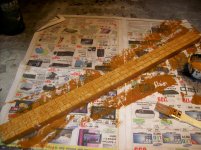
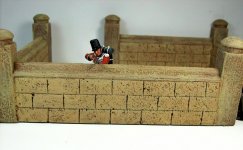
even though the foam is close celled....and very dense...it seem to have a "grain" when the razor scribes it...you won't see the grain...but you will feel the razor glide smoothly in one direction...and less smoothly in the other direction...sometimes it will drag and gouge the foam...

don't sweat it if this happens...

to avoid it as much as possible...just go slowly...

here I have taken a regular wooden golf tee...inserted the point of it into the razor cut...and dragged it slowly while gently depressing it to widen the gap a tad...

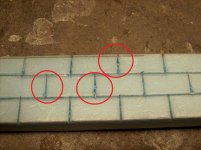
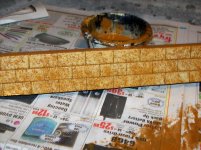
I circled some "fouled spots"..

but don't sweat these...they are gonna happen...it will give your bricks some "character"...they will be virtually invisible when you finish...
 

Attachments

  • 100_7706.jpg
    100_7706.jpg
    106.6 KB · Views: 118
after you have opened all your gaps up a little...you can paint it if you want...

here I have taken a wire brush and firmly depressed it into the foam...I'm doing this to add some charater to the brick...

I did it on the castel wall gate section in this thread...

Mike Modwalls...rest in peace...told me he crumbles up a golf ball size piece of aluminum foil and firmly presses the jagged points of it into the foam...to give it some character...the wire brush seems to work well...

I tried to take a close oup of the wire brush indentions...the will really show up as nice detail when you paint it...
 

Attachments

  • 100_7707.jpg
    100_7707.jpg
    104.3 KB · Views: 115
  • 100_7708.jpg
    100_7708.jpg
    109.5 KB · Views: 114
  • 100_7709.jpg
    100_7709.jpg
    98.8 KB · Views: 113
chose you color for your grout and indentions....I'm going to paint my bricks in a kind of light yellow...something you might find in a desert...but choose any color you want...this is only for the grout and detail...I will do a dry brush over this...I just want the grout to be defined with a darker color...

thin your paint out pretty good...you want it to flow/seep into all the cracks...I need a second coat on mine then I will dry brush it...
 

Attachments

  • 100_7710.jpg
    100_7710.jpg
    139.8 KB · Views: 125
  • 100_7711.jpg
    100_7711.jpg
    140.8 KB · Views: 123
this is not rocket science...and I'm a novice at it at best...the farthest thing from an expert on this you will find...

I know there are some fantastic modelers on here that do bricks very well...

Mike Modwall had an elaborate set of jigs that would allow him to scribe foam absolutely machine quality perfect...he did foam as well as anyone I have ever seen...

Ken Osen's work is ridiculous good...as you all know...

I'm just learning how to do this...so if any of the good brick carvers want to comment or correct me on anything...please don't hesitate...

this is a slow process...but the end result looks very realistic...

this little 2 foot piece...which I did scribe both sides of...however it took me an hour...

I am going to put another wash on it to fill all the cracks/seams...then I will dry brush it and show it again....

but this should get you started...

I'm gonna watch the Master's now...
 
Afternoon Mike ... this is good stuff!!! {sm4}

Yup ... I still have snow where it was plowed and shoveled into a pile, but it is dwindling fast. So 1/2" foam is not something that we see a lot of at HD or Lowes. Mostly you use it to add to your .. 3" + 3" + 3" + 1/2" sheets to fill the wall cavity depth in these old 1798 homes. {sm2}

I did manage to find 2 sheets that were dented and chipped for almost nothing so I am going to give it a shot .... thanks for this great tutorial!

Hey, I know :rolleyes2: ... how about you make a DVD of Mike Miller's top 20 diorama construction Hints ... Tips ... and Techniques! :eek: :eek:
They will sell like hot cakes!! --- Larry

Larry...

wow...hahaha...you move fast...

I'm delighted that this thread is helping your creative juices to flow...you sound very enthusiastic about modeling some of your own diorama props...

I think you will be amazed at what you can create with a little time and effort...please post your work or any progress you care to share...

what size thickness did you get on your foam?
 
Thanks Mike ... I purchased 2 sheets of "Pink" 1/2 foam -- each is about 36" X 96" but I only paid a total of $9.00 since they were chipped and the edges were .... bruised or dented .... but perfect to play with and experiment as well as to use as a dio base or something.

I am just finishing up composing a tutorial myself on how to build JJD Wigwams for only a few dollars/each using "stuff" in your back yard.
Well mine anyway. :rolleyes:

I will get those posted and then see what I can come up with on this foam wall technique. --- Larry
 
I'm not particularly proud of what I built here....it was just a rush job between Game of Thrones and the Masters...

but to close the thread...I will show the final result of the little 2" x 24" piece of foam that I carved some bricks into and created a small fence section...I may make a couple of straight wall pieces to finish off the project...

my only point in explaining this...is that it is simple...cheap...and pretty realistic looking...

anybody can do it...

the applications are endless as you can scribe as big a section of foam as you want...creating fortress walls...houses...small wall sections like I did...or anything your imagination can create...

the only thing I did from the last pictures was to put a light drybrush of a desert yellow paint...
 

Attachments

  • 100_7712.jpg
    100_7712.jpg
    79.6 KB · Views: 89
  • 100_7713.jpg
    100_7713.jpg
    72.5 KB · Views: 89
  • 100_7714.jpg
    100_7714.jpg
    82 KB · Views: 89
  • 100_7715.jpg
    100_7715.jpg
    111.6 KB · Views: 88
I like that effect, very impressive. I found an old Castle in the Attic the other day, only cardboard, made for my young son as a toy.

I appreciate the "stones" are not quite exact, (actually they are just pieces of sandpaper) but if they were, it would make a decent cheap backdrop.
 
Really neat work, Michael........as usual. I look forward to seeing where this will lead you. George
 

Users who are viewing this thread

Back
Top