Peter Jackson & Weta Workshop NZ WW1 Museum Exhibitions (1 Viewer)

More Gallipoli.
 

Attachments

  • DSC04832.jpg
    DSC04832.jpg
    287 KB · Views: 76
  • DSC04833.jpg
    DSC04833.jpg
    280.9 KB · Views: 75
  • DSC04834.jpg
    DSC04834.jpg
    362.7 KB · Views: 76
  • DSC04835.jpg
    DSC04835.jpg
    323 KB · Views: 76
  • DSC04836.jpg
    DSC04836.jpg
    257.8 KB · Views: 74
and more...
 

Attachments

  • DSC04837.jpg
    DSC04837.jpg
    269.6 KB · Views: 79
  • DSC04838.jpg
    DSC04838.jpg
    515.5 KB · Views: 83
  • DSC04839.jpg
    DSC04839.jpg
    313.2 KB · Views: 81
  • DSC04840.jpg
    DSC04840.jpg
    394.6 KB · Views: 80
  • DSC04841.jpg
    DSC04841.jpg
    378.7 KB · Views: 78
More........
 

Attachments

  • DSC04843.jpg
    DSC04843.jpg
    267.6 KB · Views: 86
  • DSC04844.jpg
    DSC04844.jpg
    284.2 KB · Views: 87
  • DSC04845.jpg
    DSC04845.jpg
    380.6 KB · Views: 85
  • DSC04846.jpg
    DSC04846.jpg
    406.9 KB · Views: 84
  • DSC04847.jpg
    DSC04847.jpg
    290.8 KB · Views: 82
More.........
 

Attachments

  • DSC04848.jpg
    DSC04848.jpg
    318.6 KB · Views: 79
  • DSC04850.jpg
    DSC04850.jpg
    379.6 KB · Views: 78
  • DSC04851.jpg
    DSC04851.jpg
    371.2 KB · Views: 81
  • DSC04852.jpg
    DSC04852.jpg
    303.6 KB · Views: 77
  • DSC04853.jpg
    DSC04853.jpg
    375.2 KB · Views: 77
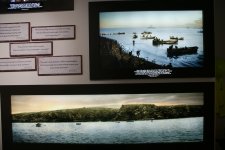
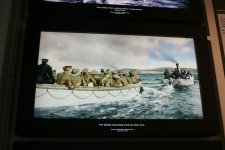
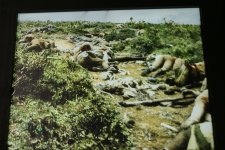
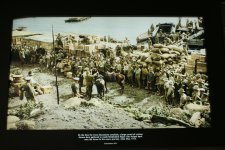
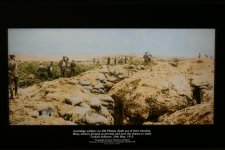
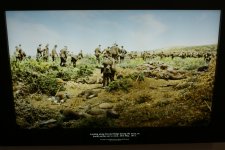
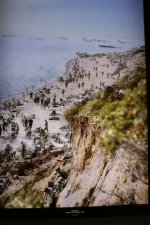
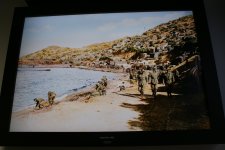
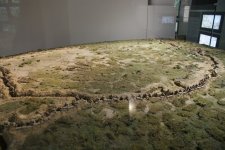
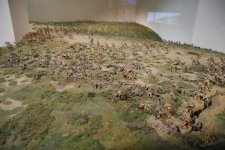
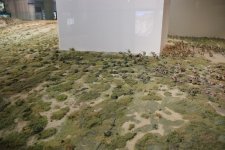
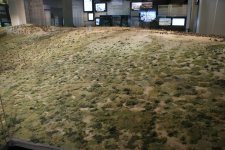
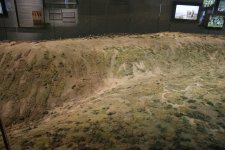
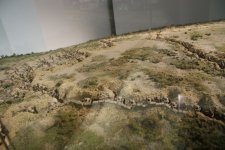
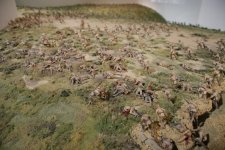
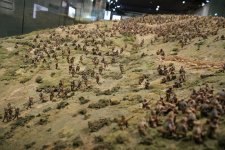
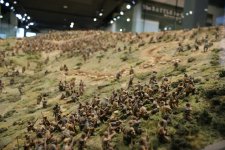
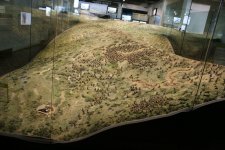
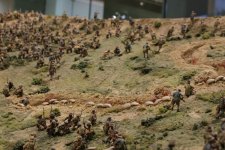
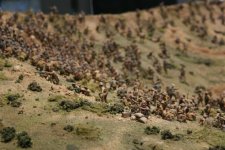
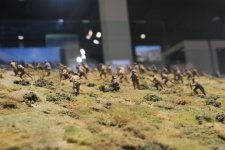
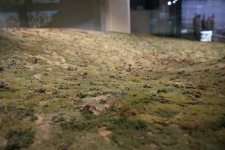
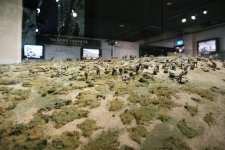
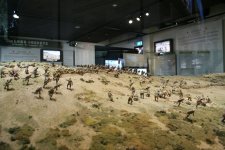
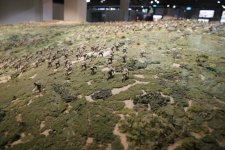
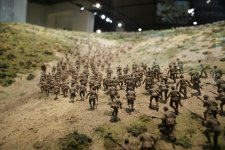
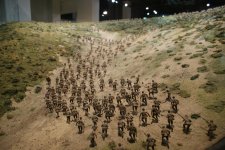
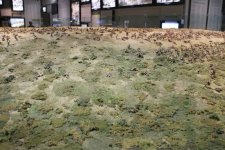
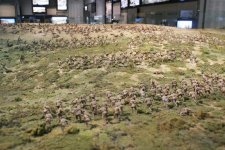
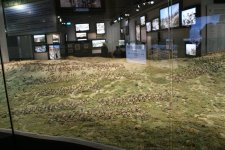
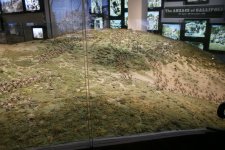
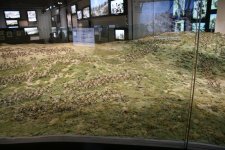
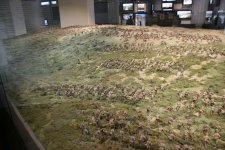
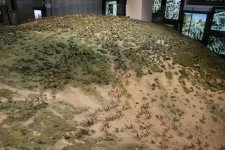
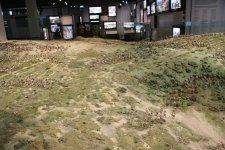
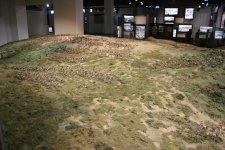
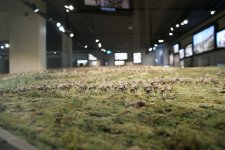
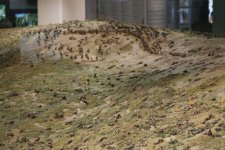
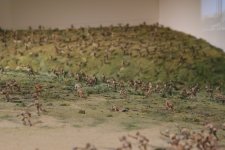
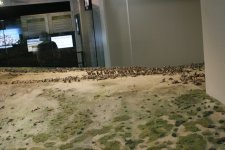
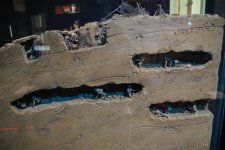
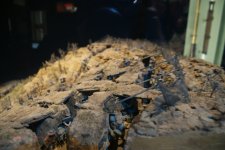
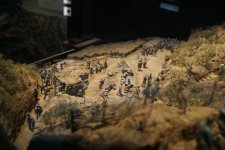
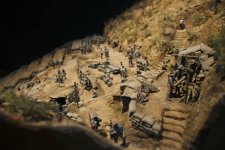
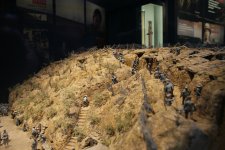
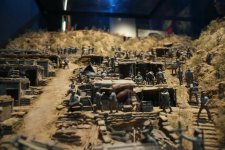
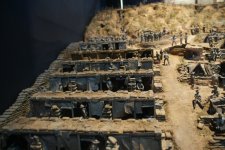
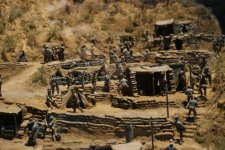
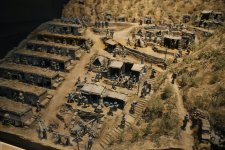
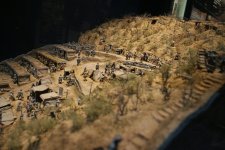
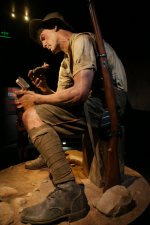
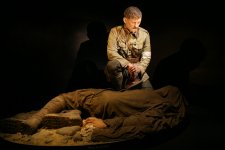
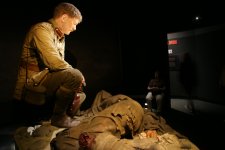
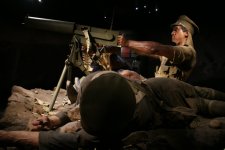
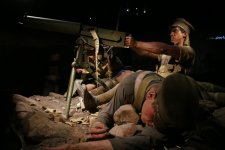
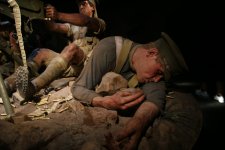
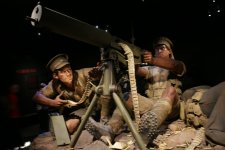
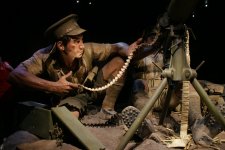
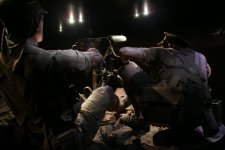
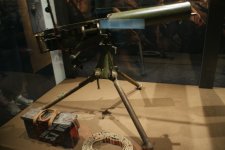
As Toddy has already provided, the next lot of pic's are of the massive dio display that was commissioned by Peter Jackson.

Tom
 

Attachments

  • DSC04857.jpg
    DSC04857.jpg
    342.6 KB · Views: 74
  • DSC04858.jpg
    DSC04858.jpg
    372 KB · Views: 76
  • DSC04859.jpg
    DSC04859.jpg
    357.7 KB · Views: 76
  • DSC04860.jpg
    DSC04860.jpg
    408.1 KB · Views: 76
  • DSC04861.jpg
    DSC04861.jpg
    373 KB · Views: 75
More..........
 

Attachments

  • DSC04862.jpg
    DSC04862.jpg
    341.1 KB · Views: 74
  • DSC04863.jpg
    DSC04863.jpg
    381.6 KB · Views: 78
  • DSC04864.jpg
    DSC04864.jpg
    340.7 KB · Views: 79
  • DSC04865.jpg
    DSC04865.jpg
    417.4 KB · Views: 76
  • DSC04866.jpg
    DSC04866.jpg
    351.1 KB · Views: 74
More............
 

Attachments

  • DSC04867.jpg
    DSC04867.jpg
    407.8 KB · Views: 87
  • DSC04868.jpg
    DSC04868.jpg
    403.6 KB · Views: 88
  • DSC04869.jpg
    DSC04869.jpg
    410.4 KB · Views: 87
  • DSC04870.jpg
    DSC04870.jpg
    380 KB · Views: 86
  • DSC04871.jpg
    DSC04871.jpg
    394.9 KB · Views: 85
Even more..
 

Attachments

  • DSC04872.jpg
    DSC04872.jpg
    315.5 KB · Views: 80
  • DSC04875.jpg
    DSC04875.jpg
    290.1 KB · Views: 81
  • DSC04876.jpg
    DSC04876.jpg
    290 KB · Views: 81
  • DSC04877.jpg
    DSC04877.jpg
    361.7 KB · Views: 81
  • DSC04879.jpg
    DSC04879.jpg
    339.6 KB · Views: 83
Even more...
 

Attachments

  • DSC04880.jpg
    DSC04880.jpg
    352.5 KB · Views: 75
  • DSC04881.jpg
    DSC04881.jpg
    329.9 KB · Views: 73
  • DSC04882.jpg
    DSC04882.jpg
    375.1 KB · Views: 77
  • DSC04884.jpg
    DSC04884.jpg
    340.3 KB · Views: 76
  • DSC04885.jpg
    DSC04885.jpg
    389.8 KB · Views: 73
Even more....
 

Attachments

  • DSC04886.jpg
    DSC04886.jpg
    451.1 KB · Views: 82
  • DSC04887.jpg
    DSC04887.jpg
    427 KB · Views: 83
  • DSC04888.jpg
    DSC04888.jpg
    411.1 KB · Views: 83
  • DSC04889.jpg
    DSC04889.jpg
    412.6 KB · Views: 81
  • DSC04890.jpg
    DSC04890.jpg
    440.1 KB · Views: 82
Even more.....
 

Attachments

  • DSC04891.jpg
    DSC04891.jpg
    423.4 KB · Views: 106
  • DSC04892.jpg
    DSC04892.jpg
    459.4 KB · Views: 125
  • DSC04893.jpg
    DSC04893.jpg
    448.6 KB · Views: 109
  • DSC04894.jpg
    DSC04894.jpg
    412.8 KB · Views: 114
  • DSC04896.jpg
    DSC04896.jpg
    275.5 KB · Views: 110
Last lot of this massive display and also the last lot of pic's from the Great War Exhibit.
 

Attachments

  • DSC04897.jpg
    DSC04897.jpg
    434.4 KB · Views: 108
  • DSC04898.jpg
    DSC04898.jpg
    360 KB · Views: 105
  • DSC04899.jpg
    DSC04899.jpg
    425.5 KB · Views: 104
  • DSC04901.jpg
    DSC04901.jpg
    270.5 KB · Views: 101
  • DSC04902.jpg
    DSC04902.jpg
    336.1 KB · Views: 106
Last edited:
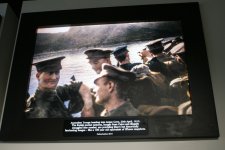
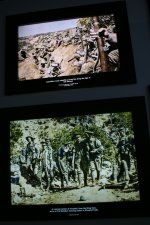
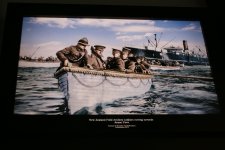
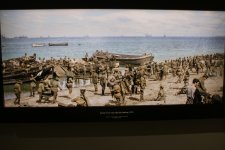
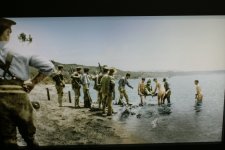
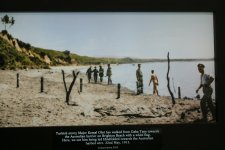
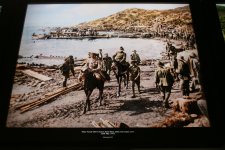
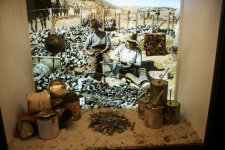
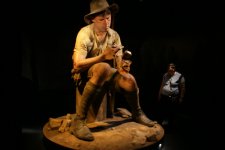
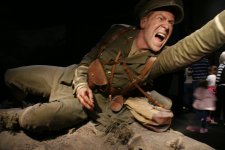
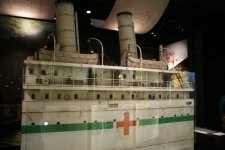
The next lot of pic's are from the WETA exhibition which is in another building not far walking distance from the Great War Exhibit.

Tom
 

Attachments

  • DSC04911.jpg
    DSC04911.jpg
    353.8 KB · Views: 116
  • DSC04912.jpg
    DSC04912.jpg
    269.5 KB · Views: 106
  • DSC04913.jpg
    DSC04913.jpg
    284.5 KB · Views: 105
  • DSC04914.jpg
    DSC04914.jpg
    300.8 KB · Views: 115
  • DSC04915.jpg
    DSC04915.jpg
    353.6 KB · Views: 112
More of this dio...
 

Attachments

  • DSC04916.jpg
    DSC04916.jpg
    323.9 KB · Views: 109
  • DSC04917.jpg
    DSC04917.jpg
    327.9 KB · Views: 110
  • DSC04918.jpg
    DSC04918.jpg
    356.1 KB · Views: 102
  • DSC04921.jpg
    DSC04921.jpg
    387.1 KB · Views: 103
  • DSC04922.jpg
    DSC04922.jpg
    434.1 KB · Views: 105
More and that's not me in the pic by the way!
 

Attachments

  • DSC04923.jpg
    DSC04923.jpg
    403.2 KB · Views: 108
  • DSC04924.jpg
    DSC04924.jpg
    338.3 KB · Views: 110
  • DSC04925.jpg
    DSC04925.jpg
    335.8 KB · Views: 102
  • DSC04926.jpg
    DSC04926.jpg
    168.5 KB · Views: 102
  • DSC04927.jpg
    DSC04927.jpg
    245.8 KB · Views: 107
As shown in Toddy's pic's, these very large and realistic figures are brilliant to see in person.
 

Attachments

  • DSC04907.jpg
    DSC04907.jpg
    250.1 KB · Views: 122
  • DSC04908.jpg
    DSC04908.jpg
    202.6 KB · Views: 108
  • DSC04909.jpg
    DSC04909.jpg
    203.6 KB · Views: 107
  • DSC04910.jpg
    DSC04910.jpg
    206 KB · Views: 115
  • DSC04931.jpg
    DSC04931.jpg
    227.1 KB · Views: 108
Some more of the MG crew.
 

Attachments

  • DSC04932.jpg
    DSC04932.jpg
    238.7 KB · Views: 110
  • DSC04933.jpg
    DSC04933.jpg
    251.4 KB · Views: 110
  • DSC04934.jpg
    DSC04934.jpg
    240.6 KB · Views: 111
  • DSC04935.jpg
    DSC04935.jpg
    273.4 KB · Views: 108
  • DSC04938.jpg
    DSC04938.jpg
    218.9 KB · Views: 119
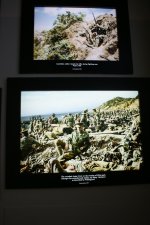
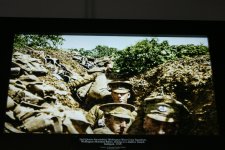
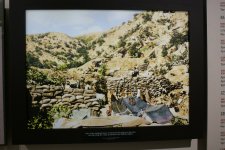
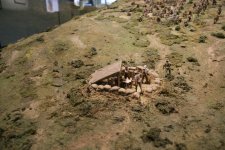
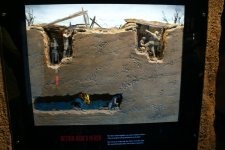
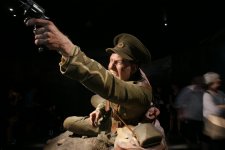
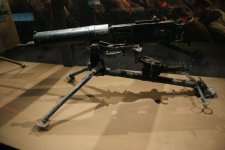
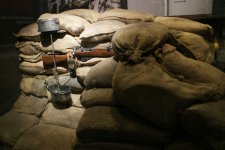
Last lot of pic's and the last one show's a lee-enfield rifle jimmied up to cover the retreating Anzac's from Gallipoli cove. The apparatus worked by water condensation collecting in a tin and then slowly filling up to enable the occasional shot to be fired at the Turks. This was very effective and the Turks had no idea that a withdrawal was taking place right under there noses.

Tom
 

Attachments

  • DSC04940.jpg
    DSC04940.jpg
    277.6 KB · Views: 107
  • DSC04941.jpg
    DSC04941.jpg
    248.1 KB · Views: 111
  • DSC04945.jpg
    DSC04945.jpg
    258.8 KB · Views: 114
  • DSC04944.jpg
    DSC04944.jpg
    288.9 KB · Views: 111
WOW.......thanks Tom, very impressive, I must see these when I visit NZ.
 
Outstanding effort Tom posting all of that lot!!:salute::

I'm still looking through them mate, you got some very good snaps of the big Gallipoli Dio and love the pic's of the colourised WW1 photographs.

Did you manage to spot the figure of Peter Jackson in the big Gallipoli dio??

He's kneeing down taking photographs near a command post wearing his famous shoulder braces? {sm4}
 

Users who are viewing this thread

Back
Top