mikemiller1955
Lieutenant General
- Joined
- Aug 3, 2008
- Messages
- 18,071

Brilliant Mike, kinda figured out already much of what you say here and good to hear that the mix needs not to be too precise as I tend to go by feel and look much like your good self. I have five moulds in the mail and if all goes well I intend to get a few more so lets see the results and onwards we go. Many thanks mate.Wayne...
honestly...I never once used a measuring ratio and I have cast 1,000's of bricks...^&grin...for real...
almost any consistency will work...but I try to make something like a thin pancake batter...
the thicker it is...the quicker it dries...
the thicker it is...the harder it dries too...
but if it's too thick...you may see air bubbles that couldn't escape...they really look bad too...
Bruce Hirst has a method to eliminate trapped bubbles with an elaborate vibrating table set up...you really don't need that...
before I pour the mold...I spritz it with a water solution and then shake off the excess water...the water solution has a squirt of dishawasher rinse agent in it...you know...the blue stuff...over here it's called "rinse aid"...and it's supposed to help the batter seep into all the cracks...after I pour the mold...I tap if pretty hard with my putty knife which allows the bubbles to rise to the surface and escape...
I use a 12oz plastic cup...a large squirt bottle of water and a wooden tongue depressor to mix it...
some molds are deeper than others and require more batter...but you will get the hang of it after a couple of batches...the tile roof mold is very thin and uses very little Hydrostone...
I try not to waste any...so if I pour a mold and have 1-2 ounces left over...I get another mold and pour some select spots in that mold of bricks that I use frequently...
I do mine over a piece of newspaper...it makes a mess...after 2-3 casts...you will change the newspaper...
it usually takes 15-20 minutes to cure...but a fan on it speeds that up...
I pour my mold...let it sit for 2-3 minutes...the water comes to the top as the Hydrostone settles...then I scrape off the excess...
then wait 15 minutes to check it to make sure it's hard before taking out...
Wayne...I have seen the quality of your work...you're an accomplished modeler...this will be easy for you...you will be in expert after 6 casts...you will be amazed how your pile of bricks grows so quickly...
one last tip...
get some quality plastic baggies...make sure to label them with the molds #...with a marker...
ex: #70...#250...etc...
put all finished pieces of each finished cast into to that bag so you can find them easily when you want them...once they get mixed up...it's difficult to sort them out...
you will thank me for that tip later...^&grin
dying to see your work...they are addictive...good luck...
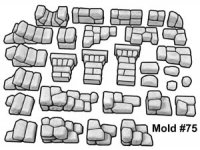
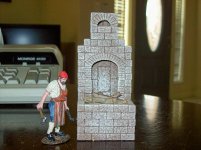
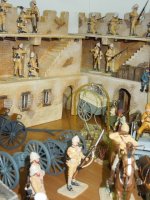
my favorite mold right now is #75...the "ruined fieldstone mold"...it works so good for exposed damaged brick...look at some of the "collapsed roof buildings I did...that is a nice mold...
Ah Robin, the trick (if there is one) is not in the 'building of' but in the 'painting of' and Mike has aced that, it is something that I hope to still master ........:wink2:That church ruin looks interesting, especially when nicely painted. Who would have thought at your age Mike you would be a brick labourer. Just shows you even in latter years you can still be active, no wonder our Government is pushing everyone to work until 70.^&grin, Robin,
Brilliant Mike, kinda figured out already much of what you say here and good to hear that the mix needs not to be too precise as I tend to go by feel and look much like your good self. I have five moulds in the mail and if all goes well I intend to get a few more so lets see the results and onwards we go. Many thanks mate.
Cheers,
Wayne.
The first five are these........................Wayne...
just curious...what molds did you decide on?
do you have anything specific in mind that you want to create...
I got a feeling you're gonna be very good at this...^&grin...


The first five are these........................
Wayne.
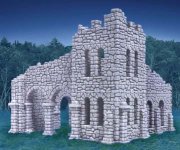
Then if all goes well I'll get this also.......Will be mainly Great War things for our dios.
Wayne.
Thanks Mike,
I am all geared up ready to start casting, I have the Hydrostone, rinse aid and all the bibs and bobs I need and I am now just waiting for the moulds to arrive. I will start a thread I think and post progress of my successes and I am sure failures as well.
Again many thanks for all your advice.
Cheers.
Wayne.
We want some blasted ruins for our next Great War dios at the museum and these moulds will do the trick judging from what you have done. I look forward to having some fun with them, now to get some time off work :wink2:{sm2}
Wayne.
Add me to the "Lets Be Like Mike" List. Trying my luck with 240 and 250 !!!

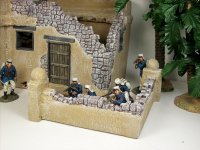
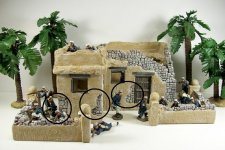
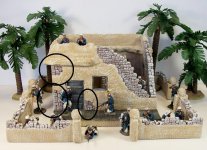
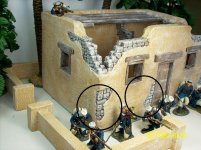
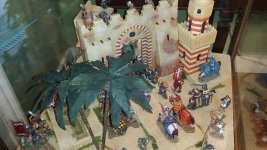
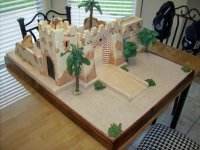
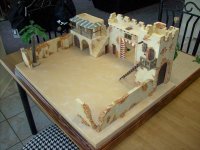
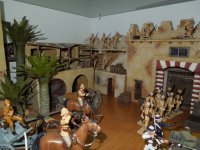
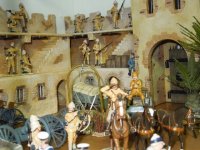
this is what I made for him...
I'm still going to add a small well in the courtyard...
and will wait to flock the groundwork when he picks it up...
I just added some of my palm trees and shrubs for these pics...
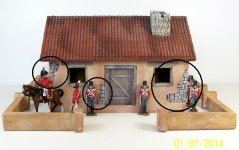
Mike,Wayne...
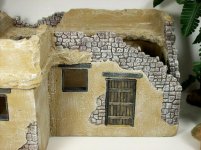
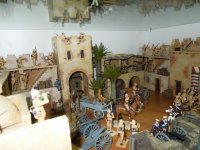
I do own #260...which is very similar to #265...
all of the exposed brick in these pics are from this mold...
in the foam building...I carve out (hollow out) a square to glue one of the tiles in...then plaster around it...it's easy...fast...and makes a very nice scaled exposed brick in spots where you want it...