Yeomanry Miniatures (2 Viewers)

JB, I would try this...working from the center out.

Start in the center with a thin stripe of the red. Outline each side with a thin dark blue stripe getting as close as you dare possible to the red. The add another stripe of red to each side concentrating on cutting the two added blue stripes to the same thickness as the original center red stripe. Finally paint the rest of the trousers the dark blue covering the red to obtain the wider outer red stripes. Hope this makes sense and is a help to you.

Good luck!


Chuck

Hi chuck - thanks for the tip. I understand where you're coming from - but I think there's a limit to what my old eyes can do, sometimes - and we're getting pretty darned close to it with these trouser stripes. :D I'll give it one last go!!!:rolleyes:
 
Hi chuck - thanks for the tip. I understand where you're coming from - but I think there's a limit to what my old eyes can do, sometimes - and we're getting pretty darned close to it with these trouser stripes. :D I'll give it one last go!!!:rolleyes:

Yea, I know what you mean, especially in 54mm.

I don't know if you use a Optivisor. If not you should try one. I replaced the standard lens that comes with it to their most powerful lens they offer. You can see the tip of the brush and it makes getting the small amounts of paint exactly where you want it. Also you need a great brush to do detail work. I use Winsor & Newton series 7 brushes. I get them on sale and they still sell for $15-$20. I only use them for fine work and am sure to clean them throughly at the end of each painting session. Acrylic paint is harder on brushes that oil/enamel paints.

Chuck


Yes - I have an Optivisor - and also have a magnifying lamp - and always use sable brushes. I use a 5x0 for this work - but am experimenting with a brush with a few hairs shaved off taht - for the central stripe!::smile2:

The trouble is - at this size of detail, only small amounts of paint can be applied - so it's almost transluscent when it goes on. This usually means more than one coat needs to be applied - or it spreads before drying. Not impossible - just tricky.

I think I'm cracking it - and at least getting the impression of what I'm looking for. I'll post my last two - along with the others, when they're all completed.
 
After a little burning of some midnight oil - shaving down brushes - and waiting for Humbrol enamel paint to thicken a little on the palette before using (leaving for 5 mins or so, stops it running quite so much), I eventually managed to finish off the dual trouser stripe - with central piping of the same red colour to my new ( and previous) pieces. The central piping may be a little difficult to see - as it DOES fade a little with wear - but it IS there. (phew!).

[ I know it fades - as I once wore blue serge trousers with a red stripe myself).

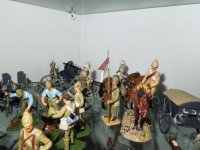
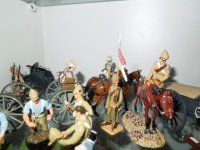
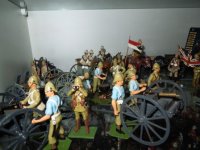
I now have a Maxim Gun of the 2nd Lifeguards (c.1900) - with a Mounted Escort from the same regiment, preparing to depart on patrol. The newer 5 figure escort comprise a Junior Officer, NCO turned in the saddle with a Trumpeter ( on a dappled grey mount) with two mounted Troopers - all of whom are in Mounted Marching Order.

I think they are just great - and compliment both Brian of Yeomanry Miniatures, and their sculptor (Alan Caton), for some really nice and unusual pieces - to add to my existing household Cavalry collection. It's a most unusual subject - but one that I like immensely. I just hope that my attempts at painting them in Glossy Toy Soldier style, is "up to snuff". I must say - that even though I sweated a bit over some of the detail - I'm glad that I persevered - and pleased that I at least got them to a point that I could live with.

Thanks to all who contributed ideas to help me to get here - much appreciated - as always. :D jb


Hello JB,

Absolutely wonderful!!! That is a terrific collection of maxim gun and escorts! I love the pavement base look as it really sets off the red tunics beautifully.

As for the red thin stripe, doesn't Beating Retreat use decals?...:):):)

Rgds Victor
 
Hello JB,

Absolutely wonderful!!! That is a terrific collection of maxim gun and escorts! I love the pavement base look as it really sets off the red tunics beautifully.

As for the red thin stripe, doesn't Beating Retreat use decals?...:):):)

Rgds Victor

DECALS!!! The devil will be skating to work before John would use decals.And JB, you have made a cracking job of this set. You are a clever little ferret. Incidently I note that you say the small brush doesn't hold much paint, try cutting down a number 1 brush. I always used to press a razor blade against the base of the bristles and then gently rotate the brush until I was left with a long springy thin tip, ideal for fine lines and long enough to hold a good enough charge of paint to finish any line. Cut down another brush for gold and silver, never use one brush for both. Alternatively you could use a Hi tech V5 roller ball pen of 0.5 size by painting the whole section red and then drawing two parallel lines with the pen. Advantage of this is you can easily wipe it off if you maake a mistake. Trooper
 
DECALS!!! The devil will be skating to work before John would use decals.And JB, you have made a cracking job of this set. You are a clever little ferret. Incidently I note that you say the small brush doesn't hold much paint, try cutting down a number 1 brush. I always used to press a razor blade against the base of the bristles and then gently rotate the brush until I was left with a long springy thin tip, ideal for fine lines and long enough to hold a good enough charge of paint to finish any line. Cut down another brush for gold and silver, never use one brush for both. Alternatively you could use a Hi tech V5 roller ball pen of 0.5 size by painting the whole section red and then drawing two parallel lines with the pen. Advantage of this is you can easily wipe it off if you maake a mistake. Trooper

Hi Trooper. I used a 5x0 cut down - as the lines were quite short - and this seemed to do the trick.. I'll keep that tip in mind though for lengthier stripes in the future. As for pens, well, I have tried and often used them for black - but never tried coloured ones. I'll look some out next time I'm I'm over in the UK and experiment with some.

Glad you approve of what I did with them - next time you see your chum Alan - pass on my thanks for a really nice couple of sets.:D

P.S If you wouldn't mind - ask him how my Household Cavalry Mounted Lifeguard Band are coming along , at the same time?:D

PPS Wot's a decal?

Cheers chum. :D jb
 
Hi JB and Trooper,

Since I started this, let me explain what a decal is. These are perfect register water slide transfers found on aircraft/tank kits. As Beating Retreat's painting technique is impeccable, I liken his technique to using decals. I certainly can't achieve his technique. My other postings on JB's techniques are clearly known to all.

Let me ask also - why cut down a size "1" brush when there are smaller brushes "000" on the market?

rgds Victor
 
DECALS!!! The devil will be skating to work before John would use decals.And JB, you have made a cracking job of this set. You are a clever little ferret. Incidently I note that you say the small brush doesn't hold much paint, try cutting down a number 1 brush. I always used to press a razor blade against the base of the bristles and then gently rotate the brush until I was left with a long springy thin tip, ideal for fine lines and long enough to hold a good enough charge of paint to finish any line. Cut down another brush for gold and silver, never use one brush for both. Alternatively you could use a Hi tech V5 roller ball pen of 0.5 size by painting the whole section red and then drawing two parallel lines with the pen. Advantage of this is you can easily wipe it off if you maake a mistake. Trooper

DECALS!!! how to offend a fellow modeller and painter with a dirty word like that {sm2}
Seriously I never use D****S just brush work and time, I agree with trooper you can cut brushes down but I don't, I just use high quality with longer bristle sable brushes from Historex agents and for fine lines I use OO or OOO nothing more. Apart from using Vallejo acrylic paint, I only use enamels for undercoats.

Happy painting John


Well John, in Victor's defense, decals are technically paint too. :tongue: Just paint printed onto a lacquer clear film. At least the old ones were before they started using computer printers to make them.

On a somewhat related subject, I'm from the old school too. I still solder my metal figures together. I just use glue to add the final items after the figure is painted. There something about a secure all metal joint that appeals to me. I know that in the future that no major part is going to flall off if the figure gets bumped accidentally. ^&grin

Chuck

I prefer painting too - even when it gets a tad small. I think I used some decals once or twice when I was younger - to put on the wings etc of a plastic Spitfire. On reflection, I think they used to eventually curl and peel off - but maybe they're better now. Still not interested. Never seen any Household Cavalry 2nd Lifeguard (c.1900) trouser stripe decals (54mm), for sale around here though!:D

As for solder - you're welcome to continue using a hot iron and hot metal for as long as you wish Chuck!{eek3} - and best of luck! I'll stick with (literally) two part epoxy resin glue ( I use Araldite Rapid) for major parts - and Super-Glue (Crazy glue) for the minor bits and pieces. I've been modelling/painting for around twenty years or so using those two glues - and nothing's fallen off yet!;) But - each to his own.:salute:: jb
 
Hi JB and Trooper,


Let me ask also - why cut down a size "1" brush when there are smaller brushes "000" on the market?

rgds Victor

I found that the longer bristles gave me a finer point with a greater reservoir of paint. With this you could actually write something on a piece of paper in a figure's hand. (My favourite was "Help, I'm being held prisoner in a model soldier factory") Wish I could do it now! Trooper
 
I found that the longer bristles gave me a finer point with a greater reservoir of paint. With this you could actually write something on a piece of paper in a figure's hand. (My favourite was "Help, I'm being held prisoner in a model soldier factory") Wish I could do it now! Trooper


Why? Are you still behind bars?? {eek3} I thought that might have let you out - by now - as you normally get time off for Good Behaviour ( or so I'm told).

You must really be a bad boy!!:p

I'll send you a file.........in a cake!:rolleyes:

jb{sm4}
 
Hi All,

Not sure that my tease remark went down well. So to prevent misunderstanding, I unreservedly take it back. ..:redface2:

I understand about the brush thing, but I just can't see myself cutting down an expensive sable brush (I use W&N 000,00,0,1). What I did find out was that if one prepared the surface to be smooth (lots of sanding etc), then further painting with an acrylic paint gives a good flow. I have seen craft supplies with fat-bodied brushes which is used for applique painting.

Rgds Victor
 
Victor, I'm sure John can take a joke.:smile2: And anyway it's me that uses a 3 inch hog hair brush for detailed work!^&grin

Martin
 
Hi All,

Not sure that my tease remark went down well. So to prevent misunderstanding, I unreservedly take it back. ..:redface2:

I understand about the brush thing, but I just can't see myself cutting down an expensive sable brush (I use W&N 000,00,0,1). What I did find out was that if one prepared the surface to be smooth (lots of sanding etc), then further painting with an acrylic paint gives a good flow. I have seen craft supplies with fat-bodied brushes which is used for applique painting.

Rgds Victor

Hi Victor

No offence taken I replied jokingly anyway, so don't worry about it. Try longer bristled brushes in OO and size 1 they work for me.

Regards John
 
Hello John and Martin,

We are all too long in the tooth to worry over some silly remark, which I started anyway.

3 inch Hog hair? No wonder your lines are straight. You only have to lay the bristle on its side...:rolleyes:

Rgds Victor
 
Machinegun detachment....
 

Attachments

  • 032.JPG
    032.JPG
    50.3 KB · Views: 187
  • 031.JPG
    031.JPG
    52.7 KB · Views: 192
  • 030.JPG
    030.JPG
    54.6 KB · Views: 185
For the London Show on 6th December 2014, I produced a new Catalogue with colour pictures for the first time. I had six at a cost of £11.95 and sold all of them. While not all the models I produce were contained within it's pages the Catalogue contained a fair representation of the models I produce. It is my intention to continue to produce copies upon request adding more pictures as and when new models are produced or older ones are ordered. Once a year I will also produce a sheet of pictures for those customers who have purchased earlier versions of the Catalogue.

Unfortunately I will have to make a charge for these sheets add postage, both for these and the Catalogue, as this is not intended as a profit making item but as a means to keep customers informed.

Regards to all and a "Merry Christmas"!

Brian.


I thought you might like to know that Yeomanry Miniatures now have their 1904 Rolls Royce Staff Car in production. There will be a few at the London Toy Soldier Show on 25th June and orders can be placed now.

The car and occupants comprising of Driver, 2 Staff Officers and a General Officer retails at £119.95 painted and £69.95 as a kit of parts, for all of you who prefer to do your own thing.

I enclose some pictures of the finished article.

See you at the show.
 

Users who are viewing this thread

Back
Top