Embrace an Angry Wind, Western American Soldiers from 1778 to 1865 (1 Viewer)

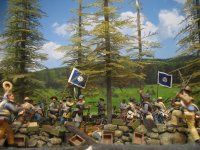
Started to work on the next diorama and will be moving back out West for this one. Staying with a Confederate theme, here are some pictures of the small stand of pine trees that we will be using as well as a close up of a few of WB's new figures in the next diorama. Let me know what you think. Chris

View attachment 196108

Excellent results !

Great scene in this photo.

Thank you for posting and showing your work.
 
Appreciate the comments everyone, the trees are a combination of kits I built, ready made trees from The Scenic Factory and custom trees I made from scratch. There are 15 full sized trees in this diorama. The pine forest bed was also made with a combination Scenic Factory products and then customized to match the trees. I used magnets in the base so that the trees can be removed from the base for storage. Glad you liked them. Working on new large deciduous trees for the fall diorama. I could show that work in progress if you are interested.

The lab is about 600 square feet and is completely devoted to toy soldiers and dioramas. It is a great set up. I also have a separate painting and coating space in the garage in addition to the lab. in total it is about 1,000 square feet. It was one of the "must haves" in our retirement home. I have a number of my past diorama's disassembled and wrapped in plastic for potential future use, some like the Franklin series unfortunately did not survive the move up here to our retirement home and were given a modern Viking recycling funeral.

I started this diorama concept about a year ago and like the last one, will use on of Don Troiani's prints as a basis. This one is taking a lot of time because of all of the custom building and tweeks to make it better than the last one.

Glad you like the direction this is going. Appreciate the likes and positive comments. Stay tuned. Chris
 
I just caught up with this thread Chris and wow, how much for the trees and when can you send! Awesome work mate {bravo}}

Tom
 
Hi Chris

To quote you " I could show that work in progress if you are interested."

Yes please, I'd certainly be interested in seeing how you do these.

Steve
 
Regarding the trees, I made some and bought some already built. You can buy trees already complete or kits from The Scenic Factory. I made some or altered them so that I could fit a figure or artillery gun underneath them. John makes a nice tree but he has a backlog so be patient if you want him to build them. He also builds them where the branches are too close to the ground if you want a figure underneath them. He has a very informative video on his web site on how to make them using his kits. The taller trees are made with balsa, plumose ferns and a covering of bark material that I substitute tile grout for variability in the colors. Here is a link to the website, http://www.thescenicfactory.com/default.asp.

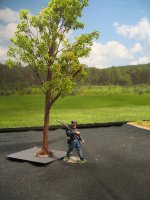
Some of the smaller trees and dead trees, I made from scratch using foxtail ferns, left overs, balsa wood and other materials. I am just about to start a build of deciduous trees for a future diorama. I will show the step by step process on making those trees and my sources for materials. It will take some time as a single medium tree takes almost 2 weeks elapsed time to construct. Here is a picture of one I made specifically for the Little Round Top diorama to match the one in Don's painting. It has a rough bark so it can show up better in the photo and to match the period image. It is not completely done (base and bark detailed touch up) but almost complete. Hope you like it. Let me know if you have anymore questions or if you want some close ups of the pine trees.

I never thought about making and selling miniature trees, I did not think anyone would want these... Chris

IMG_2443a.jpg
 
You are most welcome, got the materials yesterday for the tree project, will finish up the Chickamauga diorama this weekend first. Chris
 
On the afternoon of September 20th 1863, during the battle of Chickamauga, Patrick Cleburne's Division would be on the attack once again. They advanced quickly through a glade of cedars but stalled at the edge by the defense of U.S. Regulars assigned to the Army of the Cumberland. At this critical time, the men in General Polk's brigade began to run out of ammunition and threatened the assault. General Cleburne began seeing the fire from his troops slacken, found out it was due to ammunition and quickly had more brought to the front lines where he and his staff opened up the boxes and personally distributed the ammunition amongst his troops. This quick action on his part sustained the attack and allowed his division to eventually dislodge the Federal troops in his front. His Division pursued the Federals and turned an orderly withdrawal by the Army of the Cumberland into a route as Federal troops began to race from the field. This image shows the men of Cleburne's Division reloading and sustaining the attack after receiving the additional ammunition. Let me know what you think. Chris

IMG_2508a.jpg
 
Love it. Especially pleased to see the blue flags of Cleburne's division. Beautiful job with the foliage. -- Al
 
Excellent scene Chris and good choice of backdrop.

Tom
 
You know a great DIO when it makes you want to buy the figures involved and this 1 does that,brilliant mate brilliant.
 
Well done Chris, lots of detail. you really do put a lot of thought into your scenes. Look forward to seeing more as you get round to them. :salute::
Steve
 
Thank you everybody for your kind comments, I love adding the details so that the image can help tell the story that I write for each diorama as well as enhancing the figures I use in them. I started working on the tree project and the next diorama in parallel so that I can stay on my schedule. The next diorama will start with an eastern unit that will be quickly engaged by western troops during the battle of Gettysburg. Hope you enjoy that one also, it will be a bigger diorama in scale then these vignettes that I have been doing recently. Again, glad you liked it. Chris
 
As promised, here is a general tutorial on how I make deciduous trees for my dioramas. All of my deciduous trees were lost when I recently moved from the Bay Area in California to the Seattle area. This required me to make all new ones for my dioramas. I also wanted to refine my process and make trees from scratch rather than adopting natural materials to allow flexibility in the style, size and form of the tree. This is the first time I have done this on larger trees. I have not done a tutorial before so give me feedback on this one to make the next one better.

Step One - I select balsa wood trunks to match the size of trees I am going to construct. I use balsa would as the inner core of the trees since it is a soft would allowing for shaping and branch insertion as well as light weight to allow flexibility in making the tree balance. I usually have tree trunks in 2 sections to allow a transition from a thick low trunk to a smaller upper trunk. Depending on the height, I use a formula usually on a 1 to 3/4 ratio for the trunks and then a 1 to 1/2 ratio for any branches. I select the wood and pin the upper trunk to the lower trunk using small paneling nails with the heads cut off as the pins along with wood glue to create a strong bond.

IMG_2560[1]a.jpg

Once assembled, I use a combination of carving and sanding to create a smooth transition and taper from the lower trunk to the upper trunk as well as to round out the balsa wood into the style of trunk and give a more natural look.

IMG_2561[1].jpg

Once the taper is complete, I create a mounting hole in the base of the lower trunk to allow a nail to be inserted that will provide a way to hold the trunk while finishing the surface.

IMG_2596[1].jpg

On to Step Two in my next post.
 
Step Two - the next step in the process is to build up the trunk surface to allow insertion of branches and create a base of texture to simulate natural bark. I do this apply allying layers of paper towels and toilet tissue soaked in a solution of 50% white glue and 50% water. These layers cover up any seams from the balsa would and allow a barrier between the next coat and the balsa wood to prevent warping and weakening of the trunk core. These layers also work to simulate actual bark when they are "pinged" to simulate bullet and shrapnel hits for dioramas.

.IMG_2604[1].jpgIMG_2605[1].jpg

Once dry, I add additional main branches that were coated in a similar manner. They are pinned and glued in the same fashion as the base trunk. They will include end foliage that will need to look as if it is an extension of the main branches. This will allow an easier method of attachment of these pieces of foliage without stressing the tree build.

IMG_2644[1].jpgIMG_2645[1].jpg
 
Step Three - Once the branches are dry, the tree is coated with a mix of bathroom grout that contains sand and grout that does not contain sand. I use a mixture of gray, brown and black grouts to create a good base coat. Usually I use a 50% mix of sanded and 50% non sanded to create a surface that has both texture and one that can be carved. I mix the grout with a mix of 50% white glue and 50% water to create a paste that I spread on the tree trunk and carve lines and other features to simulate the bark surface of a tree. I use clay carving tools and some custom tools that I have made to simulate the bark surface.

IMG_2646[1].jpg

Once the bark is applied, I hang them upside down to dry and allow gravity to work for me in keeping the added branches at the right height and angle. This is because every adhesive is water based and the grout coating can seep into the next layers and weaken them at times allowing the branches to droop. The hanging also allows multiple exit points and increased surface for the water to evaporate and quickens the drying.

IMG_2648[1].jpgIMG_2649[1].jpg

Once dry, the tree will lighten in color, I sand the surface lightly to knock down any abnormal roughness and ridges.

IMG_2651[1].jpg
 

Users who are viewing this thread

Back
Top